Today, I am here to introduce a new Advanced Javascript series in 9Lessons.info. Basically, I love wall system because we can cover multiple operations or features in a single web page. 9Lessons.info is most popular for its articles designed on wall system. This article is based on this wall system concept using Angular js 1.4. Future posts will be on the same concept where I will be introducing ReactJS and AngularJS 2 to 9Lessons.info. Below is the demo and hope you all enjoy this new series
Deploying to production is always a little nerve-wracking. What happens if the new version of the site has bugs you didn’t catch? One-click rollbacks in Firebase Hosting allow you to safely go back the last working version, but how can we ensure that the problem doesn’t happen in the first place?
The answer is simple. Test your site in a mirrored production environment. Fortunately for us, the Firebase CLI makes it simple to setup and deploy to multiple environments.
Adding a new environment
Adding and switching between environments with the Firebase CLI is as simple as one command: firebase use.
When you first initialize your Firebase Hosting project with firebase init you specify what project you want to deploy your app to. This is your default project. The use command allows you to add another project.
$ firebase use --add
This command prompts you to choose from one of your existing projects:
$ firebase use --add
$ ? Which project do you want to add? (Use arrow keys)
  my-production-project
> my-staging-project
  my-dev-project
Select the project you want to use for a different environment, and then give it an alias. The alias can really be whatever you want, but it’s common to use aliases like “development”, “staging”, or “production”.
$ firebase use --add
$ ? Which project do you want to add? (Use arrow keys)
  my-production-project
> my-staging-project
  my-dev-project
? What alias do you want to use for this project? (e.g. staging) staging
Created alias staging my-staging-project.
Now using alias staging (my-staging-project)
Once you’ve created a new alias, it will be set as the current environment for deployment. Running firebase deploy will deploy your app to that environment.
Switching environments
If you want to switch to another environment, just provide the alias in the use command.
$ firebase use default # sets environment to the default alias
$ firebase use staging # sets environment to the staging alias
For a single command, you can also specify the environment using the -P flag:
$ firebase deploy -P staging # deploy to staging alias
That’s it!
That’s all there is to switching environments with Firebase Hosting. If you want a guided tour on getting setup, then check out our screencast. Let us know what you think in the comments!
Since the early days of Angular 2, core team member Victor Savkin has posted his personal thoughts on the platform to his own blog. These offer an internal perspective on how someone who builds Angular thinks about its core concepts.
Victor just refreshed his older posts with the latest and greatest from the current release candidate, at a new location on vsavkin.com. He's also added some new posts.
Check out his writing on a variety of Angular topics:
In our previous posts, Amazon EC2 Cloud Installation and Amazon EC2 Setup with Ubuntu and XAMPP Installation discuss how to launch virtual servers as you need, configure security and networking and manage storage. This allows you to eliminate your investment in hardware, so you can develop and deploy applications faster. AWS is used by most of the smart people in this present technical world. But any old or new application maintained in a server needs a backup, so that any unfortunate crash in the system should not lead you to be in a state of pressure of what to do next. Today’s post help you to maintain the backup of your files as per the daily basis.
With Firebase Dynamic Links, we made it easier for you to share deep links into your app by providing a single link that works across iOS and Android. It can even survive through the app installation process from the App Store and on Google Play. These Dynamic Links have many uses in email or social media campaigns, but one powerful use case is to enable your users to share elements of your app with their friends. A game, for instance, can take advantage of Firebase Dynamic Links to share replays of a level, so players can challenge their friends to beat their score.
And while this kind of user-to-user sharing can be quite effective -- word of mouth is still one of the most powerful drivers of app discovery -- the process of generating a Dynamic Link and making it easy for the user to send it to their friends through an SMS or email message is a sizeable chunk of work. Work that most developers would rather be spending on other tasks like building their app.
So that's the idea behind Firebase Invites: We wanted to take that process of sharing a Dynamic Link over SMS or email, and streamline it for developers. And now that we've seen some instances of Firebase Invites out in the real world, we wanted to share a couple of tips for you on how to better take advantage of Firebase Invites to make them more compelling.
Share something specific
Because Firebase Invites is built on top of Dynamic Links, your users can share specific deep link information with their friends. This means that invite recipients can immediately start up your app with an experience that's relevant to the invitation they clicked on, rather than just a standard home screen.
You should take advantage of this to ensure that you're sharing specific information about your app; not just building a generic "Share this app with my friends" feature. If you have an exercise app, make sure your users can share their latest workout or their jogging route with their friends. Or if you have a ride-sharing app with a referral code, make sure your users can share that code with their friends.
Along those lines, you should make sure that whatever interface you use to start the sharing process is close to the content your users will want to share. If you simply place a generic sharing option somewhere in your settings menu, you're probably not going to see a huge lift in usage or installs. On the other hand, if you place a "Share this!" button close to that jogging route or referral code your users want to share, it becomes a lot more compelling.
Customize your emails
When you send an email invitation from Firebase Invites, the library can automatically populate the email with images and text taken directly from your app's Play Store or App Store listing. This is certainly nice from a convenience standpoint -- you can craft a nicely-formatted email full of content with just a few lines of code.
And if you were using Firebase Invites for a generic app sharing feature, this might be fine. But if you're using Firebase Invites to share a specific piece of content like we recommend, you can customize this outgoing email by taking advantage of the setEmailHtmlContent method on Android. This gives your client the ability to supply any html you want as the content of your outgoing email message, so you can display an email message that's more relevant to the content that your users are looking to share.
For example, Yummly used Firebase Invites to power a feature where users could share specific recipes with their friends. By customizing the outgoing email on the client, Yummly provided detailed descriptions and images of each recipe for every recipient. Presenting more relevant information up front is a more interesting experience for recipients, which can lead to more engagement than the standard Firebase Invite email content.
And hey, while you're at it, why not use Firebase Remote Config in conjunction with App Invites to rapidly iterate over different versions of your email content? If you wire up your app to grab its outgoing email text from Remote Config rather than hard-coding it into your app, you can try out new emails without having to update your app. With a little bit of experimentation, you can figure out what kinds of email content are the most persuasive.
Properly support iOS users
One important limitation to understand with Firebase Invites is that, while your Android users can send and receive invitations at any time, and your iOS users can receive invitations freely, if you want to send an invite on iOS, your user must be signed in with Google.
For many developers, this isn't a problem; they encourage users to sign in, and Google is one of their preferred providers. But other apps might not have sign-in at all, or don't support Google sign-in, which makes Firebase Invites a little less appealing on iOS. Many developers at this point are tempted to think, "Well, that's fine. I'll just support Firebase Invites on my Android app."
The problem with this approach is that if a developer supports sending invites from an Android device, their users will still send invites to all their friends -- both iOS and Android users! And if the Firebase Invites library isn't available on the iOS side to read in this invitation, the corresponding deep link data (and all the Firebase Invite magic) gets lost.
Therefore, we recommend that even if you decide to not support the sending of invites on iOS, you should at least support the ability to receive invites on iOS. That way, your iOS users can still make sure they retrieve all the appropriate deep link information when they accept an invite, to get the full sharing experience.
Sharing is caring!
It seems like nearly every app has some kind of content -- whether it's a cool replay in a game, a funny picture, or a referral code -- that would benefit from sharing. And I'm guessing that somewhere on your app's to-do list, you have a "Let users share (designated content) with friends" item that you're still planning on implementing just as soon as you have a bunch of spare cycles to figure it out.
With Firebase Invites, we can take a lot of the work out of the process and move these features from the "figure it out one day" category into the "low-hanging fruit" category. Or, at least, fruit you can reach with a short stepladder. (Produce-based metaphors were never my strong suit.) So give it a try -- be sure to peruse our documentation, and check out some of our best practices for more invitation goodness.
PixelPhone is an app for your Android device that replaces your default phone app to offer you a better experience. It has features that you don't usually get through your pre-installed phone & contact apps. Since its initiation some years back, the app has constantly refined and improved its features to better suit user's needs. Once you start using the app, you would not want to go back to the previous default version of your phone.
Advertisements are very important for any post published in internet. This is what decides the person’s revenue. But, recently adblocker system is killing revenue of the publisher because of which it also effects the creativity of that person. Today, I am providing a simple new solution for those depressed and effected persons of adblocking system. Here is a simple javascript to be included along with your website code to either hide the content of your website or show a pop-up or alert message to remove the viewers adblock plugin. Any blogger or any website management can use this code to improve your revenue of your website. This code is mainly designed for Google Adsense.
Until now, the multiple language flavors of Angular 2 were written as TypeScript source, and then automatically compiled to both JavaScript and Dart. We're happy to announce that going forward, we are splitting the Angular 2 codebase into two flavors—a Dart version and a TypeScript/JavaScript version—and creating a dedicated Angular Dart team.
While this single-source multi-language approach worked in theory, in practice it made it much harder for new contributors to add to the project. Even simple changes could quickly become complicated by cross-language compatibility concerns, and many changes could only be made by someone who understood the entire compilation process and both language targets.
For developers, this doesn't really change much about how you use our APIs, except that it will become easier to contribute changes, and we'll be able to fix issues faster. Both versions will share the same template syntax and, where appropriate, the same API. But you'll have the freedom to submit pull requests in the language that you know best, and changes can be made and reviewed without the added burdens of compilation and cross-compatibility to downstream languages.
For Dart developers, the Angular Dart source code will become cleaner and more Dart-y. With a dedicated team of Dart experts, we'll be able to close issues more quickly, and finally update all of the documentation with a Dart focus. You'll also be able to use many Dart-specific features that weren't compatible with the TypeScript flavor. And it will be faster. Read more on news.dartlang.org.
If you're a TypeScript or JavaScript developer, you'll also benefit from cleaner JavaScript APIs and performance gains as we simplify the TypeScript codebase to remove the need for compilation to Dart.
We're all excited about this change, and we believe it'll make Angular 2 more useful for everyone involved.
UPDATE: We updated this tutorial for the Firebase 3.1.0 SDK which now supports the Firebase Realtime Database and Firebase Authentication.
Here at Firebase, we’rebigReact fans. Firebase synchronizes application state, and React re-renders the application UI based on state changes. It’s a perfect fit.
And with React Native, app development became a lot easier for JavaScript developers. Using React Native you can build real native apps with just JavaScript. And that’s just awesome-sauce. We live in the future. Let’s get started.
Getting started with React Native is fairly easy, but there are some gotchas you should be aware of. If you already have React Native set up, you can skip this section.
Then finally, you can begin your project with the CLI command:
react-native init GroceryApp # or whatever you want
Open the main folder in your favorite editor.
atom GroceryApp # if you’re into Atom
Build and run
To build a React Native project, run the following command:
react-native run-ios
This should launch the Simulator, and you should see the boilerplate screen.
React Native comes with hot-reloading, which means you can make an edit to the code, index.ios.js, and then hit Cmd+R and see your changes instantly update. And if you’re an iOS developer, or really any kind of developer, you know how cool that is.
With the build setup done, let’s get Firebase up and running.
Firebase Setup
React Native manages dependencies through npm. To install Firebase, run the following command at the root of the project.
npm install firebase --save
Open index.ios.js and add the following line to the top:
import * as firebase from 'firebase';
Then right above the component, initialize Firebase with your config values:
What’s a const? A const is a read-only reference to a value, which makes sense here, because you don’t want to ever override the value of Firebase. You can use this keyword since you’re using Node 4.0 or higher. If your editor yells at you, it’s telling you a lie.
One ES2015 feature isn’t enough. Rather than use React.createClass() to define components, let’s use classes.
ES2015 (ES6) Components
React is component-based. Which means an app is just a tree of components, starting with a root component. As of React 0.14, you can use ES2015 classes to define React components.
In index.ios.js, let’s change the component to use a class rather than React.createClass().
The shell of the app is complete. Let’s make it look good, or at least halfway decent.
Styling in React Native
React Native uses JavaScript rather than CSS for styling. This may sound like an extreme divergence, but it’s really not all that different. To declare a set of styles, you create a StyleSheet.
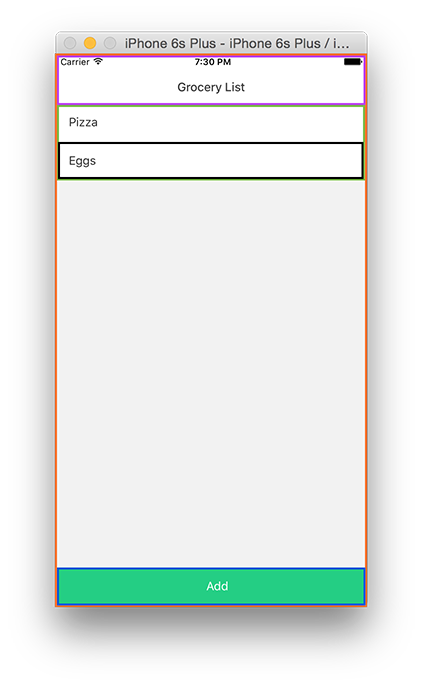
StatusBar (purple): displays the title of the view
ListView (green): displays the list of grocery items
ListItem (black): displays an individual item from the list
ActionButton (blue): adds an item to the list
Create a folder named components. Each one of these components is stored in the components folder. The exception is GroceryApp, since it is contained in index.ios.js.
Add each one of these components below to the components folder:
The component has a special property called state, which manages the entire data flow of the application. We’ll dive deeper in the next section.
The app’s state is a ListView.DataSource, which is a class that provides efficient data processing to a ListView component. The next step is to display this data.
Each component has a lifecycle, where certain functions are called at important events. When the component has first been rendered, componentDidMount() is called. This is where we want set any initial state of the app.
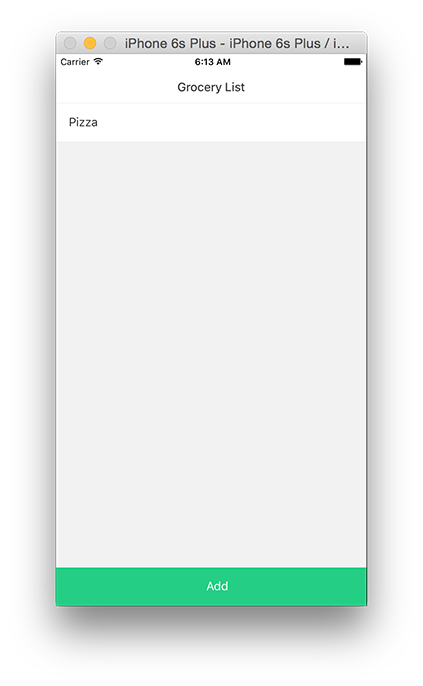
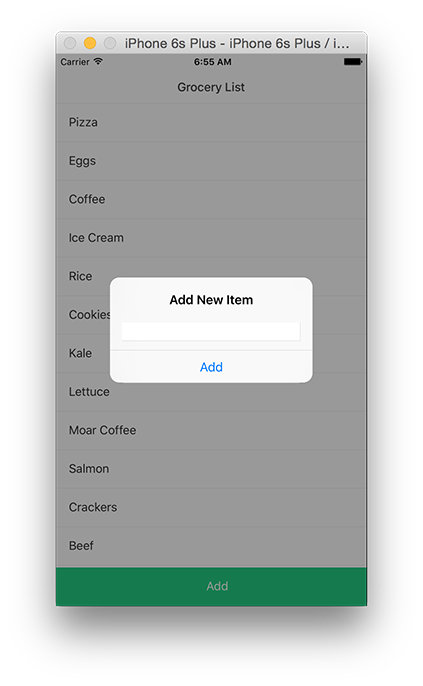
Build and run the app, and you should see the following static app.
Each one of these components just simply displays data, or sets a callback function for a touch.
The key thing to understand is that these components are not state-ful. They have properties that are set by their root component, GroceryApp. To begin to understand React, you have to learn how to manage state.
State
State is simply data that can change. This data is called state, because it represents the "state" of your application. If this data changes, your application will likely look different, hence being in a different "state". State is usually things like a list of todos, or an enabled/disabled button.
The root component will serve as the holder of state. State changes start at the root component, which is then responsible for updating the properties of its child components.
Component properties are immutable, meaning they can’t be modified. So, if you can’t modify the properties, how do they ever change? You re-render, the application by calling setState(), like seen in componentDidMount().
The setState() function is special because every time it is called, it will attempt to re-render the entire app. This means that if a child property is different from the last state, it will be re-rendered with the new value.
This is where React fits perfectly with Firebase. Because the Firebase database synchronizes application state across multiple devices, and React efficiently re-renders application state changes.
Realtime Database listener
Create Realtime Database reference as a property in the constructor:
this.itemsRef = firebaseApp.database().ref();
Then, add the following function to the GroceryApp component:
This function creates a value listener for all grocery items. Whenever an item is added, changed, or removed, you’ll get the entire result set back as a DataSnapshot, from the Firebase SDK. Using the DataSnapshot, you call forEach(child), which iterates through all of the children and adds them to an array as a grocery list item. Notice in the .forEach function, a _key property is created from the DataSnapshot's .key() value. This makes life much easier when doing data operations later down the line.
Once the array is populated, you’ll update the dataSource property on state using dataSource.cloneWithRows(items). The cloneWithRows() function is just a convenience method for creating a new ListView.DataSource based on the same DataSource previously defined.
Next, you write the listen up to componentDidMount():
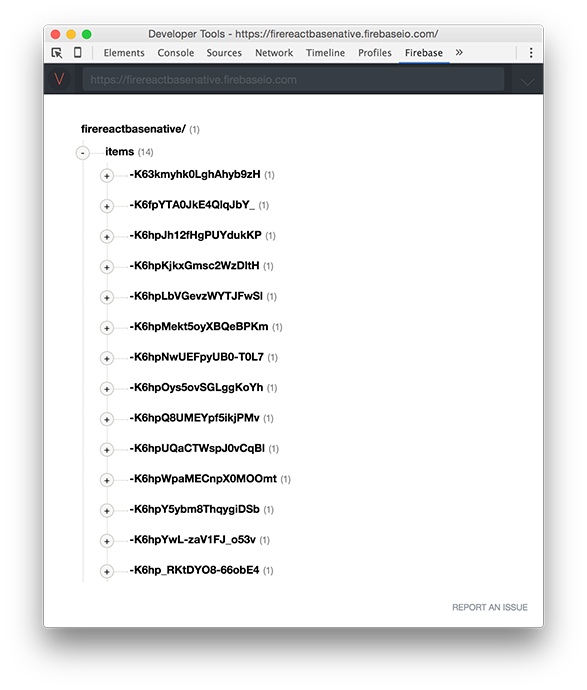
Build and run the app. You should see an empty page, but try adding a few items using the Firebase App Dashboard or the super awesome data viewer Vulcan, and you’ll see it update in realtime!
This is awesome, but you’d rather have the "Add" button working. Let’s tackle that in the next section.
Add Item
When the ActionButton is tapped, an alert should pop up prompting the user to enter an item. The AlertIOS API is what you’ll use to create this alert box.
Add the following function to the GroceryApp component:
The AlertIOS API is quite extensible when it comes to building alerts. The first two parameters are simple, they're just the title of the alert box and an optional message. The third parameter is the meat of the API. Here you create an array that specifies the buttons available to the user. Each button can have a text, style, and an onPress callback function. The last parameter is type the of input, whether plain-text or secure-text.
To add an item, create an object in the buttons array. This object can add items in the onPress callback. The callback returns the text the user has entered. Use this text to .push() a new child onto the /items location.
Next, you'll need to update render() to assign the onPress property of the ActionButton:
To "complete" an item, you'll need to delete it from the Firebase database. Using .child(key), you can drill down into a specific item in the list. The onPress callback is a closure, therefore it has access to the outer environment which contains the item parameter. This is where the _key property comes in hand.
When the "Complete" option is tapped, you can find the specific child by using the _key property on item. Then you can call .remove() to delete the item in the Firebase database.
Build and run, yet again. Tap any ListItem , tap "Complete", and you should see it removed from the list.
Get the code, give a star
Check out the completed app on Github. And, if you’re feeling generous, we would love a star. Feel free to fork the repo, and even send in a PR if you want.
Still having trouble?
If you’re running into issues, open up a question on Stackoverflow, we monitor the Firebase tag closely, or drop a line in our community Slack Team.
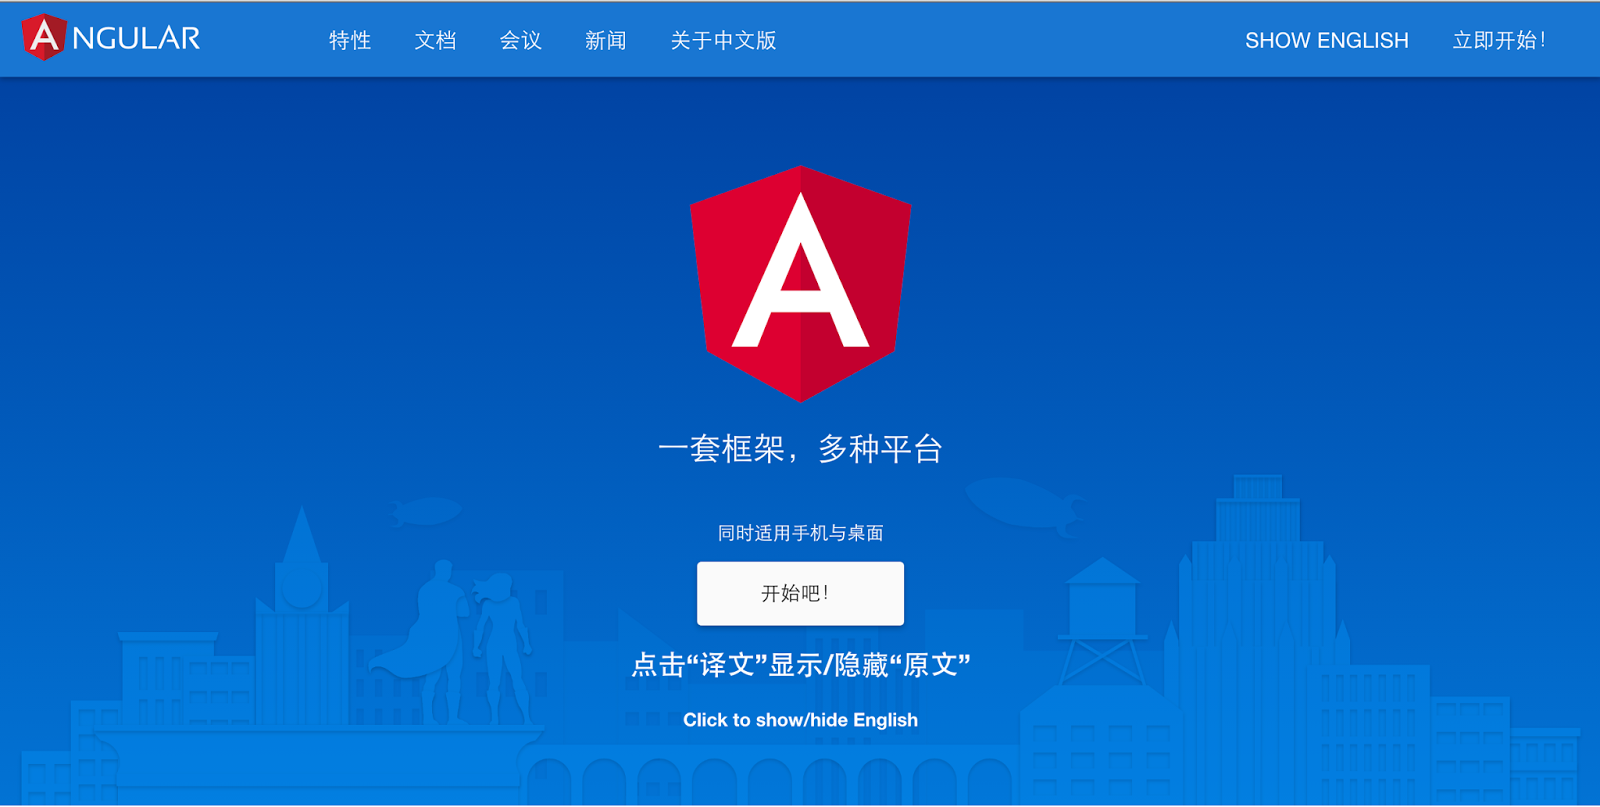
Please welcome Ralph Wang (汪志成) and Rex Ye (叶志敏), joining our blog as guest authors. Ralph is a developer, author, community lead, and Angular GDE in Beijing, China. Rex is an entrepreneur based in London. Together, they have led the first localization of angular.io for developers in China. We're excited to share the newly-launched angular.cn with you! Read on to learn how they did it, and how you can get involved in bringing Angular to your locale. --Naomi Black, Angular TPM
The language barrier does not stop Angular getting all the love from Chinese developers. There is new blood joining our community everyday. Some of them are newcomers, some of them have been using Angular in isolation for a long time without the support from the community. There are more than 4000 active users in our two Angular QQ chat groups, which is nothing compared to the sheer size of the whole Angular community in China. We felt that we needed to do more to enhance the influence of the community so that it could reach and help more developers. 语言的障碍并没有阻挡住中国的开发者们对Angular的热情。每天都有新人加入我们这个社区。他们有的是初学者、有的是在并没有社区支持的情况下自学了Angular很久的人。在我们两个Angular QQ群里,有4000千多名活跃的成员,但是他们仍旧远远比不上全中国Angular社区的巨大数量。我们认为我们需要加强Angular社区的影响,使得它能够影响到以及帮助更多的开发者。
We chose official document localisation as a starting point. 为此,我们选择了“翻译官方文档”作为突破口。
As a large open source project, Angular 2 is in continuous development and its documents will also be constantly updated. “Complete the localisation and leave it alone” obviously does not meet the requirement as a copy of an obsolete document could be misleading. We needed a new approach. 作为一个大型开源代码的项目,Angular 2处在不断的开发中,它的文档也将会被不断地更新。显然,“一次性翻译完,然后再也不管”的模式是无法满足需求的,一份过时的文档有时候甚至会误导读者。我们因此需要采用一种新的、能够保持持续更新的翻译方式。
The new approach we adopted is Git-based. We forked a copy of angular.io and appended the translations right next to each of the corresponding paragraphs. This way, our repository is structurally identical to angular.io. We can pull and merge any changes from angular.io easily and update our translations accordingly. Git has enabled our effective collaboration across time zones. We have created a script to hide the original text post compilation. It also allows our users to toggle the original text by simply clicking on the translated text, or by clicking the (Show English) button in the upper right corner. This is extremely handy for us and community contributors when it is time to review the work. 我们决定所采用的这种新的方式是基于GitHub的。我们开了一个angular.io库的分支,并把译文直接追加在原文之后,这样,我们资源库的架构将和angular.io的保持一致。当原文发生变更时,我们就会发现这种变化,并可以借助工具相对轻松的进行合并并及时更新译文。Github还让我们可以有效地实现跨时区的协作、也帮助协调我们两位译者的更新。填补了时区差别造成的无法及时交流的盲点。把这些源文件编译之后,我们增加了一个额外的js文件,它会按照格式上的规约,在运行期间把原文隐藏掉,还能通过点击译文来让原文重新显示出来。这种方式对于自己校对和社区的合作者协助校对至关重要。
After over a month of hard working, our localised docs site finally caught up with angular.io. 经过一个多月的高强度翻译,我们的翻译稿(并完成了第一遍校对)终于赶上了在angular.io上的官方文档的更新进度。
Without knowing anyone on the Angular team yet, we sent an email to Naomi in the evening, Beijing time. She was online early, California time, and replied right away. A few hours later, we were collaborating with the core Angular team and the project was officially under way . This is an interesting case of effective global collaboration. Ralph was in Beijing, Luke was in Shanghai, Rex was in London and Naomi was in San Francisco. 虽然我们并不认识Angular产品部门的人,但我们还是于北京时间的晚上给Naomi发了个邮件告知她我们的工作结果。加州还是当地的早晨,Naomi很快就给我们回复了热情洋溢邮件,并把我们介绍给了程路。几个小时后, 我们和Angular产品部门的核心团队的协作就开始了。这是个有趣的在全球范围内进行有效合作的案例。汪志成在北京、程路在上海、叶志敏在伦敦,而Naomi在旧金山。
We joined the Angular organisation on github,created the angular/angular-cn repository for our project, and were welcomed to Angular's doc authoring team on Slack so that we could speak to the authors directly regarding their articles and be informed of any future updates. This greatly increased the accuracy and timeliness of our translation. We were also able to contribute ideas to help the authors improve their articles. 不仅如此,Naomi还把我们加入了github上的Angular开发组,并在组下给我们建立了一个专门用作翻译的仓库。她还把我们加入了文档作者的slack小组,让我们可以与Angular开发组亲密接触,及时了解文档的写作及更改计划。这帮助我们避免了很多无用功,并能直接跟作者讨论对原文理解不透的地方,确保译文准确无误。反过来,我们也通过这个渠道,对多处原文提出了修改意见。
To ensure that developers in China would have consistent access from a locally-hosted official domain, Google China's Developer Relations team helped us to secure angular.cn and we launched the site. When we made our work known to our Chinese community, more than 10% subscribers instantly “liked” the news in Ralph’s personal WeChat channel. Many volunteers started to provide valuable feedback on our work, many of whom preferred to be kept anonymous. All they wanted was the feeling of being able to contribute to the community. Our work has also attracted many new Angular developers to the the community. 为了帮助在中国的开发者们能够从基于国内的服务器方便地得到统一和一致性的资源使用,谷歌开发技术推广部的中国团队帮助我们获得了angular.cn的域名并发布了这个网站。当我们向社区通告了我们的工作成果,10%以上的成员们马上在汪志成的微信朋友圈中点了赞。很多志愿者开始向我们的工作提供回馈,他们中的很多人甚至都不愿意署名,他们所追求的只是为社区贡献力量的感觉而已。我们的工作还吸引了很多原本在Angular开发者社区之外的开发者们来加入我们这个社区。
Although we expected a positive response from the community according to our past experience with Angular 1, we were still surprised with the overwhelming praises and positive feedback received. Bear in mind that some developers were skeptical about Angular 2’s brand new design approach initially. It looks like Angular 2 has eventually won their heart. 虽然早就从Angular 1的经验中就对社区的正面反响有所期待,但是这个新的网站的发布以及获得的反应仍然超出了我们的想象。要知道,有些人对Angular 2的全新设计曾经是持怀疑态度的。看来,Angular 2的这些优异特性还是赢得了他们的心。
Our work has received great acceptance and recognition in the community. It has helped many developer teams overcome the language barriers. Many teams have started or are preparing to adopt Angular 2 in their projects. There are also a huge amount of developers starting to learn and play with angular 2 in their open source projects. The Chinese Angular community has become more active than ever since the launch of angular.cn. More and more developers have become involved in the community by actively exchanging ideas and helping solve other people’s issues. 我们的努力和工作成果获得了开发者社区的接受和认可,它帮助了中国的开发者们克服了语言的障碍。已经有不少项目团队开始在筹备或使用Angular 2开发他们的项目,也有大批的开发者们在开始学习或尝试在他们的开源代码项目中使用Angular 2。自从Angular.cn网站发布之后,中国的Angular开发者社区变得更加活跃,越来越多的开发者们参与到我们的社区中来积极进行分享、交流、以及互相帮助解决开发问题。
We have also organised a team of Angular experts to translate the new ng-book 2. We will retain the same quality standard and we aim to publish the book shortly after the official release of Angular 2. We hope this will help Angular 2 take off to a flying start in China! 我们还组织了一个Angular专家团队来准备翻译并出版ng-book2。我们将坚持同样的质量标准和高效率,争取能在官方发布后不久就让本书面世,为Angular中文社区来一个开门红。
The workload for the localisation is not the lightest, however it has given us great sense of accomplishment and helped us build influence in our community. If you want to contribute and at the same time obtain recognition from the community, this is the opportunity you do not want to miss. If your local community is not yet strong, this could be the starting point to build a better and stronger one. Would you like to try replicating this effort for your language? The Angular team is looking for leads to bootstrap similar projects in other countries, and we would love to help you. 虽然翻译的工作确实相当繁重,但其成就感和影响力也同样非凡。如果你想付出努力并取得所属社区的认可,这将是一个难得的机会。如果你的社区尚且孱弱,这也是一个建设并发展它的绝好时机。你愿意为Angular技术文档的翻译工作提供你的贡献吗? Angular产品部门正在寻找更多的志愿者们来做为其它国家市场类似的翻译工作,我们很期盼有更多的志愿者们来加入我们。
There is only one Angular community and that is the global Angular community. Let us work to build up our local communities and connect them together through the Angular team, to form an ever growing Angular community worldwide. 本质上,Angular只有一个社区,那就是全球社区。让我们大家一起努力和协作,建设好我们中国的Angular社区,并通过谷歌Angular产品部门的纽带,让它成为全球不断发展壮大的Angular社区的一部分。
One flower does not bring the spring, one tree does not make a forest. Only a prosperous community could make a technology succeed. The work we have done has not only brought us a great sense of achievement, more importantly it has helped form the building blocks of a stronger community. In this day and age, only a strong community can prevent a technology from becoming obsolete quickly. Only a strong community can help us get support from each other whenever we need. Only a strong community can feed the ever growing job market, which is crucial for business success. More importantly, in the process of building up our community, we will meet countless good friends - maybe, we are already friends, we are just waiting to discover each other. 一花不成春,独木不成林。只有繁荣的社区才能让一项技术发扬光大。我们所做的这些工作,除了给个人带来荣誉之外,更重要的是它有助于建设并保持一个强大的社区。只有强大的社区,才能让我们之所学不至于成为夕阳技术;每个人都有思维盲点,只有强大的社区,才能让我们在将来遇到问题时,可以向他人求助;而将来当我们无论是以技术骨干的身份还是以创业者的身份求贤若渴时,也只有强大的社区才能为我们提供源源不断的高质量的小伙伴儿。最重要的是,在建设社区的过程中,我们结识了很多原本陌生的朋友 —— 或许,他们原本就是我们的朋友,只是在世界的某个角落等待我们去发现而已。
Contributing to a strong community is the best way to pay back to the Angular team for their continuous investment in Angular. 贡献与一个强大的社区,也是我们对Angular产品部门做作的不断的投资所能给与的最佳回报。
If we can do it, you can! 我行,你也行!
Dear friends, we look forward to joining forces with you soon! 期待有一天能与你们胜利会师。
Engineer In this series of posts we cover the features of Firebase. This time we'll talk about the most classic of Firebase features: the Realtime Database.
History
The Realtime Database was the first feature we launched for Firebase, over four years ago. Cloud-hosted JSON databases were still somewhat new at the time, so it immediately stood out. What made the Firebase database truly unique was its ability to synchronize data between the different clients instantly, with a single, simple to use API. The Realtime database hides the complexity of building applications behind one consistent programming interface. This made it easy to build realtime, collaborative applications.
What is it?
The Realtime Database is really just one big JSON object that you manage in realtime. This means it’s really just a tree of values.
This allows for simple, flexible data modeling. The database is schemaless, which means you don't have to commit to a fixed structure early on. But, if you’re worried about data validation, the Realtime Database comes with a server enforced rules language that allows you to validate the data structure of each write to the database. The truly unique aspect of the Firebase database is in its realtime synchronization. Most traditional databases make you work with a request/response model. You write a query, then ask the database to give you the results for that query. If you need the results again, or want to check for updates to the results, you execute the query again. Our database is different. Our database tells you when changes occur. You say to our database: if something changes at this location in the tree, notify me. This makes it simple to monitor changes and to keep these changes in sync across all users.
Realtime Events
With a single API, the Firebase database provides your app with both the current value of the data and any updates to that data. iOS
refHandle = postRef.observeEventType(FIRDataEventType.Value, withBlock: { (snapshot) in
  let postDict = snapshot.value as! [String : AnyObject]
  // …
})
Web
firebase.database().ref('posts/' + postId).on('value', function(snapshot) {
    var post = snapshot.val();
    // …
});
Android
mPostReference.addValueEventListener(new ValueEventListener() {
    @Override
    public void onDataChange(DataSnapshot dataSnapshot) {
        // Get Post object and use the values to update the UI
        Post post = dataSnapshot.getValue(Post.class);
        // …
    }
    @Override
    public void onCancelled(DatabaseError databaseError) {
        // Getting Post failed, log a message
        Log.w(TAG, "loadPost:onCancelled", databaseError.toException());
        // …
    }
});
Your app then displays the data in its user interface and allows the user to manipulate it. It's that easy.
What happens when you're offline
Ever used an app that became unresponsive the very moment you lost network connection? Most developers want their app to work despite the network condition. That's why the Firebase database keeps an internal cache of all data that is being shown in the app. When the network connection temporarily drops, the app keeps working from the cache. And while the connection is lost, the Firebase data client keeps a queue of local write operations. Your app continues to work and remains responsive, all without having to write any extra code.
The power of the Firebase platform is in the integration of all our features. We're adding more integrations, but these are a few example of the integrations that you can already use. Allow your users to sign in to your app, then secure access to their data based on their identity. Store the user's files in Firebase Storage, then use the realtime database to synchronize the status and availability to all other users of the app. Track what files are most popular with Firebase Analytics and invite other users to collaborate on those files. The possibilities are almost endless and it's never been easier to build an app than with Firebase.
Developer Advocate You asked for it, and it’s finally here: file storage for Firebase developers! Firebase Storage is a stand-alone solution for uploading user generated content like images and videos from an iOS and Android device, as well as the Web. In typical Firebase fashion, there's no server required. Firebase Storage is designed specifically for scale, security, and network resiliency.
Scale: Every file uploaded is backed by Google Cloud Storage, which scales to petabytes.
Security: Files can be secured to specific users or sets of users using Storage Security Rules.
Network Resiliency: Uploads and downloads are automatically retried in the case of poor network connections, so you don’t have to keep track of them yourself.
In this blog post, we’ll cover five tips to help you go far with Firebase Storage. But enough with the chatter, let’s see some code!
1. References point to files
Even if you’re not familiar with the Realtime Database, you’ll feel right at home storing data with Firebase Storage. Firebase Storage uses a simple folder/file system to structure data. Each file is accessed through a reference: Web
var storageRef = firebase.storage.ref("folderName/file.jpg");
Swift
let storageRef = FIRStorage.reference().child("folderName/file.jpg")
References give you control over files at that location in your storage bucket. With this storage reference you can easily download an existing file, or upload a new one.
2. Upload files with one method
Once you have a reference, you can upload a file with one method: Web
var storageRef = firebase.storage.ref("folderName/file.jpg");
var fileUpload = document.getElementById("fileUpload");
fileUpload.on(‘change’, function(evt) {
  var firstFile = evt.target.file[0]; // get the first file uploaded
  var uploadTask = storageRef.put(firstFile);
});
iOS
let storageRef = FIRStorage.reference().child("folderName/file.jpg");
let localFile: NSURL = // get a file;

// Upload the file to the path "folderName/file.jpg"
let uploadTask = storageRef.putFile(localFile, metadata: nil)
For the web, the binary file comes from the File object received from the <input type="file" /> element. iOS users can upload a file from memory or from a local file. On Android you can even upload using a stream.
3. Monitor progress with Tasks
Need to create a progress indicator for your app? Firebase Storage makes it easy. When you upload or download a file, Firebase Storage creates UploadTask or DownloadTasks, which allows you to monitor the progress of the file upload or download. Web
var storageRef = firebase.storage.ref("folderName/file.jpg");
var fileUpload = document.getElementById("fileUpload");
fileUpload.on(‘change’, function(evt) {
  var firstFile = evt.target.file[0]; // get the first file uploaded
  var uploadTask = storageRef.put(firstFile);
  uploadTask.on(‘state_changed’, function progress(snapshot) {
     console.log(snapshot.totalBytesTransferred); // progress of upload
  });
});
iOS
let storageRef = FIRStorage.reference().child("folderName/file.jpg");
let localFile: NSURL = // get a file;

// Upload the file to the path "folderName/file.jpg"
let uploadTask = storageRef.putFile(localFile, metadata: nil)

let observer = uploadTask.observeStatus(.Progress) { snapshot in
  print(snapshot.progress) // NSProgress object
}
The progress listeners return a snapshot of the upload and the file is uploaded to the server. This snapshot gives you useful information, such as the total size of the file in bytes and how many bytes have been uploaded so far. Using this information, you can calculate the percentage uploaded and use it to update any UI control in your app.
4. Download files with one method
There are two ways to download files with Firebase Storage, using references in the SDK or a download URL. iOS and Android users can download files into memory, disk, or from a download URL. The web SDK can download files just from a download URL. Web
var storageRef = firebase.storage.ref("folderName/file.jpg");
storageRef.getDownloadURL().then(function(url) {
  console.log(url);
});
iOS
let storageRef = FIRStorage.reference().child("folderName/file.jpg");
storageRef.downloadURLWithCompletion { (URL, error) -> Void in
  if (error != nil) {
    // Handle any errors
  } else {
    // Get the download URL for 'images/stars.jpg'
  }
}
Android
StorageReference storageRef = FirebaseStorage.getInstance().reference().child("folderName/file.jpg");
storageRef.getDownloadUrl().addOnSuccessListener(new OnSuccessListener() {
    @Override
    public void onSuccess(Uri uri) {
        // Got the download URL for 'users/me/profile.png'
    }
}).addOnFailureListener(new OnFailureListener() {
    @Override
    public void onFailure(@NonNull Exception exception) {
        // Handle any errors
    }
});
iOS and Android apps can either store the file in memory or on disk, or use URLs to work with popular image caching libraries. Where web apps prefer having the URL due to the modern browsers powerful caching systems.
5. User based security with Storage Security Rules
Similar to the Realtime Database, Firebase Storage provides you with a set of rules that allow you to specify constraints to the size and type of files uploaded and who has access to what files. Firebase Storage integrates with Firebase Authentication, which allows you to secure files against users in your application. This is great for situations where you only want to let users upload their own profile photos, but allow anyone else to view it.
// Only a user can upload their profile picture, but anyone can view it
service firebase.storage {
  match /b/<bucket>/o {
    match /users/{userId}/profilePicture.png {
      allow read;
      allow write: if request.auth.uid == userId;
    }
  }
}
What do you think?
We’re extremely proud of everything we’ve done with Firebase Storage so far, but it’s just the beginning and we want your feedback! What are some of your useful Firebase Storage tips? What are you using Firebase Storage for? What features would help you and your apps? Leave a comment or hit us up in our Slack Team.
Software Engineer Thanks to your continued feedback, Firebase now has broader support for React Native with version 3.1.0 of the JavaScript SDK. And, that’s not all! This version also adds unauthenticated access from the Node.js SDK, which means you can initialize an app without a service account. What does this all mean? Let’s break it down.
React Native Support
When the Firebase 3.x SDK was released at Google I/O, the authentication part of the SDK was no longer compatible with React Native. The 3.1.0 release replaces the use of browser-specific APIs that allows Firebase to once again work with React Native. In addition, it fixes longstanding issues with using Firebase in React Native, including persisting authentication state across app restarts. This means all you have to do is initialize your Firebase project just as you would in any other JavaScript app:
import ReactNative from "react-native";
import * as firebase from 'firebase';
// Initialize Firebase
const firebaseConfig = {
  apiKey: "<YOUR-API-KEY>",
  authDomain: "<YOUR-AUTH-DOMAIN>",
  databaseURL: "<YOUR-DATABASE-URL>",
  storageBucket: "<YOUR-STORAGE-BUCKET>"
};
firebase.initializeApp(firebaseConfig);
With the updates in the 3.1.0 SDK, almost all of the JavaScript SDK’s functionality should now work smoothly in React Native. But there are a couple caveats:
"Headful" auth methods such as signInWithPopup(), signInWithRedirect(), linkWithPopup(), and linkWithRedirect() do not work in React Native (or Cordova, for that matter). You can still sign in or link with a federated provider by using signInWithCredential() with an OAuth token from your provider of choice.
React Native does not support the File and Blob types, so Firebase Storage uploads will not work in this environment. File downloads do work however.
Unauthenticated Access
Another feature of the 3.1.0 release is support for unauthenticated access with the Node.js SDK. Previously a service account was required to use the Node.js SDK. This required you to create a service account key in the Firebase Console, download it to your server, and authenticate by referencing the file in your code. A service account is still required to create and verify tokens, but it isn’t necessary for all Node.js use cases. With the latest SDK, we’ve relaxed this requirement, so you can initialize your app with just your database URL.
import * as firebase from 'firebase';
firebase.initializeApp({
  databaseURL: "<YOUR-DATABASE-URL>",
});
Without a service account, access to the Realtime Database will be restricted just like any other unauthenticated client.
Let us know what you think
Thanks to everyone for their patience and voicing their opinions in our Slack Team, on our Google Group, and across our other support channels. If you run into any issues with the new SDK, please reach out. Are you excited about React Native and Firebase? Let us know in the comments.