Showing posts with label Visual Studio.NET 2010. Show all posts

Monday, 22 December 2014

Sharing the Cookies in Web Farm OR across different servers

Consider you have an application which provides you an authentication cookie using ASP.NET Membership provider, and you are using this authentication cookie across multiple servers to access the secured contents. I have depicted this scenario using the diagram below.

image

Now to read the client cookies across the applications you can simple use the following line of line of code fetch the cookies

HttpContext.Current.Request.Cookies[FormsAuthentication.FormsCookieName].Value;

But wait a minute, is it that simple? In fact yes except the fact that to secure your session and prevent from any men in the middle attacks your cookies are encrypted using the machine key of Authentication Server. Which might look similar to the one below. This is configured at your machine level, which means you may not usually find this key in your local web.config files.

<machineKey
validationKey="21F090935F6E49C2C797F69BBAAD8402ABD2EE0B667A8B44EA7DD4374267A75D7AD972A119482D15A4127461DB1DC347C1A63AE5F1CCFAACFF1B72A7F0A281B"
decryptionKey
="ABAA84D7EC4BB56D75D217CECFFB9628809BDB8BF91CFCD64568A145BE59719F"
validation
="SHA1" decryption="AES"/>


And also you might be aware that every machine has its own machine.config file which is tailored to that particular machine, so if the cookie is encrypted using the machine key of Server1 then it cannot be decrypted using machine key of Server2 or any other Server.


So even if you managed to get the cookie, but when you try to read the data from the cookie you must have to first decrypt the cookie in order to read any key from the cookie. I have provided below a sample code which exactly does the same.


private void SetFormsAuthenticationTicket()
{
FormsAuthenticationTicket ticket
= default(FormsAuthenticationTicket);
if (System.Web.HttpContext.Current.Request.Cookies.Get(System.Web.Security.FormsAuthentication.FormsCookieName) != null)
{
ticket
= System.Web.Security.FormsAuthentication.Decrypt(
System.Web.HttpContext.Current.Request.Cookies.Get(
System.Web.Security.FormsAuthentication.FormsCookieName).Value);
string[] roles = ticket.UserData.Split(new char[] { '|' });
GenericIdentity userIdentity
= new GenericIdentity(ticket.Name);
GenericPrincipal userPrincipal
= new GenericPrincipal(userIdentity, roles);
System.Web.HttpContext.Current.User
= userPrincipal;
}
}


To get a better view I have also provided the screenshot of the code below.


image


This does solve your problem, but the when you try run the code you might get the following exception.


System.Web.HttpException : Unable to validate data. at System.Web.Configuration.MachineKeySection.EncryptOrDecryptData(Boolean fEncrypt, Byte[] buf, Byte[] modifier, Int32 start, Int32 length, IVType ivType, Boolean useValidationSymAlgo, Boolean signData)


image


This happens because as I mentioned above, your cookie was created by machine key of Server1, but some of the part of your application is served by Server2 which tries to decrypt the cookie using the code above. So to mitigate this issue first this you might need to do is to generate the machineKey which can be shared across all your applications who is sharing the cookies and located across your network. I have written a separate post on How to generate  the machineKey using IIS 7.0+ you can visit the link: http://tutorials.indianjobs.co.in/2014/12/generate-machinekey-in-iis-70.html


Secondly you have to place the same decryptionKey in all your application local web.config, and you are done.


You might encounter this types of scenario is small scale applications, but for most of the complicated application these days where applications are placed on completely different domains, you will need to implement your own SSO architecture. Details are out of then scope of this article, so you might take a look for details in some other article such as Single Sign On (SSO) for cross-domain ASP.NET applications or Single Sign-On (SSO) for .NET or Using a third party identity provider like Facebook, Google, etc


References:


http://msdn.microsoft.com/en-us/library/ff649308.aspx


http://www.codeproject.com/Articles/288631/Secure-ASP-NET-MVC-applications

Share:

Wednesday, 14 November 2012

My Top 8 picks for Microsoft.NET Architects (ASP.NET MVC)

Past few month was very hectic for me, now since I have some time for myself I am sharing the list of articles which I am going through, these articles are basically related to architecting .NET application using ASP.NET MVC. I hope you will find these links useful for you too.

  1. Of course not to mention GoF Design Pattern Tutorial: http://www.dofactory.com/Patterns/Patterns.aspx
  2. On the same line as above, this link elaborates the patterns by GoF as Illustrated GOF Design Patterns in C# Part I: Creational: (Series Article)http://www.codeproject.com/Articles/3130/Illustrated-GOF-Design-Patterns-in-C-Part-I-Creati
  3. A N-Tier Architecture Sample with ASP.NET MVC3, WCF, and Entity Framework : http://www.codeproject.com/Articles/434282/A-N-Tier-Architecture-Sample-with-ASP-NET-MVC3-WCF
  4. Design pattern – Inversion of control and Dependency injection by By Shivprasad Koirala: http://www.codeproject.com/Articles/29271/Design-pattern-Inversion-of-control-and-Dependency
  5. LINQ and WF Based Custom Profile Provider for ASP.NET 3.5, this article demonstrates Microsoft Provider Pattern using Workflow Foundation: http://www.codeproject.com/Articles/31308/LINQ-and-WF-Based-Custom-Profile-Provider-for-ASP
  6. patterns & practices Application Architecture Guide 2.0, Microsoft Link from where you can download free eBook, Microsoft Application Architecture Guide – by J.D. Meier, Alex Homer, David Hill, Jason Taylor, Prashant Bansode, Lonnie Wall, Rob Boucher Jr, Akshay Bogawat : http://apparchguide.codeplex.com/ or direct Link to download the eBook: Download the final release in PDF on MSDN, either you can download the pdf from this link or you can read the same book online at the link: http://msdn.microsoft.com/en-us/library/dd673617.aspx
  7. Architecture Guide: ASP.NET MVC Framework + N-tier + Entity Framework and Many More : http://www.codeproject.com/Articles/70061/Architecture-Guide-ASP-NET-MVC-Framework-N-tier-En
  8. Security is the most important aspect of any application specially when you are dealing with financial intuitions, even the best of the architecture is good-for-nothing if is is not secure. This is the link of top 10 Security vulnerabilities provided by Open Web Application Security Project, a non-profit charitable organization and elaborated with solution by Troy Hunt: OWASP Top 10 for .NET developers part 1: Injection : (Series Article) http://www.troyhunt.com/2010/05/owasp-top-10-for-net-developers-part-1.html , same is available for download as pdf eBook from  : http://asafaweb.com/OWASP%20Top%2010%20for%20.NET%20developers.pdf

This list is open for comments, so go ahead and suggest me if you have good links which I can add to my top 8 and in the same line. Thanks.

Share:

Sunday, 1 April 2012

Hosting ASP.NET Web Api on Windows Azure Platform

In this post I am going to show you how to Host your ASP.NET Web Api Services on Windows Azure, to demonstrate this I am going to use my application which I have created in my previous couple of Post :

CRUD operation using ASP.NET Web Api and MVC 4 – Part 1

CRUD operation using ASP.NET Web Api and MVC 4 – Part 2

Before hosting my application I have to perform the following steps.

1. Add an Cloud Application from Add New project

image

2. Select ASP.NET MVC 4 Web Role, since I have used ASP.NET MVC 4 to create my Web Api project.

image

3. From the following Screen I have to select cancel, since I am adding this to my existing Web Api Project, and don’t want to create a new Applications.

image

4. Once the project creation is successful, right click on the Roles folder from the WebRole.Azure project and Select Add, from the add menu select Web Role Project in solution  and Select the WebApi Project listed in the Popup windows. This will add my Web Api project in the Roles folder of Azure project as given in the screen below.

image

image

5. Now our Azure project is configured to publish my WebApi service on Web, but before we publish we need to configure the Database connection which is currently pointing to my local system, we need to change this to the SQL Azure database. Since SQL Azure setup and configuration is out of scope of this Post, so I am not going to cover that here, but don’t worry I have given that instruction in my another post, which will help you to configure the Entity Framework EDMX with SQL Azure.

6. Now once your application is ready with the SQL Azure connection, we will publish our Application on Windows Azure. But before we continue, we may have to configure publish settings in my system, sometime back I have written couple of articles where you can find how to publish your website on Windows Azure. But simplest way to do the same I have given below. Right click on your Windows Azure project and Select Publish, You will be prompted with the screen below. Now Select the option “Sign in to download credential”

image

7. This link will take you to the windows azure site, where you will have to provide your credentials and then you can download the publishsettings files, using the Save as option. Save this file to your system.

image

8. Now select the import button and locate the downloaded publishsettings file, this will auto populate the Subscription dropdown as given below, I have used my 3 months free subscription to demonstrate this. You too can subscribe to 3 months free trial from here.

image

9. Provide your Name and Location details.

image

10. Select Ok then Next, you will land up in the below screen, where you can Say next.

image

11. Finally you will provided with the Publish Summary settings, where you can review your settings and it everything looks good then you can click on publish.

image

12. You can see the progress here, or if you want you can see the same in your Windows Azure console also.

image

Windows Azure console.

image

13. Once ready you will be come to the following screen, where you can see the status as Ready.

image

And that’s it we are ready to test our application. You can get the DNS name (URI) of your Web Api Service from the console once your applications are ready. Lets try out Api Services, in the browser using Developer ToolBar. Following are the list of Methods and URI are exposed to web.

image

Lets try with the Get (/api/values) and check in Dev Toolbar, So I am getting the Responsed code 200 and in the detailed view –> Response Body I can see my result returned from my Api Service.

image

image

Now lets try from from the Client screen where I have written few lines of jQuery to demonstrate the CRUD operation, details of which you can refer in my previous post.

CRUD operation using ASP.NET Web Api and MVC 4 – Part 1

CRUD operation using ASP.NET Web Api and MVC 4 – Part 2

GetById (/api/values/1) and GetAll (/api/values)

image

image

The codes for these sample can be downloaded from here https://docs.google.com/open?id=0BzIjFd_Ps-MSUm4zMklvYkxUMXlFZzdOWVBsaHJvQQ

This is the same code which I have already provided in my previous post : CRUD operation using ASP.NET Web Api and MVC 4 – Part 2, You will just have to do the configurations which I have mentioned in this post. Hope this helps.

Share:

Generate Entity Framework using SQL Azure Database

In this example I am going to show you how to generate your Entity Model edmx using SQl Azure database.

Before we start, first lets create a Sample database named called ContactDetail on SQl Azure database.

To create a SQL Azure database you can either Login directly to your SQL Azure account through web or you can Login to your Windows Azure Account, and from the Homepage you can navigate to the Database. In my example below I am using the Second option.

1. Login to your Windows Azure Account and Navigate to the Database, this will give you the below screen.

image_thumb

2. Now Select the Create Button to Create a new database, this will give you the following screen where you can enter your region and provide a new credentials which you will use with this new database.

image_thumb[1][1]

image_thumb[2][1]

3. Once done, Select Next this will provide you with the below screen where you can provide the firewall rule, this is just for extra security. Once you have provided the IP Address Range, you will not be able to connect from any other IP Address which does not fall in this Range.

image_thumb28[1]

4. If you are connecting through any other application which is Hosted on any other Windows Azure accounts then make sure to Select this option, this will allow your Windows Azure applications to connect to this SQL Azure Database.

image_thumb[3][1]

5. Once completed you can see your fully qualified server name in the Dashboard provided. This Server name is used to connect remotely to your Azure DB from your application or from VS 2010 Server Explorers, etc.

image_thumb26

6. Now lets create some sample database which we are going to use to generate our Entity Model, to create a new database you will have to first select the newly created server from the left hand side of the Windows Azure console, and select Create from the Menu, this will present you the windows where you have to provide your Database information. Based on your requirement you can select the Edition and Size, I am keeping my Database names as ContactDetail and Leaving rest as default and Select Ok.

image

7. Now I can see my New database in the Azure Console, select manage to manage the database objects like SP, Tables, etc. This will open the SQL Azure console.

image

8. SQL Azure console will prompt you for credentials, once you are thru, you will get the SQL Azure Dashboard, where once you have to select the Contact Detail Table –> Design – New Table

image

9. In the New Table I have provided the following information, for my Contact table and Click on Save, this will create my ContactDetail Table.

image

Now I am ready with the SQL Azure table, my next task will be to configure my Entity Framework to use this table, to use in my Application. Please note if you want to use any scripts which is used for your SQL Server database, then this will not work with your SQL Azure database, you can read more in the following link: http://blog.sqlauthority.com/2010/06/04/sql-server-generate-database-script-for-sql-azure/

10. Now lets get back to my application, where I am going to create a entity framework entity model, which I am going to configure with this SQL Azure DB, to perform this I am opening my .NET application where I want to add Entity Model, and Select Add New Item – Data –> ADO.NET Entity Data Model.

image

11. Select Next, in the Wizard, Select New Connection and enter the fully qualified Server name, and the credentials and Select Ok and then Next with default options selected.

image

12. You will get the list of your tables, views and Stored procedures, select the desired Database objects with the default options selected and Select Finish, you will get the Designer with the tables, stored procedures or views you have selected.

image

And that’s it, once done you can work like any other Entity Framework you have used to work with your SQL Server 2008/2005 databases.

Share:

Wednesday, 28 March 2012

CRUD operation using ASP.NET Web Api and MVC 4 – Part 2

This Post is continuation to my Previous Post where I have created a ASP.NET Web Api Service, In this Post I am going to create a simple client using jQuery, MVC 4 and Razor View Engine to call the Services and perform POST, DETELE, PUT and of course GET operations using the Web Api Service.

To get the Service details which I am going to consume in this article, you can refer to the Part 1 of this post : CRUD operation using ASP.NET Web Api and MVC 4 – Part 1

Lets just directly get into my client code, as discussed in Part 1 of this post, on how to create a Web Api Project you can follow the same steps here,

OR alternatively you can use any existing application not necessarily on MVC 4, it can be any web application which supports jQuery version 1.6.2 or later. Now lets start one by one

1. Get (Get All Records, GET)

In this function I have given a sample which gets all the records present in my Database using code first approach of entity framework, jQuery and ASP.NET Web Api Services. I have used two approach here, one using getJson function of jQuery and the other using ajax function.

   1: function GetCustomersAJAX() {


   2:        $.ajax({


   3:            url: "/api/values/",


   4:            type: "GET",


   5:            contentType: "application/json;charset=utf-8",


   6:            success: function(data)


   7:            {


   8:            //declare a varialbe which holds html string to be appnended to create a table structure from returned data                


   9:            var strHTML = "<table width='50%' style='border-width:thin;font-family:Verdana;font-size:small;border-collapse:collapse' border='1'>";


  10:            strHTML += "<tr><th>Contact ID</th><th>First Name</th><th>Middle Name</th><th>Last Name</th><th>Email Address</th></tr>";


  11:            //iterate over every object returened using each function                 


  12:            $.each(data, function (key, val) {


  13:                //Form a html row string based on the returned Json object                    


  14:                strHTML += "<tr>";


  15:                strHTML += "<td width='20%' style='border:1 solid gray;'>" + val.ContactId + "</td>";


  16:                strHTML += "<td width='20%' style='border:1 solid gray;'>" + val.FirstName + "</td>";


  17:                strHTML += "<td width='20%' style='border:1 solid gray;'>" + val.MiddleName + "</td>";


  18:                strHTML += "<td width='20%' style='border:1 solid gray;'>" + val.LastName + "</td>";


  19:                strHTML += "<td width='20%' style='border:1 solid gray;'>" + val.EmailAddress + "</td>";


  20:                strHTML += "</tr>";


  21:            });


  22:            $('#contacts').append(strHTML);


  23:            },


  24:            statusCode: {


  25:                200: function () {


  26:                    alert("All Contact Displayed successfully using AJAX");


  27:                }


  28:            }


  29:            });


  30:        };


The function above calls the api url “api/values” without any input parameters using AJAX, and the same call using JSON is as below


   1: function GetCustomersJSON() {


   2:     $.getJSON("/api/values", function (data) {


   3:         //declare a varialbe which holds html string to be appnended to create a table structure from returned data                


   4:         var strHTML = "<table width='50%' style='border-width:thin;font-family:Verdana;font-size:small;border-collapse:collapse' border='1'>";


   5:         strHTML += "<tr><th>Contact ID</th><th>First Name</th><th>Middle Name</th><th>Last Name</th><th>Email Address</th></tr>";


   6:         //iterate over every object returened using each function                 


   7:         $.each(data, function (key, val) {


   8:             //Form a html row string based on the returned Json object                    


   9:             strHTML += "<tr>";


  10:             strHTML += "<td width='20%' style='border:1 solid gray;'>" + val.ContactId + "</td>";


  11:             strHTML += "<td width='20%' style='border:1 solid gray;'>" + val.FirstName + "</td>";


  12:             strHTML += "<td width='20%' style='border:1 solid gray;'>" + val.MiddleName + "</td>";


  13:             strHTML += "<td width='20%' style='border:1 solid gray;'>" + val.LastName + "</td>";


  14:             strHTML += "<td width='20%' style='border:1 solid gray;'>" + val.EmailAddress + "</td>";


  15:             strHTML += "</tr>";


  16:         });


  17:         //append html table to div                


  18:         $('#contacts').append(strHTML);


  19:     });


  20: }


Both my function above gives the list of all the contacts I have in my DB and wraps the results in a HTML Tables using $each method of jQuery. Just for a quick reference here I am giving below the Get method which maps to the url “api/values”


   1: // GET /api/values


   2: [HttpGet]


   3: public IEnumerable<ContactDetail> Get()


   4: {


   5:     return repository.GetAll();


   6: }


And the corresponding repository method is as below:


   1: ContactEntities context = new ContactEntities();


   2:  


   3: /// <summary>


   4: /// Gets All Contact


   5: /// </summary>


   6: /// <returns>All Contact Details</returns>


   7: public IEnumerable<ContactDetail> GetAll()


   8: {


   9:     return context.ContactDetails;


  10: }


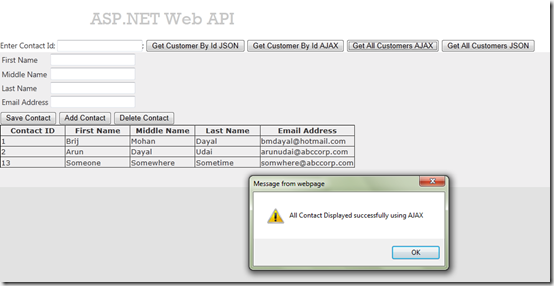
When I run my application and press the Get All Button either Ajax or Json, I will get the following result.


image


Now let me run my Developer toolbar using F12 key of IE 9 to show you the result in raw data format using Ajax and Json.


image


This is giving me the the Http result as 200, which means Get request is Successful, which exactly I am checking in the jQuery ajax code using the statusCode: 200, and displaying the Success message. Similarly for other results we can either return from my controller as 404 not found and handle it here to display appropriate message.


image


Now lets dig more into this request, by clicking into go to detailed view of developer toolbar and see the response body, this gave me the following Text output, this will be same for both JSON and AJAX.


[{"ContactId":1,"EmailAddress":"bmdayal@hotmail.com ","FirstName":"Brij      ","LastName":"Dayal     ","MiddleName":"Mohan     "},{"ContactId":2,"EmailAddress":"arunudai@abccorp.com","FirstName":"Arun      ","LastName":"Udai      ","MiddleName":"Dayal     "},{"ContactId":13,"EmailAddress":"somwhere@abccorp.com","FirstName":"Someone   ","LastName":"Sometime  ","MiddleName":"Somewhere "}]


2. Get (Get By Id, GET)


Now let me take you to my next Get request which is get by Id, this will take id as a parameter and returns me the specific contact:


   1: function GetCustomersByIdAJAX() {


   2:     //declare a varialbe which holds html string to be appnended to create a table structure from returned data


   3:     $.ajax({


   4:     url: "/api/values/" + $("#ContactId").val(),


   5:         type: "GET",


   6:         contentType: "application/json;charset=utf-8",


   7:         success: function(data)


   8:         {


   9:              if (data != null) {


  10:                  $("#ContactFName").val(data.FirstName);


  11:                  $("#ContactMName").val(data.MiddleName);


  12:                  $("#ContactLName").val(data.LastName);


  13:                  $("#ContactEmail").val(data.EmailAddress);


  14:              }


  15:              else {


  16:                  alert("Customer does not exists");


  17:                 ResetForm();


  18:              }


  19:          },


  20:          statusCode: {


  21:             //Web API Post method returns status code as 201                    


  22:             200: function () {


  23:                 $('#errMsg').html('');


  24:                 //alert("Contact Displayed successfully using AJAX");


  25:                 //GetCustomersById();


  26:             },


  27:              400:  function (jqXHR, textStatus, err) 


  28:              {                    


  29:                 $('#errMsg').html('Error: ' + err);                


  30:              },


  31:              404: function (jqXHR, textStatus, err) 


  32:              {                    


  33:                 $('#errMsg').html('Error: ' + err);                


  34:              }


  35:          }


  36:        });


  37: }


And the same code using Json is as follows


   1: function GetCustomersByIdJSON() {


   2:     //declare a varialbe which holds html string to be appnended to create a table structure from returned data


   3:     $.getJSON("api/values/" + $("#ContactId").val(),


   4:          function (data) {


   5:              if (data != null) {


   6:                  $("#ContactFName").val(data.FirstName);


   7:                  $("#ContactMName").val(data.MiddleName);


   8:                  $("#ContactLName").val(data.LastName);


   9:                  $("#ContactEmail").val(data.EmailAddress);


  10:                  $('#errMsg').html('');


  11:              }


  12:              else {


  13:                  alert("Customer does not exists");


  14:                 ResetForm();


  15:              }


  16:          })


  17:          .fail(                


  18:              function (jqXHR, textStatus, err) 


  19:              {                    


  20:                 $('#errMsg').html('Error: ' + err);                


  21:              });


  22:  


  23:     return false;


  24: }


In the code above for AJAX I have handled the different error codes aka Not Found, Bad Request or Success using their error codes, to elaborate more on this let me first give here the code for controller


   1: // GET /api/values/5


   2: [HttpGet]


   3: public ContactDetail Get(int id)


   4: {


   5:     ContactDetail contact = repository.GetById(id);


   6:     if (contact == null)


   7:         throw new HttpResponseException(HttpStatusCode.NotFound);


   8:     return contact;


   9: }


So now you can see above few things, first of all my Contact Id should be integer, if this this not integer then I will get HttpResponseException as BadRequest (400), and if the Contact Id does not exists then I am explicitly throwing the Not Found Exception (404) and if everything is success the system is giving me Success response (200), which I am handling in my jQuery as below


image


Now when I run my application I will get the following result:


For Success Result (200)


image


For Bad Request (400):


image


And finally for Not Found (404)


image


These are just few examples, you can have as many as possible depending upon your requirements. The code of the repository is given below I hope this code is self explanatory,


   1: /// <summary>


   2: /// Get Contact by Contact ID


   3: /// </summary>


   4: /// <param name="contactId">Contact Id</param>


   5: /// <returns>Contact Detail</returns>


   6: public ContactDetail GetById(int contactId)


   7: {


   8:     IQueryable<ContactDetail> customers = context.ContactDetails.Where(a => a.ContactId == contactId);


   9:     return customers.FirstOrDefault();


  10: }


So with these codes above I have covered the GET, now lets move on to PUT, POST and DELETE of Web Api. defined as Update, Add and Delete in my example.


3. Update (PUT)


In this method I have created a simple form where I can search for a contact as I have given in my example above, displaying the values in the HTML text boxes, updating those values and finally I am saving those updated values back to my Database.


Her let me start in reverse direction, I am first giving my repository code and then controller and then I will show how I am updating those values using jQuery.


   1: /// <summary>


   2: /// Updates Existing Contact


   3: /// </summary>


   4: /// <param name="contact">Contact</param>


   5: /// <returns>result</returns>


   6: public int Update(ContactDetail contact)


   7: {


   8:     ContactDetail updateContact = context.ContactDetails.FirstOrDefault(c => c.ContactId == contact.ContactId);


   9:     updateContact.FirstName = contact.FirstName.Trim();


  10:     updateContact.MiddleName = contact.MiddleName.Trim();


  11:     updateContact.LastName = contact.LastName.Trim();


  12:     updateContact.EmailAddress = contact.EmailAddress.Trim();


  13:  


  14:     return context.SaveChanges();


  15: }


My repository codes are very simple I am just taking the updated contact from the controller, searching the same in the context of Entity model, and finally calling SaveChanges.


   1: // PUT /api/values


   2: [HttpPut]


   3: public void PutContact(ContactDetail contact)


   4: {


   5:     if (repository.Update(contact)==0)


   6:     {


   7:         throw new HttpResponseException(HttpStatusCode.NotFound);


   8:     }


   9: }


Controller codes is also just taking the value from the HttpRequestContext and just passing the values to the repository, now lets get into my view code where I am taking the values from the Html Controls, creating the Json object and using Ajax I am passing the contact object to the controller.


   1: function UpdateContact() {


   2:     //create a Json object based on data entered by user            


   3:     var newContact = {


   4:         ContactID: $("#ContactId").val(),


   5:         FirstName: $("#ContactFName").val(),


   6:         MiddleName: $("#ContactMName").val(),


   7:         LastName: $("#ContactLName").val(),


   8:         EmailAddress: $("#ContactEmail").val(),


   9:     };


  10:     //call jQuery Ajax method which calls Json.stringify method to convert             


  11:     //the Json object into string and send it with post method            


  12:     $.ajax({


  13:         url: "/api/values/",


  14:         data: JSON.stringify(newContact),


  15:         type: "PUT",


  16:         contentType: "application/json;charset=utf-8",


  17:         statusCode: {


  18:             //Web API Post method returns status code as 201                    


  19:             200: function () {


  20:                 alert("Employee Updated successfully");


  21:                 //GetCustomersById();


  22:             }


  23:         }


  24:     });


  25:     return false;


  26: }


In the above example once I created the contact object in JSON, I am using the Json.stringyfy method to convert the object to string format, which can be passed to the controller. Now lets see this in action, in the developer toolbar you can see my both the results are showing 200, one is used for GET and other for PUT,


image


Now lets get deeper into the request and response. Here you can see my Request body has the updated values, which is passed as a string to the Action method Update, which in turn calls the repository and update my contact Database.


image


4. Add (POST)


As the name indicates this method is used to Add a new record to the Database, my Add method is very much similar to the Update method only difference is instead of calling the HttpPut this is using HttpPost, and in repository I have to add a new contact object to the entity context and save the changes.


   1: function AddContact() {


   2:     //create a Json object based on data entered by user            


   3:     var newContact = {


   4:         ContactID: $("#ContactId").val(),


   5:         FirstName: $("#ContactFName").val(),


   6:         MiddleName: $("#ContactMName").val(),


   7:         LastName: $("#ContactLName").val(),


   8:         EmailAddress: $("#ContactEmail").val(),


   9:     };


  10:     //call jQuery Ajax method which calls Json.stringify method to convert             


  11:     //the Json object into string and send it with post method            


  12:     $.ajax({


  13:         url: "/api/values/",


  14:         data: JSON.stringify(newContact),


  15:         type: "POST",


  16:         contentType: "application/json;charset=utf-8",


  17:         statusCode: {


  18:             //Web API Post method returns status code as 201                    


  19:             200: function () {


  20:                 alert("Employee Added successfully");


  21:                 //GetCustomersById();


  22:             }


  23:         }


  24:     });


  25:     return false;


  26: }


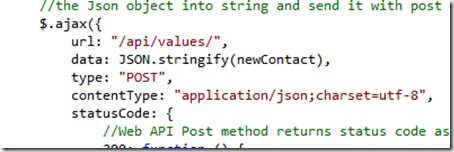
You can see my jQuery code, this is same as what I have used for update, only difference is instead of using the PUT I am using POST


image


and this will call the action method which is listening to HttpPost.


   1: // POST /api/values


   2: [HttpPost]


   3: public void PostContact(ContactDetail contact)


   4: {


   5:     repository.Add(contact);


   6: }


and my repository method is taking the contact object and saving this to the Database


   1: /// <summary>


   2: /// Adds New Contact


   3: /// </summary>


   4: /// <param name="contact">Contact</param>


   5: public ContactDetail Add(ContactDetail contact)


   6: {


   7:     var addedContact = context.ContactDetails.Add(contact);


   8:     context.SaveChanges();


   9:  


  10:     return addedContact;


  11: }


Now lets see this in action.


image


the last result returned in the Dev Toolbar shows the result as 200, and the method as POST, which means addition successful, if you check the detailed view this will give you the request body which is very much similar to what we have in update method.


5. Delete (DELETE)


And last but not the least, lets clean up my unwanted records using the delete method. this method is simplest of all, where I just pass the contact id the action method, which uses the repository method to delete the contacts.


image


Table above is showing all my contacts present in the database, I will try to delete the contact id 16.


image


In the Dev Toolbar you can see my Method is showing DETELE and Result is 200, which means Delete Success.


With all the examples above I just tried to demonstrate a basic CRUD operations using jQuery and ASP.NET Web Api.


To explore more into this topic you can always refer to the http://www.asp.net link: http://www.asp.net/mvc/mvc4 


In the same link you can download the MVC4 beta, and explore the other features of MVC 4, tutorials, samples, Videos, etc


You can download the complete code I have used for this example from here:  https://docs.google.com/open?id=0BzIjFd_Ps-MSUm4zMklvYkxUMXlFZzdOWVBsaHJvQQ


Sample code includes both Part 1 and Part 2 of this post.


In my next post I have shown how you can publish and host your application on Windows Azure Platform: Hosting ASP.NET Web Api on Windows Azure Platform

Share: