In this post I am going to cover a very basic CRUD operations using MEAN (MongoDB, Express, Angular and NodeJS) stack. You can use this example to kick start your project using MEAN stack.

Before I begin, I am assuming that the reader of this post has basic understanding of AngularJS, MongoDB, NodeJS, jQuery and other client side technologies like jQuery, HTML 5, CSS 3, etc.
Most of the commands, environment I have used is for Windows operating system, but there’s not much difference if you are using MacOS or Linux operating system, and moreover all the technologies used in this example are platform independent.
1. Setup the environment
Follow the URL in their respective sites to get detailed information on download and installation instructions. You can get the installers of all the OS which is supported by these framework and their installation instructions in these links.
- Install/configure NodeJS
- Install/configure MongoDB
- If you want to download this sample you can fork or clone using github using the link
2. Setup Solution
Solution Structure: In this example I am using a person database and the only function of this application would be to Create-Read-Update-Delete a person record. To achieve this I have created a simple solution structure, using the following structure.

Here I am using app folder for most of my application code, this folder contains angular controller, service and views. I am keeping my node modules very simple just to expose API’s which will be consumed by AngularJS services. I have covered most of the server side node modules in just one file called server.js I will try to cover specially more complex node module/architecture in my next post.
3. Downloading, Installation and configuration of Dependencies
Download and installation instructions: For this example my application is using following node-modules, to install these modules I am using node package manager using GitBash.
- body-parser: It’s a node.js body parsing middleware, for simple application, for mode detail please refer, https://github.com/expressjs/body-parser
- Installation: $ npm install body-parser
- express: Express is a minimal and flexible Node.js web application framework that provides a robust set of features for web and mobile applications (Reference: http://expressjs.com/). I am using express in my middleware to create node.js server and API’s
- Installation: $ npm install express
- mongojs : A node.js module for mongodb, that emulates the official mongodb API as much as possible. It wraps mongodb-core and is available through npm (Reference: https://github.com/mafintosh/mongojs).
- Installation: $ npm install mongojs
- angular-loading-bar : I am using this for my client side for displaying progress bar. Interesting thing is due to the fast performance of my application I never get to see this in action.
- Installation: $ npm install angular-loading-bar
Configuration: of AngularJS client application
4. Setup Middleware
I am using my node.js for middleware, to setup my middleware first I have created my server in node.js
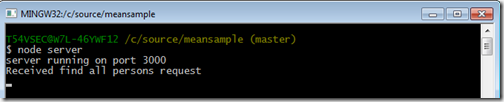
Here in line 1 and 2 above I have imported express module and created a instance of express, and in line 3 I have used listen function of express to create new server on port 3000. With this example my server is listening on port 3000. When I run this in GitBash I will get the following message.

I still need to add few more modules to my server.js which will help the application to connect to my mongodb server, configure the application working directories. But before I do that let me first start creating GET/POST/PUT and DELETE API’s in server.js which can communicate with my Client module in AngularJS
4. Create GET/POST/PUT and DELETE server API’s
In the above code I have create a blueprint of my middleware in server.js
| Node JS API Controller | Description |
| /persons | Get All Persons |
| /person/:id | Get single person by person Id |
| /addPerson | Add new person |
| /deletePerson/:id | Delete single person by id |
| /updatePerson | Update single person |
in the first few lines of my code I have created the instances of express and configure my application to use my root directory of the application as a working folder. Now lets run the server and check the output in web browser.
In this example I have created stubs for Get by Id, GetAll, Update, and Delete person request. To test the code start the node server, though initially you can see the same output what I have provided earlier. But when you enter the URL’s in the browser with the URL’s on which I have created my API’s you can see the outputs in the console.
I have provided example of GET requests. I will write Angular modules to test POST/PUT and DELETE API’s
GET All (localhost/persons)


GET By ID (localhost/person/1)

5. Configure Angular JS Client
I am using simple MVC model in AngularJS Client, but you can fork or clone my Git repository to extend this solution. This example assume that you have basic understanding of Angular JS. To start with lets create a simple router which redirects my application to the home page of my person page.
Angular JS Routing
Here in the example above, I have mapped the paths /person and /person/:PersonId with the PersonCtrl and PersonAddressCtrl controller respectively and corresponding view as app/views/person.html and app/views/persondetail.html views respectively. Which means when I hit the URL: http://localhost:3000/person, this will go to the person.html and mapped to the PersonCtrl.js controller and when I hit a single person using URL: http://localhost:3000/person/1 out of the list using personId my routing engine will redirect the users to persondetail.html using PersonAddressCtrl.js
Angular Controllers – PersonCtrl
onError : This is going to be my common error module, this action method is used only for the purpose of displaying the error when something goes wrong during the whole communicate process wither at the server level or at the client level.
refresh : This will be my default get all person action method, which is used to load all the person data from mongodb database via nodejs. Here in this code I am calling the corresponding API ‘/persons’ which is created in nodejs and express to populate all the persons from mongodb. Once the data is returned from mongodb I have created a callback function onPersonGetCompleted event, which is used to populate the person data in the scope of the current module. refresh() is called as soon as person.html my default page is loaded in the application or every time we need to refresh my data from mongodb.
searchPerson : This action method will be called when I want to view a single person based on person id, for example during opening the update form for the selected person. This method is associated with the callback function onGetByIdCompleted, which populates the scope with a single person result from mongodb.
addPerson : As name suggest, this action method is used to add a new person, and the associated call back function to this is onAddPersonCompleted, which refresh the data once add is completed to reflect the uptodate information on the Person default page.
deletePerson : As the name suggest, only purpose of this action method is used to delete the selected person. This calls '/deletePerson/:id' API of nodejs and once the call returns it uses its callback function onPersonDeleteCompleted to refresh the update data in the HTML page person.html
updatePerson : This action updates the person information in mongodb. This calls the ‘/updatePerson’ API in nodejs. Once the update completed, it calls the callback function onUpdatePersonCompleted action in Angular to refresh the updated data in the Person page.
Let's put everything together to see my completed PersonCtrl.js, next I am going to show how this is going to integrate with the View and the final step will be to write the body of my API controller which will be used to transact with mongodb.
5. Completing the NodeJS express API Controller
Now lets revisit the API controller, the skleton of which I had created in the Step 4 above. Here I am going to write the body of my GET/POST/PUT and DELETE methods which will be used to transact with mongodb document database. In the chart below I have shown the NodeJS express API and corrosponding mongodb API against that which will be called to complete the transactions.
| Action | NodeJS Express API | MongoDB API |
| Get All Persons | /persons | db.Persons.find() |
| Get Person by Id | /person/:id | db.Persons.findOne() |
| Add new Person | /addPerson | db.Persons.insert() |
| Delete Person by Id | /deletePerson/:id | db.Persons.remove() |
| Update single Person | /updatePerson | db.Persons.findAndModify() |
If you want to extend your knowledge beyond the list provided above, then I would suggest you to look into the very detailed and excellent documentation provided by MongoDB : http://docs.mongodb.org/manual/applications/crud/
Now lets look into the completed API of my nodejs, Here in line #4, AddressBook is mu collection name which is equivalent to the tables in RDBMS and Person is the document. If you are still confused with the document and collection and other jargons of MongoDB then probably you can look into the link: http://docs.mongodb.org/manual/reference/glossary/, this covers all the mogodb glossary.
I have also introduced body-parser here, which is used to parse the request and response in json format.
And again, for an extensive explanation of each of the operations I have used in this example below you can refer the MongoDB documentation: http://docs.mongodb.org/manual/applications/crud/
This is the least code you can write to implement the CRUD operation using mongodb and node, but the possibilities are limitless you you want to extend this example. Some of the things which you can do with very little effort if you want to make this solution more structure and object oriented are:
1. Use the application generator tool, express, to quickly create an application skeleton. http://expressjs.com/starter/generator.html
2. Use ORM/ODM tools like mongoose. Mongoose provides a straight-forward, schema-based solution to model your application data. It includes built-in type casting, validation, query building, business logic hooks and more, out of the box.
3. Use routing in Server side, though I have used routing in my client side but you can also use routing in middleware to keep more control of your code. You can learn more on these topics @ http://expressjs.com/starter/basic-routing.html OR http://expressjs.com/guide/routing.html
This is just few of options which can be done with very little effort but the possibilities are unlimited. You can fork or clone my example to extend it up to your capacity for learning purpose.
Now lets get back to the pending items which will wind up my post by creating Views
6. Angular JS and HTML Views
I am going to create a Dashborad which will display all the persons I have in my mongodb database in AddressBook collection. I have provided below the screenshot to show you how the completed code will look like. Here I have used AngularJS bindings for model binding and CSS3 and HTML5 to make my page look little descent.On click of Edit I am going to edit the person using a Model popup with pre-populated person data and similarly I am going to have a model popup for Add Person with empty controls which will allow the user to add a new person record and delete is simply going to remove the record from the mongodb. My example is designed to take you to the persondetail.html page which will have more details of the person, like person address but for the simplicity sake I have not implemented that in this example.

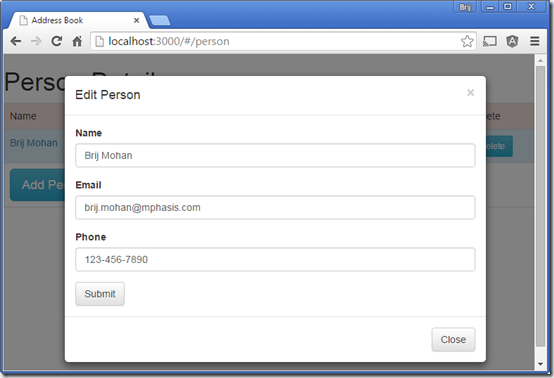
Now to achieve this I will need only few pages, which are listed below
index.html : This page is going to have only the references to the controller, angularjs, bootstrap and other client side libraries. This page also have a
<div data-ng-view="data-ng-view"></div>
This acts as a place holder for displaying the views injected by angularjs routing engine.
person.html
This is the home page or default page in my application. Screenshots of this page is provided above. The purpose of this page is to list all the persons in the mongodb database, add, edit and delete the persons from mongodb.
I have used a very loosely defined model called person for my model and this is going to be saved in mongodb directly without any further transformation. My view is binded with persons model in the $scope through the
PersonCtrl. Once the model is populated I have used ng-repeat to display all the persons in the table. In line #17, I have called the
searchPerson with personId in
PersonCtrl to get selected person to edit from mongodb. Here data-toggle and data-target is used to tell the Edit button to display the #personEditModal is clicked. And for delete in line #18 I have called
deletePerson action in
PersonCtrl, this in turn calls the NodeJs API for delete and remove the person from mongodb database.
And for Add and Edit modal popup, I have a very basic design, refer the screenshot above. I have provided below the example of edit person, only difference of edit and add person is the display captions/headings and on click of save button, Edit calls the
updatePerson(person) action in
PersonCtrl and in add person modal this calls the
addPerson(person) action in
PersonCtrl.
So with these code I have completed end to end data bindings, client side API using angular, server side API using nodejs and express and you might have noticed I have not done much like schema creation in mongodb data as mongodb is schema less document oriented database. So the same JSON which I have used to communicate between the different layers are stored directly into the mongodb database. But again this is just the start, the things I have not covered in mongodb is relation data example like person and person address documents and how they can be associated with each other using references, complex model bindings, etc. You can Clone, Form or download this example from my git repository @ https://github.com/bmdayal/MEANSample
References and Other helpful links


