Showing posts with label CodeProject. Show all posts

Monday, 12 November 2012

Free Microsoft Learning Events by Microsoft Learning Partners

Click on the link below to find some of the third-party events where you can learn about Microsoft technologies.

http://www.microsoft.com/learning/en/us/community/events.aspx

Microsoft Tech Showcase: Technology events hosted by Microsoft Learning Partners

You can search events based on your technology, country, City/Province, Online/In Person events, From Date, To Date and name of the partners. These events will help you to boost your careers, learn new technologies, etc all free of cost.

Share:

Tuesday, 6 November 2012

Programming in HTML5 with JavaScript and CSS3 (70-480) Free Examination Voucher

Programming in HTML5 with JavaScript and CSS3. It's your chance to assess your skills, validate your knowledge, and prove your HTML5 chops. More importantly, it's your first step toward earning our industry's first and only certification for HTML5 expertise: Microsoft Certified Solutions Developer (MCSD). MCSD certification is proof positive to employers and peers that your code skills are second to none.

How to take free examination

Go to www.register.prometric.com and follow the steps to schedule Exam 70-480: Programming in HTML5 with JavaScript and CSS3 at a testing centre near you.

Use the voucher code HTMLJMP to get the free exam. Pass, and you'll be well on your way to joining the community of elite MCSD developers.

Developing HTML5 Apps Jump Start Free Online Course

Go to http://www.microsoftvirtualacademy.com/tracks/developing-html5-apps-jump-start and enroll in the JumpStart online course, which covers HTML5 development using JavaScript and CSS3, and sharpens your Windows app development skills.

Download free eBook (Programming Windows 8 Apps with HTML, CSS and JavaScript)

Share:

Debugging .NET code using Devices(iPad/iPhone) and Fiddler

While working on programs which are targeted for devices (mobile, tablets, etc) we often face a situation where we feel that just device simulators are not enough I wish if I could run my programs in debug mode using the physical device. And this scenario often arises because personally I too faced a scenario where I was able to run my website on the simulator without any issues but the same was not working as expected on the physical device.

So in this post I am going to show you how to debug the .NET codes using apple iPhone or iPad. To do this  you

  • First need to configure Desktop or Laptop computer where you are running your .NET code
  • Second Configure Devices iPhone or iPad

There are few perquisites which are required

  1. Of course a apple (iPhone or iPad) device which can be used to debug the codes, you can also use Andriod phones but ad hoc connections are not supported by default on Andriod phone.
  2. WiFi enabled on your PC with administrator privileges, you can either enable you Internet connection sharing on WiFi network or created a ad hoc network, details of which I am going to mention later.
  3. If you are going for ad hoc network you may need a proxy server installed on your PC, here I am going to use Fiddler, you can download from here: http://www.fiddler2.com/fiddler2/version.asp
  4. Visual Studio installed, I am going to use Visual Studio 2012 in this article, but this post holds good for any version of Visual Studio as long as it can support debugging.

In this post I am going to show connecting using iPhone/ iPad using ad hoc network using my Fiddler.

Now lets get started step by step starting from configuring my system to configuring the phone device.

Creating a ad hoc network

  1. Open Network and Sharing Centre (Control Panel\All Control Panel Items\Network and Sharing Center).
  2. Go to Manage wireless network –> Add, this will open a Popup screen where either you can Manually create a network profile or you can Create an ad hoc network

image

3. Once you get the following screen, you can enter the name of the ad hoc network of your choice, select WEP as Security type, give the Security key and select the checkbox to Save the network, as given in the screen below.

image

Now you system is almost ready to accept incoming connection through the wireless network devices, just make sure your wireless is turned on, go to the taskbar network icon and open the window, this will display the newly created ad hoc network by you as Waiting for users. 

image

Now since your network is ready to accept incoming connections I am going to set up my proxy server where I am going to use Fiddler. To configure Fiddler open the fiddler in your system, Go to Tools –> Fiddler Options –> Navigate to Connections Tab select the check boxes as given in the screenshot below and leave the port as default 8888 if not already in use in your system, this can be changed as required.

image

Now since your system is ready for device connection, the only thing left is configuring your device. To configure your device follow the following steps.

In your iPhone or iPad first go to Cellular Data settings this is applicable if you are using your network provider internet connection. Once you open this Cellular Data tab in your device, disable the cellular data as given in the screen below..

iPadDeviceiPhoneDevice1

Now its time to configure your Network Settings in iPad and iPhone

iPadDevice3

iPhoneDevice2iPhoneDevice3

In the screen above you have to configure your device to use Static IP Address, with the IP Address which should be in the same network address and subnet address. You just need to give some unused class D address which should be different from your system to which this is connecting. You can check your system IP Address of Wireless LAN adapter using ipconfig command in command prompt. This IP address will be the IP Address of the device (iPad/iPhone).

Now go to the HTTP Proxy settings on the same page below of device network settings, select the proxy settings as Manual. In the Server you have to enter the correct IP Address of the wireless LAN adapter of your system (Desktop/Laptop), enter the port which was configured on Fiddler as given in the fiddler settings above.

Once you have completed these settings your device is also ready to connect to the System. Once connected you can see the status as connected instead of Waiting for users in ad hoc network.

Now once everything looks fine, you can go ahead and first run the application in debug mode in your system, once your application opens in the web browser you can get the URL address on which your application is ready for debug. As per my convenience I have used a MVC application for debugging, but you can use any other types of web application also.

iPad1

Enter the Same URL (http://localhost:35510/) in your device. I have kept a line of code which gives me the UserAgent from where the request is coming from.

string userAgent = HttpContext.Request.UserAgent;

Following are the screens which I get in iPad and iPhone respectively

iPhoneDevice4   iPadDevice2 

Now if I go and set the breakpoint in the code, I can see the user agent which clearly shows the requested client user agent.

iPhone2Laptop

iPad2Laptop

In the above two screens you can see the user agent browser as Mozilla/5.0 (iPhone…) and Mozilla/5.0 (iPad…) for iPhone and iPad respectively.

Note: IP addresses are used in this article are just for illustration only, this is not directly or indirectly related to any existing IP address used anywhere in existence.

Hope this helps.

Share:

Friday, 2 November 2012

Visual Studio 2012 Team Foundation Service

Almost most of us who work in our personal systems often face challenges when it comes to learn something on Team Foundation Server, because the biggest challenges we face is setting up the environment, acquiring the server license, configuring the environment, setting up the client applications, etc.

So we have to depend on our office environment where we can learn something on TFS. But still we have limited privileges and we cannot experiment with so many uncovered features which we had always wished for while learning through books or website or MSDN.

Ok, having said all these let me give you some good news, Visual Studio has launched much awaited Cloud based Team Foundation Server Service for Visual Studio, Eclipse, Xcode environments with the following brilliant features and top of those free to learn, experiment and of-course for business too.

  • Team Collaboration and Agile Planning,
    • Built-in task board
    • Backlog management
    • Capacity planning
    • Issue and Bug tracking
    • Integrated feedback requests
    • Storyboarding with Microsoft PowerPoint
  • Build, Test, Deploy
    • Track build health over time
    • Continuous delivery to Azure
  • Cloud powered source code management
    • Code reviews
    • Code merging for check-in conflicts
    • Context management preserves your focus

and much more…

with no infrastructure required to manage, accessible from anywhere, supporting almost all the languages and platforms.

image

And the icing on the cake is this is Free to use, you just need to signup using this link https://tfs.visualstudio.com/

Once you sign-up for Team foundation service has got all the required resources to help you to learn the TFS features and offerings. Team Foundation Service getting started guide will help you to learn almost everything you need to know about this service like:

  • Connect to TFS (using Visual Studio, Eclipse, and Xcode)
  • Uploading your code
  • Check files in and out
  • Get your Code Reviewed using TFS environment
  • Creating and running a unit test manually or automatically with local builds
  • Using other unit test frameworks
  • Use Git and VS with TFS

Free plan of TFS will cover the following features

image

For additional users, pricing you can visit the following links for other service plans you may have to wait till 2013.

Happy Learning !!!

Share:

Sunday, 1 April 2012

Hosting ASP.NET Web Api on Windows Azure Platform

In this post I am going to show you how to Host your ASP.NET Web Api Services on Windows Azure, to demonstrate this I am going to use my application which I have created in my previous couple of Post :

CRUD operation using ASP.NET Web Api and MVC 4 – Part 1

CRUD operation using ASP.NET Web Api and MVC 4 – Part 2

Before hosting my application I have to perform the following steps.

1. Add an Cloud Application from Add New project

image

2. Select ASP.NET MVC 4 Web Role, since I have used ASP.NET MVC 4 to create my Web Api project.

image

3. From the following Screen I have to select cancel, since I am adding this to my existing Web Api Project, and don’t want to create a new Applications.

image

4. Once the project creation is successful, right click on the Roles folder from the WebRole.Azure project and Select Add, from the add menu select Web Role Project in solution  and Select the WebApi Project listed in the Popup windows. This will add my Web Api project in the Roles folder of Azure project as given in the screen below.

image

image

5. Now our Azure project is configured to publish my WebApi service on Web, but before we publish we need to configure the Database connection which is currently pointing to my local system, we need to change this to the SQL Azure database. Since SQL Azure setup and configuration is out of scope of this Post, so I am not going to cover that here, but don’t worry I have given that instruction in my another post, which will help you to configure the Entity Framework EDMX with SQL Azure.

6. Now once your application is ready with the SQL Azure connection, we will publish our Application on Windows Azure. But before we continue, we may have to configure publish settings in my system, sometime back I have written couple of articles where you can find how to publish your website on Windows Azure. But simplest way to do the same I have given below. Right click on your Windows Azure project and Select Publish, You will be prompted with the screen below. Now Select the option “Sign in to download credential”

image

7. This link will take you to the windows azure site, where you will have to provide your credentials and then you can download the publishsettings files, using the Save as option. Save this file to your system.

image

8. Now select the import button and locate the downloaded publishsettings file, this will auto populate the Subscription dropdown as given below, I have used my 3 months free subscription to demonstrate this. You too can subscribe to 3 months free trial from here.

image

9. Provide your Name and Location details.

image

10. Select Ok then Next, you will land up in the below screen, where you can Say next.

image

11. Finally you will provided with the Publish Summary settings, where you can review your settings and it everything looks good then you can click on publish.

image

12. You can see the progress here, or if you want you can see the same in your Windows Azure console also.

image

Windows Azure console.

image

13. Once ready you will be come to the following screen, where you can see the status as Ready.

image

And that’s it we are ready to test our application. You can get the DNS name (URI) of your Web Api Service from the console once your applications are ready. Lets try out Api Services, in the browser using Developer ToolBar. Following are the list of Methods and URI are exposed to web.

image

Lets try with the Get (/api/values) and check in Dev Toolbar, So I am getting the Responsed code 200 and in the detailed view –> Response Body I can see my result returned from my Api Service.

image

image

Now lets try from from the Client screen where I have written few lines of jQuery to demonstrate the CRUD operation, details of which you can refer in my previous post.

CRUD operation using ASP.NET Web Api and MVC 4 – Part 1

CRUD operation using ASP.NET Web Api and MVC 4 – Part 2

GetById (/api/values/1) and GetAll (/api/values)

image

image

The codes for these sample can be downloaded from here https://docs.google.com/open?id=0BzIjFd_Ps-MSUm4zMklvYkxUMXlFZzdOWVBsaHJvQQ

This is the same code which I have already provided in my previous post : CRUD operation using ASP.NET Web Api and MVC 4 – Part 2, You will just have to do the configurations which I have mentioned in this post. Hope this helps.

Share:

Generate Entity Framework using SQL Azure Database

In this example I am going to show you how to generate your Entity Model edmx using SQl Azure database.

Before we start, first lets create a Sample database named called ContactDetail on SQl Azure database.

To create a SQL Azure database you can either Login directly to your SQL Azure account through web or you can Login to your Windows Azure Account, and from the Homepage you can navigate to the Database. In my example below I am using the Second option.

1. Login to your Windows Azure Account and Navigate to the Database, this will give you the below screen.

image_thumb

2. Now Select the Create Button to Create a new database, this will give you the following screen where you can enter your region and provide a new credentials which you will use with this new database.

image_thumb[1][1]

image_thumb[2][1]

3. Once done, Select Next this will provide you with the below screen where you can provide the firewall rule, this is just for extra security. Once you have provided the IP Address Range, you will not be able to connect from any other IP Address which does not fall in this Range.

image_thumb28[1]

4. If you are connecting through any other application which is Hosted on any other Windows Azure accounts then make sure to Select this option, this will allow your Windows Azure applications to connect to this SQL Azure Database.

image_thumb[3][1]

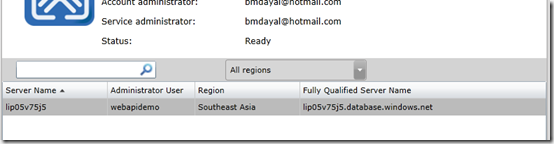
5. Once completed you can see your fully qualified server name in the Dashboard provided. This Server name is used to connect remotely to your Azure DB from your application or from VS 2010 Server Explorers, etc.
image_thumb26

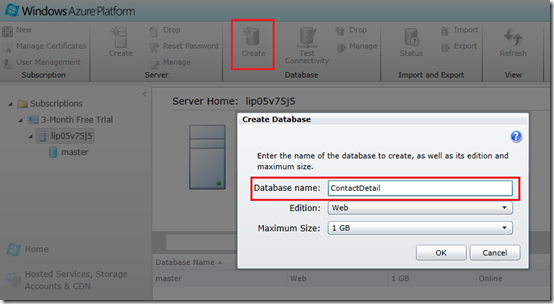
6. Now lets create some sample database which we are going to use to generate our Entity Model, to create a new database you will have to first select the newly created server from the left hand side of the Windows Azure console, and select Create from the Menu, this will present you the windows where you have to provide your Database information. Based on your requirement you can select the Edition and Size, I am keeping my Database names as ContactDetail and Leaving rest as default and Select Ok.
image

7. Now I can see my New database in the Azure Console, select manage to manage the database objects like SP, Tables, etc. This will open the SQL Azure console.

image

8. SQL Azure console will prompt you for credentials, once you are thru, you will get the SQL Azure Dashboard, where once you have to select the Contact Detail Table –> Design – New Table

image

9. In the New Table I have provided the following information, for my Contact table and Click on Save, this will create my ContactDetail Table.

image

Now I am ready with the SQL Azure table, my next task will be to configure my Entity Framework to use this table, to use in my Application. Please note if you want to use any scripts which is used for your SQL Server database, then this will not work with your SQL Azure database, you can read more in the following link: http://blog.sqlauthority.com/2010/06/04/sql-server-generate-database-script-for-sql-azure/

10. Now lets get back to my application, where I am going to create a entity framework entity model, which I am going to configure with this SQL Azure DB, to perform this I am opening my .NET application where I want to add Entity Model, and Select Add New Item – Data –> ADO.NET Entity Data Model.

image

11. Select Next, in the Wizard, Select New Connection and enter the fully qualified Server name, and the credentials and Select Ok and then Next with default options selected.

image

12. You will get the list of your tables, views and Stored procedures, select the desired Database objects with the default options selected and Select Finish, you will get the Designer with the tables, stored procedures or views you have selected.

image

And that’s it, once done you can work like any other Entity Framework you have used to work with your SQL Server 2008/2005 databases.

Share: