Showing posts with label guest post. Show all posts

Friday, 13 January 2017

Understanding AOT and Dynamic Components

This is a guest post from Sean Landsman at ag-Grid. Sean is the lead engineer on ag-Grid's Angular integration. -- Stephen Fluin


Motivation

ag-Grid is an enterprise datagrid that works with Angular. As ag-Grid works with many frameworks, the internals of the grid had to allow for Angular rendering inside the grid despite ag-Grid not being written in Angular itself. This was done using Angular Dynamic Components and we managed to do it while still supporting AOT. This blog details what we learnt along the way.

The Setup

To explain we present a simple sample application that isolates what we are trying to do. In our example below we are going to develop two main Modules - one will be a Library (in our case this was ag-Grid) that will display an array of dynamically created Components (similar to how ag-Grid displays Angular components inside the grid's cells), and the other will be our actual Application.
The end result will be look like this:


You can find all the code for this example over at GitHub, and the live example over at GitHub.io
One further note - when we return to "user" below, we are referring to a user (or client) of the Library we're writing.

The Library

Our Library is going to be a simple one - all it does is display an array of dynamically created Angular Components. The main component looks like this:

@Component({
selector: 'grid-component',
template: `
<div class="row" *ngFor="let cellComponentType of cellComponentTypes">
<div class="col-lg-12">
<grid-cell [componentType]="cellComponentType"></grid-cell>
</div>
</div>
`
})
export class Grid {
@Input() componentTypes: any;

cellComponentTypes: any[] = [];

addDynamicCellComponent(selectedComponentType:any) {
this.cellComponentTypes.push(selectedComponentType);
}
}

As you can see it's a pretty simple component - all it does is display the current cellComponentTypes. These are the user supplied components, and they can be any Angular Component.

The interesting part of the Library is in the Cell Component:

@Component({
selector: 'grid-cell',
template: ''
})
export class Cell implements OnInit {
@Input() componentType: any;

constructor(private viewContainerRef: ViewContainerRef,
private cfr: ComponentFactoryResolver) {
}

ngOnInit() {
let compFactory = this.cfr.resolveComponentFactory(this.componentType);
this.viewContainerRef.createComponent(compFactory);
}
}
You'll notice that we don't have a template here - that's deliberate as the Cell doesn't have any     content of its own - all it does is serve up the user supplied Component. The important part of this Component are     these two lines:

let compFactory = this.cfr.resolveComponentFactory(this.componentType);
This line asks the ComponentFactoryResolver to find the ComponentFactory for the provided     Component. We'll use this factory next to create the actual component:

this.viewContainerRef.createComponent(compFactory);
And that's all there is to it from the Library Component side of things - we find the factory for the Component, and     then create a new instance of the Component. Easy!

For this to work we need to tell Angular's AOT Compiler to create factories for the user provided Components, or ComponentFactoryResolver won't find them. We can make use of NgModule.entryComponents for this - this will ensure that the AOT compiler creates the necessary factories, but for you purposes there is an easier way, especially from a users perspective:

@NgModule({
imports: [
BrowserModule,
FormsModule
],
declarations: [
Grid,
Cell
],
exports: [
Grid
]
})
export class GridModule {
static withComponents(components: any[]) {
return {
ngModule: GridModule,
providers: [
{provide: ANALYZE_FOR_ENTRY_COMPONENTS, useValue: components, multi: true}
]
}
}
}
By making use of ANALYZE_FOR_ENTRY_COMPONENTS here, we are able to add multiple components to the NgModule.entryComponents    entry dynamically, in a user friendly way.

The Application

From the application side of things, the first thing we need to do is create the components we want to use in the Library - these can be any valid Angular Component. In our case we have three similar Components:

@Component({
selector: 'dynamic-component',
template: '<div class="img-rounded" style="background-color: lightskyblue;margin: 5px"> Blue Dynamic Component! </div>',
})
export class BlueDynamicComponent {
}
All these components do is display a little styled text.
To register these in both our Application, and in the Library, we need to switch to the Application Module:

@NgModule({
imports: [
BrowserModule,
FormsModule,
GridModule.withComponents([
BlueDynamicComponent,
GreenDynamicComponent,
RedDynamicComponent
])
],
declarations: [
AppComponent,
BlueDynamicComponent,
GreenDynamicComponent,
RedDynamicComponent
],
bootstrap: [AppComponent]
})
export class AppModule {
}
We declare our Components in the usual way, but we additionally need to register them with the Library (remember,     this is the part where they'll be added to the     Library's NgModule.entryComponent entry). We do this in this part of the module:

GridModule.withComponents([
BlueDynamicComponent,
GreenDynamicComponent,
RedDynamicComponent
])
Finally, we can take a look at the main Application Component:

@Component({
selector: 'my-app',
template: `
<div class="container-fluid">
<div class="page-header">
<h1>Creating AOT Friendly Dynamic Components with Angular
</div>
<div class="row">
<div class="col-lg-12">
<div class="panel panel-default">
<div class="panel-heading">Application Code</div>
<div class="panel-body">
<div class="input-group">
<span class="input-group-btn">
<button type="button" class="btn btn-primary" (click)="grid.addDynamicCellComponent(selectedComponentType)">Add Dynamic Grid component
</span>

<select class="form-control" [(ngModel)]="selectedComponentType">
<option *ngFor="let cellComponentType of componentTypes" [ngValue]="cellComponentType">{{cellComponentType.name}}
</select>
</div>
</div>
</div>
</div>
</div>
<div class="row">
<div class="col-lg-12">
<div class="panel panel-default">
<div class="panel-heading">Library Code</div>
<div class="panel-body">
<grid-component #grid></grid-component>
</div>
</div>
</div>
</div>
</div>
`
})
export class AppComponent implements OnInit {
@Input() componentTypes: any[] = [BlueDynamicComponent, GreenDynamicComponent, RedDynamicComponent];
@Input() selectedComponentType: any;

ngOnInit(): void {
// default to the first available option
this.selectedComponentType = this.componentTypes ? this.componentTypes[0] : null;
}
}

It may look like theres a lot going on here, but the bulk of the template is to make it look pretty. The key parts of this Component are:

<button type="button" class="btn btn-primary" (click)="grid.addDynamicCellComponent(selectedComponentType)">Add Dynamic Grid component

This will ask the Library to add a create a new instance of the supplied Component, and in turn render it.

<grid-component #grid></grid-component>
And this line is our Library Component.

That's it - easy to write and use (from both an Application and Library perspective), and AOT (and JIT!) friendly.

Benefits of using AOT

The speed and size of the resulting application when using AOT can be significant. In our ag-grid-ng2-example project, we estimate the size of the resulting application went from 3.9Mb down to 2.4Mb - a reduction of just under 40%, without optimising for size or being particularly aggressive with rollup.

Speed-wise, the loading time when using AOT is significantly more responsive on startup - this makes sense given that Angular doesn't have to compile all the code once again. Take a look at the examples project and try both the JIT and AOT versions out for yourself!

There's so much more you can do if you decide to combine Angular Components with ag-Grid - powerful functionality, fast grid and easy configuration. What are you waiting for?!
Share:

Tuesday, 13 December 2016

Ok... let me explain: it's going to be Angular 4.0, or just Angular

This is a guest blog post by Juri Strumpflohner. Juri is a full-stack developer, architect and tech lead with a passion for frontend development, especially Angular. Juri writes technical articles on his personal blog and is the author of some online video courses. He also likes to engage and help the Angular community on Twitter, so follow him for more interesting news and articles around Angular and frontend web development. Juri was an attendee of NG-BE, Belgium’s first Angular conference last week and did a better job covering our announcements than we would have done, so we are cross-posting his blog post here.

Update: This blog was updated by the Angular team on 2017-01-26 to reflect the latest naming standards.


At the 8th and 9th of December 2016 was NG-BE, Belgium’s first Angular conference. Igor Minar (Angular lead dev) attended as the keynote speaker with some interesting announcements regarding Angular’s release schedule. Please read the entire post, there are a couple of important things.
Igor was extremely open and transparent about the announcement and even about the way of presenting it. He basically created the presentation openly the day before the conference:


So here it is:

Angular 4, March 2017, Backwards Compatible w/ Angular 2

Why Angular 4?? Why even Angular 3?? What is going on?

Angular uses SEMVER

Back in September when the new Angular was finally released, the Angular team also announced they will switch to Semantic Versioning (SEMVER).
As the name already explains, Semantic Versioning is all about adding meaning to version numbers. This allows developers to not only reason about any upgrade we do, but we can even let tools such as NPM do it in a automatic and safe manner for us.
A semantic version consists of three numbers:

2.3.1 - major = breaking change, minor = new features, not breaking, patch = bugfixes, not breaking

Whenever you fix a bug and release it, you increase the last number, if a new feature is added, you increase the second number and whenever you release a breaking change you increase the first number.
“A breaking change happens whenever you as a developer and consumer of a library, have to step in and adjust your code after a version upgrade.”
So what does this mean for the Angular team? As with every evolving piece of software, breaking changes will occur at some point. For example, giving a compiler error for existing application bugs that went unnoticed with the previous compiler version, anything, that will break an existing application when upgrading Angular, requires the team to bump the major version number.
Just to be clear, as also Igor mentioned in his talk. Right now, even just upgrading Angular’s TypeScript dependency from v1.8 to v2.1 or v2.2 and compile Angular with it, would technically cause a breaking change. So they’re taking SEMVER very, very seriously.

Breaking changes don’t have to be painful!

People that have been following the Angular community for a while, definitely know what I’m talking about. We went from Angular 1 to Angular 2, and it was a total breaking change, with new APIs, new patterns. That was obvious: ultimately Angular 2 was a complete rewrite. (Even though there are upgrade options for you available)
Changing from version 2 to version 4, 5, … won’t be like changing from Angular 1. It won’t be a complete rewrite, it will simply be a change in some core libraries that demand a major SEMVER version change. Also, there will be proper deprecation phases to allow developers to adjust their code.
Internally at Google, the Angular team uses a tool for handling automatic upgrades, even of breaking changes. This is still something that has to be planned in more detail, but the team is working hard on making this tool generally available, most probably in 2017 in time for version 5.

It’s just “Angular”

As you might have already guessed, the term “Angular 2” is also kind of deprecated once we get to version 4, 5 etc. That said, we should start naming it simply “Angular” without the version suffix.
“It’s just #angular”
Also, we should start avoiding GitHub/NPM libraries prefixed with ng2- or angular2-.


Naming guidelines

Basically from now on, you should name versions 2.0.0 or later of Angular simply “Angular”. Try to avoid using the version number, unless it is really necessary to disambiguate.

Three simple guidelines:
  • Use “Angular” for versions 2.0.0 and later (e.g. “I’m an Angular developer”, “This is an Angular meetup”, “The Angular ecosystem is growing quickly”)
  • Use "AngularJS" to describe versions 1.x or earlier
  • Use the version number “Angular 4.0” "Angular 2.4" when needed to talk about a specific release (e.g. when talking about a newly introduced feature - “This is an introduction to feature X, introduced in Angular 4”, “I’m proposing this change for Angular 5”)
  • Use full semver version when reporting a bug (e.g. “This issue is present as of Angular 2.3.1”)
All the docs - even for AngularJS - will be aligned to this in the coming weeks. Also in blog articles, courses, books, if you are targeting a very specific version of Angular for a reason, consider adding a header line which states that:
“This article uses Angular v2.3.1.”
That helps avoid confusion for your readers, especially when you are writing about specific APIs.

Why not version 3 then?

The core Angular libraries live in one single GitHub repository at github.com/angular/angular. All of them are versioned the same way, but distributed as different NPM packages:

@angular/core v2.3.0, @angular/compiler v2.3.0, @angular/compiler-cli v2.3.0, @angular/http v2.3.0, in bold: @angular/router v3.3.0

Due to this misalignment of the router package’s version, the team decided to go straight for Angular v4. In this way again, all the core packages are aligned which will be easier to maintain and help avoid confusion in the future.
Also it is important to understand how Angular is being used and integrated inside Google (Igor speaks about this here in his keynote). All Google applications use Angular version equal to the current GitHub’s master branch of the Angular repository. Whenever a new commit lands in master, it will be integrated into Google’s single, giant mono-repo, where also other products such as Maps, Adsense etc. live. As a consequence all of the projects using Angular internally at Google will run their extensive test suites against this new version. This makes the team very confident to cut a new release, since it will contain the exact combination of versions of Angular packages that have been already battle tested inside Google. Thus, having aligned versions totally makes sense and makes it easier to maintain them over time, which in turn helps the team be more productive in releasing new features.

Tentative release schedule

The fact that breaking changes will arrive, doesn’t mean they will arrive every other week. The Angular team committed to time based releases that occur in three cycles:
  • patch releases every week,
  • 3 monthly minor release after each major release and
  • a major release with easy-to-migrate-over breaking changes every 6 months.
The next 3 months will be dedicated to finalizing Angular 4.0.0.

Weekly breakdown of all releases starting with 4.0.0-beta.0, ending with 4.0.0 on March 1, 2017

After Angular 4.0.0, this will be the tentative schedule for further releases:

Version 4 in March 2017, Version 5 in September/October 2017, Version 6 in March 2018, Version 7 in September/October 2018

Video: See the announcement yourself


Conclusion

There are two main important messages here:
  • don’t worry about version numbers
  • we do need to evolve Angular in order to avoid another Angular 1 to Angular 2 change, but we should do it together as a community in a transparent, predictable and incremental way.
Also, I’d like to thank Igor for being so open at presenting this data, especially since he knows what a sensitive topic breaking changes are and have been in the past. This means a lot and I hope that the community will realize why all these changes are good for everyone involved.
Share:

Wednesday, 2 November 2016

Easy Angular Authentication with JSON Web Tokens

Easy Angular Authentication with JSON Web Tokens

Stateless authentication is a great fit for Angular apps. In this post, guest-blogger Ryan Chenkie from Auth0 talks about implementing it using JSON Web Tokens. -- Victor Savkin


TL;DR: Single page apps--like the ones we build with Angular--present a few challenges when it comes to authentication. In general, traditional session-based authentication isn't a good fit for SPAs that use data APIs because it necessitates state on the server. A better way to do authentication in Angular apps (and SPAs in general) is with JSON Web Tokens (JWTs). Read on to find out more about JWTs, or check out Angular 2 Tour of Secret Heroes to see an example of a full Angular 2 app with user authentication.
Pretty well all non-trivial applications require some way of dealing with user authentication and authorization. This can be fairly straight-forward in round-trip applications because all that is really needed when a user logs in is to check their credentials against a database, save a session for them on the server, and return a cookie to be saved in their browser. The cookie is then sent along in subsequent requests to the server and is checked against the session to verify their identity.
This works well for "traditional" applications, but it isn't a great fit for single page apps that use data APIs. Since SPAs are client-side apps, dealing with the notion of the user's authentication state is also a bit trickier. Essentially what it boils down to is that we need some indication of the user's authentication state even though the backends that we rely on should remain stateless. This isn't a problem in round-trip apps because the HTML and data that get returned to the user is constructed on the backend, which is exactly the place that a stateful check can be done to figure out whether or not the user is currently logged in. When we use REST APIs for data however, a stateful session that tracks authentication is bad practice.

JSON Web Tokens - Stateless Authentication in Angular Apps

A great way to do stateless authentication in an Angular app is to use JSON Web Tokens (JWT). JWT is an open standard (RFC 7519), and likely the most compelling reason to choose it as an authentication mechanism is that it can be used to transmit arbitrary data as a JSON object. Since JWTs are digitally signed with a secret key that lives only on the server, we can rest assured that the information in the token can't be tampered with at any point. If the payload in the JWT were to be tampered with, the token would become invalid, which means it wouldn't be able to get past any checkpoints on the server. This makes JWT the perfect mechanism for transmitting information about a user and it gives us a distinct advantage: we can include everything required for our API to know who the user is and what level of access they should have, and the API doesn't need to know a single thing about them prior to the JWT arriving.
So what does a JWT look like? Here's an example:
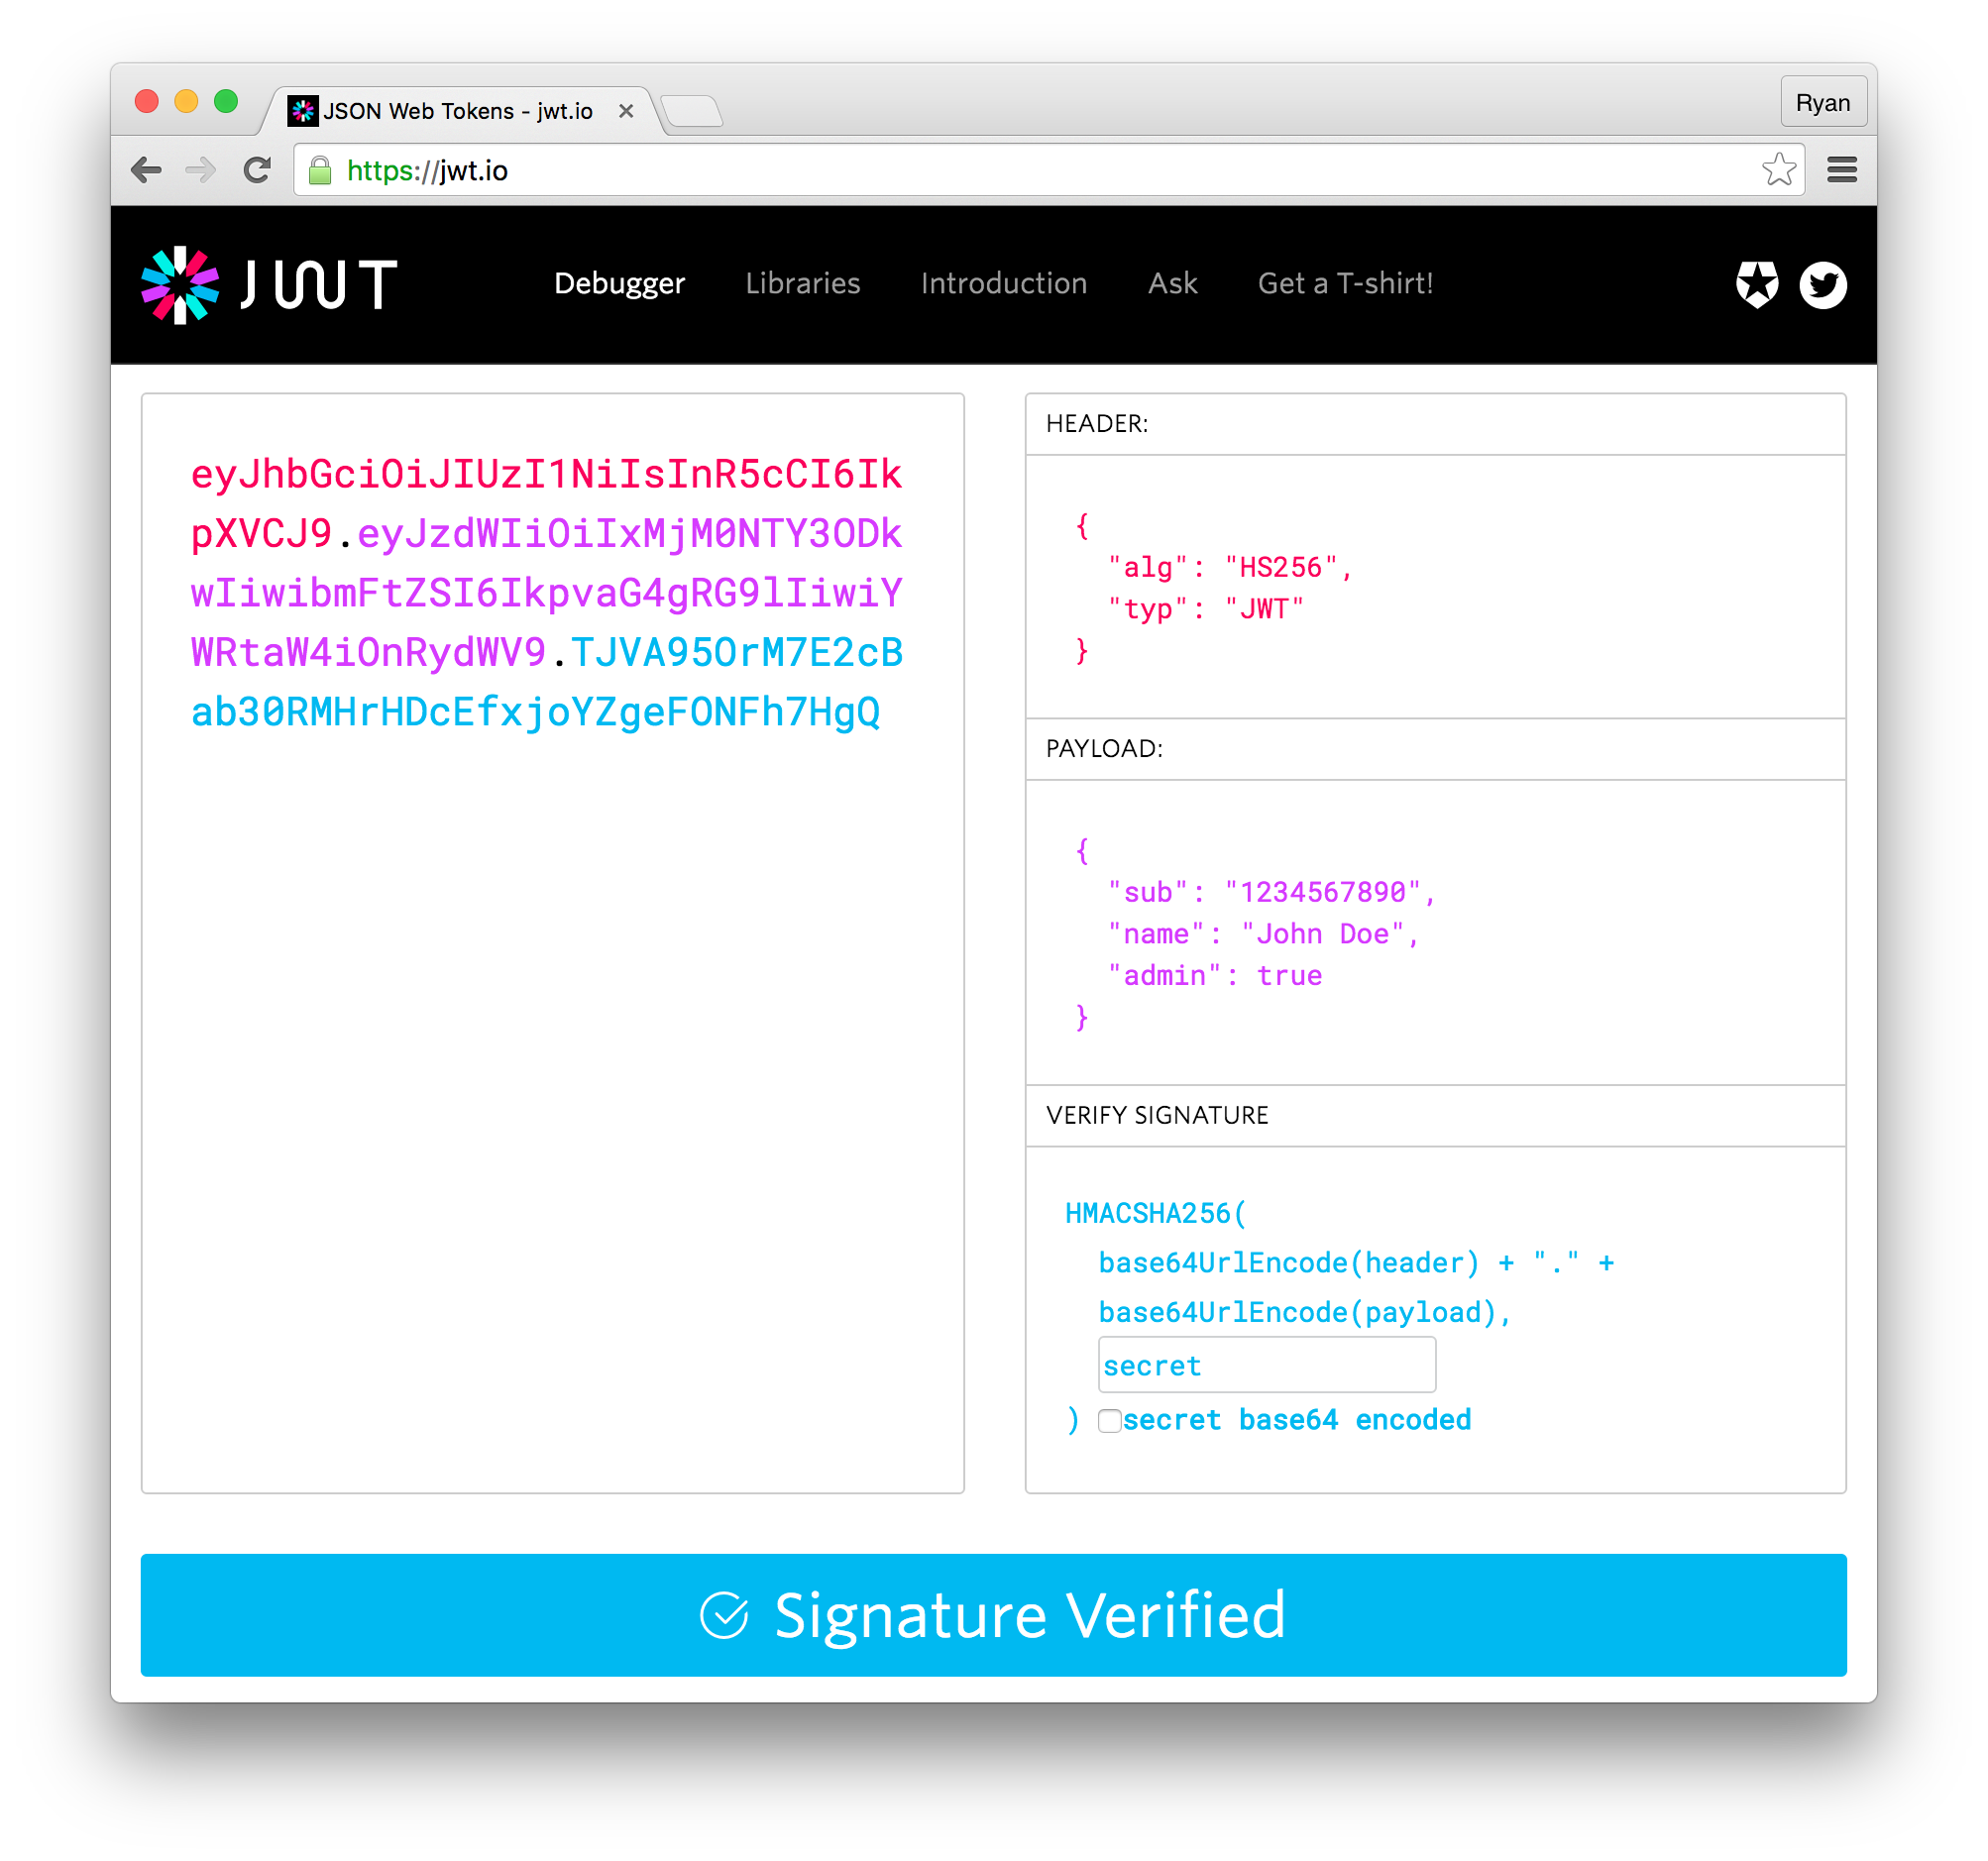
eyJhbGciOiJIUzI1NiIsInR5cCI6IkpXVCJ9.eyJzdWIiOiIxMjM0NTY3ODkwIiwibmFtZSI6IkpvaG4gRG9lIiwiYWRtaW4iOnRydWV9.TJVA95OrM7E2cBab30RMHrHDcEfxjoYZgeFONFh7HgQ
JWTs contain three parts, and each of them is tacked together with a dot separator. The three parts are:

Header

Where we define the algorithm used to sign the token, as well as the token type.

Payload

The meat of the JWT. This is where we keep a JSON object of all the claims we want. Claims can include those that are registered in the JWT spec, as well as any arbitrary data we want.

Signature

The signature is where the signing action happens. To get the signature, we take the Base64URL encoded header, tack the Base64URL encoded payload next to it, and run that string along with the secret key through the hashing algorithm we've chosen. For the token to properly decode on the backend, it needs to have exactly this form, which means that if someone tries to change any of the information contained within, they'll be out of luck.
We can see this token decoded with Auth0's open source JWT debugger.
angular jwt authentication
It should be noted that although JWTs are digitally signed, they are not encrypted. While the digital signature ensures that the content of a JWT cannot be tampered with, they should not be used to transmit sensitive information, as the payload can easily be decoded with tools like the jwt.io debugger.

How Are JWTs Used to Authenticate Angular Apps?

For Angular apps that use data APIs, the typical scenario is this:
  1. Users send their credentials to the server which are verified against a database. If everything checks out, a JWT is sent back to them.
  2. The JWT is saved in the user's browser somehow--either by holding it in local storage or in a cookie.
  3. The presence of a JWT saved in the browser is used as an indicator that a user is currently logged in.
  4. The JWT's expiry time is continually checked to maintain an "authenticated" state in the Angular app, and the user's details are read from the payload to populate views such as the their profile.
  5. Access to protected client-side routes (such as the profile area) are limited to only authenticated users
  6. When the user makes XHR requests to the API for protected resources, the JWT gets sent as an Authorization header using the Bearer scheme, or as a cookie.
  7. Middleware on the server--which is configured with the app's secret key--checks the incoming JWT for validity and, if valid, returns the requested resources.
Fortunately for us, there are several open source libraries for both Angular 1.x and 2 which help us work with JWTs. These libraries are varied in their functionality, but some of the features we get with them are the ability to:
  • Decode the JWT and read its payload
  • Attach the JWT as an Authorization header to XHR requests
  • Have a service which exposes methods for logging in and logging out, and which checks whether the current user's JWT is expired or not

Angular 1.x

Angular 2

There are also hosted authentication solutions that can drastically simplify the process of setting up user login and signup functionality for Angular apps. This basically means that we don't need to worry about any logic for checking the user's credentials and signing tokens for them.

Authentication in Action

So we've got a list of things that our Angular apps should be doing to deal with authentication, but what does this look like in practice? Let's see an example using Angular 2.

Retrieve a JWT for a User and Save it in Local Storage

To retrieve a JWT for a user, we need to verify their credentials against a database. If everything checks out, we sign a JWT and send it back to them in the response. We can use almost any server-side language or framework for this task, and there are JWT libraries available for almost everything.
With the token signing logic set up, we need to expose an endpoint that the app can make a request to for authentication. For this, we just need to send a regular HTTP request. Placing this logic in an injectable service gives us a way to reuse it across our application.
// auth.service.ts

import { Injectable } from '@angular/core';
import { Http } from '@angular/http';
import 'rxjs/add/operator/map';

@Injectable()
export class AuthService {

constructor(private http: Http) {}

login(credentials) {
this.http.post('https://my-app.com/api/authenticate', credentials)
.map(res => res.json())
.subscribe(
// We're assuming the response will be an object
// with the JWT on an id_token key
data => localStorage.setItem('id_token', data.id_token),
error => console.log(error)
);
}
}
We can then wire up a form which takes input from the user and calls the AuthService.
// login.component.ts

import { Component } from '@angular/core';
import { AuthService } from './auth.service';

interface Credentials {
username: string,
password: string
}

@Component({
selector: 'login',
template: `
<form #f="ngForm" (ngSubmit)="onLogin(f.value)" *ngIf="!auth.loggedIn()">
<input type="text" placeholder="username" ngControl="username">
<input type="password" placeholder="password" ngControl="password">
<button type="submit">Submit</button>
</form>
`
})

export class LoginComponent {

credentials: Credentials;

constructor(private auth: AuthService) {}

onLogin(credentials) {
this.auth.login(credentials);
}
}
With the login form and the authentication service in place, the user's JWT will be saved in local storage if they successfully authenticate.
You can see that we've got an *ngIf condition on the form which is looking for a loggedIn method on the AuthService. Let's put that in next.

Checking for an Unexpired Token

With stateless authentication, the only real indication for the front end that the user is "authenticated" is if they have an unexpired JWT. Certainly a more robust indication would be a check to make sure their JWT is not only unexpired, but is also still valid. However, to do this kind of check, the front end would need to know the secret key used to sign the JWT, and we really don't want to expose that. Simply checking the expiry is just fine though; if the token is invalid (in other ways than it just being expired), it won't be useful for retrieving protected API resources anyway.
To do this kind of check, we can get some help from angular2-jwt's tokenNotExpired function.
npm install angular2-jwt
// auth.service.ts

import { tokenNotExpired } from 'angular2-jwt';

...

loggedIn() {
return tokenNotExpired();
}

...
This function simply checks the expiry date of the JWT and returns true if it is not expired.

Limit Routes to Authenticated Users

We've got a way to hide our links and navigation elements if the user either doesn't have a JWT or if their JWT is expired. However, they could still navigate by plugging in URI segments manually, so what we need is a way to limit navigation to private routes altogether. To do this we can set up an AuthGuard which checks whether the user has an unexpired JWT in local storage. We'll then apply the guard through CanActivate when we set up the routing configuration.
// auth-guard.service.ts

import { Injectable } from '@angular/core';
import { Router } from '@angular/router';
import { CanActivate } from '@angular/router';
import { Auth } from './auth.service';

@Injectable()
export class AuthGuard implements CanActivate {

constructor(private auth: Auth, private router: Router) {}

canActivate() {
if(this.auth.loggedIn()) {
return true;
} else {
this.router.navigateByUrl('/unauthorized');
return false;
}
}
}
When route navigation is requested, AuthGuard will use the AuthService to check for the presence of an unexpired JWT and, if one exists, the user will be allowed to continue to the route. If the user isn't authenticated however, they will be navigated to an "unauthorized" page.
The AuthGuard needs to be applied to whichever routes should be kept private, and this is done in the RouterConfig setup.
...

import { AuthGuard } from './auth-guard.service';

export const routes: RouterConfig = [
{ path: 'admin', component: AdminComponent, canActivate: [AuthGuard] },
{ path: 'unauthorized', component: UnauthorizedComponent }
];

...

Send Authenticated HTTP Requests

The last big step for applying authentication to our app is to have the user's JWT sent as an Authorization header in the HTTP requests they make. Since Angular 2 doesn't have any concept of HTTP interceptors like Angular 1.x does, we need to either send the header in the options object of each request, or we can wrap Http to perform this automatically. The angular2-jwt library provides AuthHttp which does the latter.
// secure-stuff.component.ts

import { Component } from '@angular/core';
import { AuthHttp, tokenNotExpired } from 'angular2-jwt';
import 'rxjs/add/operator/map';

@Component({
selector: 'secure-stuff',
template: `
<button (click)="getSecureStuff()">Get Secure Stuff!</button>
`
})

export class SecureStuffComponent {

stuff: [];

constructor(private authHttp: AuthHttp) {}

getSecureStuff() {
this.authHttp.get('https://my-app.com/api/secure-stuff')
.map(res => res.json())
.subscribe(
data => this.stuff = data.stuff,
error => console.log(error)
);
}
}
Note: Any application that uses JWT authentication should always be served over HTTPS to prevent malicious interception of the token.

Log the User Out

With stateless authentication using JWTs, logging the user out is just a matter of removing their token from local storage.
// auth.service.ts

...

@Injectable()
export class AuthService {

...

logout() {
localStorage.removeItem('id_token');
}
}
You might be wondering if this is secure or not, given the fact that we're just removing the token from its holding place and it could, in reality, still be used to access the API. We've got two options to address this concern: we can set the token's expiry time to be short and/or we can implement token blacklisting on the server. With a short window of validity, the JWT can't be exploited for very long, and with blacklisting, the token's ability to access secure resources can be revoked altogether.

Full Example: Angular 2 Tour of Secret Heroes

It would be nice to see all of this authentication business in action in a working app. For that, I've put together a fork of John Papa's Tour of Heroes app (used in the Angular 2 Getting Started guide), called Angular 2 Tour of Secret Heroes. In this app, all the original heroes data--plus a set of new 'secret' heroes--has been moved to an Express server. Authentication happens with Auth0, and angular2-jwt is used for protecting routes, conditionally showing UI elements, and sending authenticated HTTP requests.

Wrapping Up

Stateless authentication has distinct advantages over traditional session-based auth. Keeping our APIs stateless makes them more agile and lets us easily port our apps to other platforms like mobile or desktop. With open source libraries, such as angular2-jwt, we can easily check for token validity and send authenticated HTTP requests with just a bit of configuration.
If you're interested in adding authentication to an Angular 1.x app, the things we went through here still apply, but there are a few differences to keep in mind. For instance, Angular 1.x has HTTP interceptors which can be used to attach the Authorization header to requests, so there's no need to wrap the $http service.
For more on Angular 1.x and 2 authentication, as well as tutorials about Angular in general, be sure to check out the Auth0 blog.
Share:

Tuesday, 26 July 2016

Fresh Guides from Victor Savkin

Since the early days of Angular 2, core team member Victor Savkin has posted his personal thoughts on the platform to his own blog. These offer an internal perspective on how someone who builds Angular thinks about its core concepts.


Victor just refreshed his older posts with the latest and greatest from the current release candidate, at a new location on vsavkin.com. He's also added some new posts.


Check out his writing on a variety of Angular topics:


Share: