Showing posts with label AngularJS. Show all posts

Monday, 25 December 2017

Ionic Angular Lazy Loading with Child Components

We have already discussed few articles on Ionic. Latest Ionic 3 came up with lazy loading concepts. Changing Ionic apps to use lazy loading significantly boost up the app performance. This actually improves the app speed, instead of loading everything in root application module file. This allows doing the work in sync with when your users want it to happen. This article explains to you how to modify the existing default Ionic app and apply lazy load concepts like working with providers, shared/child components. It process by loading chunks of code such as child components when it’s requested not when the app is loaded. Use this feature and enrich your application. Watch the video, you understand it better.

Ionic and Angular: Using the Native Camera with Restful Upload.

Read more »
Share:

Sunday, 3 December 2017

Ionic and Angular: Native Camera with Restful Upload.

It is very simple to trigger any camera device and show the resulting output. This has been discussed in my article to take multiple photos with delete action using Ionic and AngularJS. Here is a problem. You can only see the image temporarily, since it has not been stored in any storage. Today’s article will explain to you how to store the captured image in a database, so that you can use it later. I’ll be using RESTful API to achieve this. Look into the demo below and also the code to see how to connect with RESTful API to store any captured image into a database.

Ionic and Angular: Using the Native Camera with Restful Upload.

Read more »
Share:

Monday, 13 November 2017

Ionic and Angular: Infinite Scrolling with RESTful APIs

We have seen series of posts on developing a mobile application using Ionic and AngularJS. One of my previous articles which deal with insertion and deletion of posts using RESTful API. Similarly, today’s post makes use of RESTful API. These days, a single page web applications are most commonly used ones, because of which there is a need to show loads of data on the same page as we keep on scrolling. This infinite scrolling avoids pagination system.

Infinite Scrolling using Ionic and Angular with RESTful APIs

Read more »
Share:

Thursday, 7 September 2017

Angular 4 TypeScript Google Account Email Login and Routing

A few days back, I read an article about Google Authentication. A bug was mentioned in the article, that Google login status can be easily accessed by calling out some images. After reading the article, I got an idea that why don't we use this bug in a positive approach to validate user authentication. This same idea has been implemented in this post to do email validation. I have used Google email login system (not OAuth) using Angular 4 CLI project. Take a look at the live demo ( Make sure to login into your Google account in another tab to do this validation).

Angular 4 TypeScript Google Account Email Login

Read more »
Share:

Monday, 21 August 2017

Ionic 3 and Angular 4: Insert and Delete with Token Based Restful API

This is the continued series of article on developing a mobile app with Ionic and Angular JS. This post deals with updating and deleting any post on the application. This also explains how to show the loading image by making an Ajax call. While deleting a post, it will show an alert message to confirm whether to delete or not. This post is all about this. Hope you all make use of this series of articles on Ionic and Angular to build your own mobile app.

Ionic 3 and Angular 4: Insert and Delete with Token Based Restful API

Read more »
Share:

Tuesday, 8 August 2017

Ionic Split Pane with Login and Logout System.

I received a tutorial request from one of my blog readers to implement Ionic Split Pane with the login system. Ionic has been improving and releasing new desktop layout features. This post is an enhancement to my previous application. SplitPane is the new component introduced in Ionic 2.2.0. This targets to create apps of any screen size like desktops and tablets. With this, it is easy to show a side menu with side-by-side navigation controllers. Let’s see how we do this, and follow the demo below for more details.

Ionic 3 and Angular 4:Login and Signup with PHP Restful API.

Read more »
Share:

Wednesday, 12 July 2017

Ionic 3 and Angular 4: JSON Parsing with Token Based Restful API

We have covered most of the topics in building a mobile application using Ionic 3 and Angular JS 4. Today’s topic is to pull in data for news feed from a server and display it on your website. This is suggestible post since it does proper verification at the backend based on token. All it does is, it will verify system token and user token at the backend and then pulls data using feed API url. I have also added an extra code to the previous post for login authentication with PHP Restful API for showing alert messages. Please do follow the below video and code for your understanding.

Ionic 3 and Angular 4:Login and Signup with PHP Restful API.

Read more »
Share:

Wednesday, 28 June 2017

Ionic 3 and Angular 4: Adding Custom Fonts like Open Sans and Font Awesome.

We all know that Ionic is the useful framework for building HTML 5 mobile applications. It is mainly designed for the front end. When it comes to look and feel of the Ionic website, you have to work more on your application branding standards. Ionic default icons are not up to current market standards. This tutorial is all about how to add custom downloaded fonts like open sans and font awesome for icons into the Ionic application. Let’s see how you use customized fonts in your Ionic website.

Ionic 3 and Angular 4:Create a Welcome Page with Login and Logout.

Read more »
Share:

Thursday, 22 June 2017

Ionic 3 and Angular 4: PHP Restful API User Authentication for Login and Signup.

Here is the continued article on my previous post for creating a welcome page with login and logout. Today’s post explains how to implement login authentication system for your AngularJS applications. It will show you how to log in with a user and store the user session, so it deals with token based authentication. Since we are using token based authentication, it protects if any unauthorized request is made and notices for a new login if required. This makes your application’s authentication to be more secured compared with any other authentication system. Every user details will be stored in an external database and a PHP based API is used in the backend for handling this authentication. Hope you’ll find it more easily using this as your authentication system in your AngularJS projects. Let’s look into the live demo and follow the below code.

Ionic 3 and Angular 4:Login and Signup with PHP Restful API.

Read more »
Share:

Monday, 12 June 2017

Ionic 3 and Angular 4:Create a Welcome Page with Login and Logout.

Most of the mobile applications starts with welcome page with login and signup buttons. A proper login or signup redirects to application home page and there you can navigate to different pages and finally you can end up with a logout action. Today’s tutorial is all about this. Here I am using AngularJS 4 and Ionic 3. The combination of AngularJS and Ionic in handling login is a straight forward process. This design is already explained in my previous posts using ReactJS navigations. Lets see how to set a starting page using Ionic 3 and AngularJS4 and learn basic understanding of how the navigation works.

Ionic 3 and Angular 4:Create a Welcome Page with Login and Logout.

Read more »
Share:

Wednesday, 19 April 2017

Ionic 3 and Angular 4: Working with Signature Pad.

This tutorial explains how to upgrade to Ionic 3 and Angular 4 and how to use signature pad for your application. If you are working with some agreement related project or something which needs some written proof from the customers, we might in need of a signature pad. The combination of Ionic 3 and Angular 4 provides some better features to achieve signature pad. This will allow you to sign/draw something on the application and save that image as data on the screen. Using this tutorial, you can also make a signature pad with Ionic 2 and Angular 3. Why late? Let’s start this small, but most commonly used task in your application.

Ionic 2 and Angular 2: Using the Native Camera

Read more »
Share:

Thursday, 6 April 2017

Ionic 3 and Angular 2: Using the Native Camera, Take Multiple Photos with Delete Action.

Are you searching for easy camera access for taking multiple pictures in your mobile application? Then here is the post explaining on how to access camera and take pictures. In most recent days, this is achieved easily with the combination of Ionic framework and AngularJS. We have already discussed in my previous article, how easy it is to use pre-built it in components of Ionic with AngularJS and build awesome mobile apps. Today’s article explains Cordova plugin provided by Ionic framework to access camera , take picture and see the output. The most exciting thing about this article is, it explains you to upload multiple images you take in camera. Let’s follow the article and also the video tutorial on this.

Ionic 2 and Angular 2: Using the Native Camera

Read more »
Share:

Tuesday, 28 February 2017

Angular Firebase Facebook, Google, Github and Twitter Login - Part 2

This article is the continuation of previous post Create an Angular 2 CLI App with Firebase Social Authentication. This post further explains the authentication feature for your Angular CLI application using Firebase. AngularFire is the library used for this. In addition to this, we require some Angular providers called sign-in providers to use Firebase Authentication feature. This article explains Facebook, Google and Twitter authentication to log in with our users. Follow the demo and article to install and setup AngularFire library and build your angular web application with an easy and perfect login authentication. Also, the article explains how to redirect to home page from other pages and vice-versa.

Create RESTful API NodeJS Mysql

Read more »
Share:

Monday, 27 February 2017

Create an Angular 2 CLI App with Firebase Social Authentication Facebook, Google, Github and Twitter

There is a lot of fun in building an AngularJS application and after you finish the application, for others to see your application you will need to deploy the project on some web server such as NodeJS, Amazon AWS, Heroku,etc,. But, this requires a long procedure for the deployment and sometimes it can even be expensive. Google provides free Firebase for deploying AngularJS projects. Firebase Hosting provides fast and secure static hosting for your web app. This Hosting also provides social login authentication and gives your project a subdomain for deploying. for Facebook, Google and Twitter.

Create RESTful API NodeJS Mysql

Read more »
Share:

Friday, 27 January 2017

Branding Guidelines for Angular and AngularJS

Angular
In September of last year we made several big announcements. We released version 2.0.0 of Angular and that we were adopting Semantic Versioning, meaning that developers will see version number increases in a planned and careful manner. As a result of these announcements, you’ve seen us using the term Angular to refer to all versions of the framework after 2.0.0.


We’ve had a great response from Developers about this. Bloggers and authors and discussions boards can in most contexts drop the version number from discussions of Angular, because the tutorials, tips, tricks, and content that works in version 2 will work in version 4, and likely beyond. This allows those discussing Angular to talk about the framework without becoming prematurely dated each time there’s a version bump.


Here’s an example tutorial you could write:


Correct
Angular Router Guide - Learn about how to use the Router in Angular as the basis for page animations, analytics tracking, and how to fetch parameters and data reactively from the router.
Incorrect
Angular 2 Router Guide - Learn about how to use the Angular 2 Router as the basis for page animations, analytics tracking, and how to fetch parameters and data reactively from the router.

Reasoning
By not using “Angular 2” in the title, the content still feels applicable and useful after version 4, 5, 6, 7, etc have been released, as the syntax is unlikely to change.


AngularJS
Our announcements around “It’s just Angular" were the first step in bringing consistency into the naming of the platform and the ecosystem. Our recommendation last month was to use Angular 1 for all 1.x versions of the framework and Angular for all the subsequent versions (unless a version was required for clarification in a given context). We heard from the community that because AngularJS has been used for for so long, it would be too hard and confusing to "rewrite history" across the web and the physical world.


We agree with this and we have accepted the suggestions many of you have brought up to return to our roots with the name AngularJS for any 1.x release, and Angular for any 2+ release. Our goal is to bring as much consistency as possible especially going forward, while reducing the maintenance burden caused by past branding inconsistencies.


These new guidelines match what already exists in a number of ways. If you are looking for a book on version 1.x, you’ll probably find it with the name AngularJS. And as more content is written consistently using these guidelines, it should become easier to search for what you are looking for.


What about Angular Material?
Angular Material is a project led by Google to build a great reusable component library for Angular Developers. The Material project takes Google’s design principles, and boils them down into components you can add your projects. We are continuing to invest in Material as a great choice for developers working with either Angular or AngularJS. To match the name guidelines, we’re clarifying the naming of the projects to “Angular Material” and “AngularJS Material”.


Brand Guidelines
For the full guidelines, check out our Press Kit.

We've been propagating these standards across all of our projects over the last week or so, but there's more work to be done. You can help by using these names to build consistency across the ecosystem! Here are some handy regular expressions if you'd like to help us fix the branding in your projects!
s/angular (1\.\d)/AngularJS $1/ig
s/angular 1\.x/AngularJS/ig
s/angular 1/AngularJS/ig
s/angular1/AngularJS/ig
s/angular 2\.0/Angular/ig
s/angular 2/Angular/ig
s/angular 2\.x/Angular/ig
s/angular2/Angular/ig

Share:

Tuesday, 17 January 2017

Ionic 2 Mobile App using Angular 2 and TypeScript Tutorial

Ionic is an open-source front-end SDK framework made for building hybrid mobile apps on cross platforms. Ionic is used for developing hybrid mobile apps using web technologies like HTML 5, CSS, Cordova and Sass, it is made of AngularJS 2. Both ionic and AngularJS provides some pre- built in components, which allows us to easily develop mobile apps. Here is the demo for creating mobile app using AngularJS and typescript on ionic V2 framework. The demo used here is my 9lessons.info blog as a mobile app. Follow this tutorial to easily build mobile app.

Ionic Angular 2 typscript tutorial

Read more »
Share:

Sunday, 31 July 2016

Angular JS Facebook Wall System with Multiple Bindings Tutorial

Today, I am here to introduce a new Advanced Javascript series in 9Lessons.info. Basically, I love wall system because we can cover multiple operations or features in a single web page. 9Lessons.info is most popular for its articles designed on wall system. This article is based on this wall system concept using Angular js 1.4. Future posts will be on the same concept where I will be introducing ReactJS and AngularJS 2 to 9Lessons.info. Below is the demo and hope you all enjoy this new series

Ad Blocker Detector for Blogger with JavaScript

Read more »
Share:

Saturday, 17 October 2015

Simple CRUD operation using MEAN stack

In this post I am going to cover a very basic CRUD operations using MEAN (MongoDB, Express, Angular and NodeJS) stack. You can use this example to kick start your project using MEAN stack.

Meanstack-624x250.jpg

Before I begin, I am assuming that the reader of this post has basic understanding of AngularJS, MongoDB, NodeJS, jQuery and other client side technologies like jQuery, HTML 5, CSS 3, etc.

Most of the commands, environment I have used is for Windows operating system, but there’s not much difference if you are using MacOS or Linux operating system, and moreover all the technologies used in this example are platform independent.

1. Setup the environment

Follow the URL in their respective sites to get detailed information on download and installation instructions. You can get the installers of all the OS which is supported by these framework and their installation instructions in these links.

2. Setup Solution

Solution Structure: In this example I am using a person database and the only function of this application would be to Create-Read-Update-Delete a person record. To achieve this I have created a simple solution structure, using the following structure.

image

Here I am using app folder for most of my application code, this folder contains angular controller, service and views. I am keeping my node modules very simple just to expose API’s which will be consumed by AngularJS services. I have covered most of the server side node modules in just one file called server.js  I will try to cover specially more complex node module/architecture in my next post.

3. Downloading, Installation and configuration of Dependencies

Download and installation instructions: For this example my application is using following node-modules, to install these modules I am using node package manager using GitBash.

  • body-parser: It’s a node.js body parsing middleware, for simple application, for mode detail please refer, https://github.com/expressjs/body-parser
    • Installation: $ npm install body-parser
  • express: Express is a minimal and flexible Node.js web application framework that provides a robust set of features for web and mobile applications (Reference: http://expressjs.com/). I am using express in my middleware to create node.js server and API’s
    • Installation: $ npm install express
  • mongojs : A node.js module for mongodb, that emulates the official mongodb API as much as possible. It wraps mongodb-core and is available through npm (Reference: https://github.com/mafintosh/mongojs).
    • Installation: $ npm install mongojs
  • angular-loading-bar : I am using this for my client side for displaying progress bar. Interesting thing is due to the fast performance of my application I never get to see this in action.
    • Installation: $ npm install angular-loading-bar
Configuration: of AngularJS client application

4. Setup Middleware

I am using my node.js for middleware, to setup my middleware first I have created my server in node.js

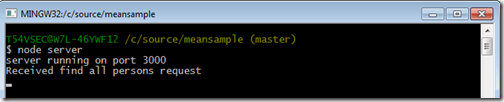
Here in line 1 and 2 above I have imported express module and created a instance of express, and in line 3 I have used listen function of express to create new server on port 3000. With this example my server is listening on port 3000. When I run this in GitBash I will get the following message.

image

I still need to add few more modules to my server.js which will help the application to connect to my mongodb server, configure the application working directories. But before I do that let me first start creating GET/POST/PUT and DELETE API’s in server.js which can communicate with my Client module in AngularJS

4. Create GET/POST/PUT and DELETE server API’s

In the above code I have create a blueprint of my middleware in server.js

Node JS API Controller Description

/persons

Get All Persons
/person/:id Get single person by person Id
/addPerson Add new person
/deletePerson/:id Delete single person by id
/updatePerson Update single person

in the first few lines of my code I have created the instances of express and configure my application to use my root directory of the application as a working folder. Now lets run the server and check the output in web  browser.

In this example I have created stubs for Get by Id, GetAll, Update, and Delete person request. To test the code start the node server, though initially you can see the same output what I have provided earlier. But when you enter the URL’s in the browser with the URL’s on which I have created my API’s you can see the outputs in the console.

I have provided example of GET requests. I will write Angular modules to test POST/PUT and DELETE API’s

GET All (localhost/persons)

image

image

image

GET By ID (localhost/person/1)

image

5. Configure Angular JS Client

I am using simple MVC model in AngularJS Client, but you can fork or clone my Git repository to extend this solution. This example assume that you have basic understanding of Angular JS. To start with lets create a simple router which redirects my application to the home page of my person page.

Angular JS Routing

Here in the example above, I have mapped the paths /person and /person/:PersonId with the PersonCtrl and PersonAddressCtrl  controller respectively and corresponding view as app/views/person.html and app/views/persondetail.html views respectively. Which means when I hit the URL: http://localhost:3000/person, this will go to the person.html and mapped to the PersonCtrl.js controller and when I hit a single person using URL: http://localhost:3000/person/1 out of the list using personId my routing engine will redirect the users to persondetail.html using PersonAddressCtrl.js

Angular Controllers – PersonCtrl

onError : This is going to be my common error module, this action method is used only for the purpose of displaying the error when something goes wrong during the whole communicate process wither at the server level or at the client level.

refresh : This will be my default get all person action method, which is used to load all the person data from mongodb database via nodejs. Here in this code I am calling the corresponding API ‘/persons’ which is created in nodejs and express to populate all the persons from mongodb. Once the data is returned from mongodb I have created a callback function onPersonGetCompleted event, which is used to populate the person data in the scope of the current module. refresh() is called as soon as person.html my default page is loaded in the application or every time we need to refresh my data from mongodb.

searchPerson : This action method will be called when I want to view a single person based on person id, for example during opening the update form for the selected person. This method is associated with the callback function onGetByIdCompleted, which populates the scope with a single person result from mongodb.

addPerson : As name suggest, this action method is used to add a new person, and the associated call back function to this is onAddPersonCompleted, which refresh the data once add is completed to reflect the uptodate information on the Person default page.

deletePerson : As the name suggest, only purpose of this action method is used to delete the selected person. This calls '/deletePerson/:id' API of nodejs and once the call returns it uses its callback function onPersonDeleteCompleted to refresh the update data in the HTML page person.html

updatePerson : This action updates the person information in mongodb. This calls the ‘/updatePerson’ API in nodejs. Once the update completed, it calls the callback function onUpdatePersonCompleted action in Angular to refresh the updated data in the Person page.

Let's put everything together to see my completed PersonCtrl.js, next I am going to show how this is going to integrate with the View and the final step will be to write the body of my API controller which will be used to transact with mongodb.

5. Completing the NodeJS express API Controller

Now lets revisit the API controller, the skleton of which I had created in the Step 4 above. Here I am going to write the body of my GET/POST/PUT and DELETE methods which will be used to transact with mongodb document database. In the chart below I have shown the NodeJS express API and corrosponding mongodb API against that which will be called to complete the transactions.

Action NodeJS Express API MongoDB API
Get All Persons /persons db.Persons.find()
Get Person by Id /person/:id db.Persons.findOne()
Add new Person /addPerson db.Persons.insert()
Delete Person by Id /deletePerson/:id db.Persons.remove()
Update single Person /updatePerson db.Persons.findAndModify()

If you want to extend your knowledge beyond the list provided above, then I would suggest you to look into the very detailed and excellent documentation provided by MongoDB : http://docs.mongodb.org/manual/applications/crud/

Now lets look into the completed API of my nodejs, Here in line #4, AddressBook is mu collection name which is equivalent to the tables in RDBMS and Person is the document. If you are still confused with the document and collection and other jargons of MongoDB then probably you can look into the link: http://docs.mongodb.org/manual/reference/glossary/, this covers all the mogodb glossary.

I have also introduced body-parser here, which is used to parse the request and response in json format.

And again, for an extensive explanation of each of the operations I have used in this example below you can refer the MongoDB documentation: http://docs.mongodb.org/manual/applications/crud/

This is the least code you can write to implement the CRUD operation using mongodb and node, but the possibilities are limitless you you want to extend this example. Some of the things which you can do with very little effort if you want to make this solution more structure and object oriented are:

1. Use the application generator tool, express, to quickly create an application skeleton. http://expressjs.com/starter/generator.html

2. Use ORM/ODM tools like mongoose. Mongoose provides a straight-forward, schema-based solution to model your application data. It includes built-in type casting, validation, query building, business logic hooks and more, out of the box.

3. Use routing in Server side, though I have used routing in my client side but you can also use routing in middleware to keep more control of your code. You can learn more on these topics @ http://expressjs.com/starter/basic-routing.html OR http://expressjs.com/guide/routing.html

This is just few of options which can be done with very little effort but the possibilities are unlimited. You can fork or clone my example to extend it up to your capacity for learning purpose.

Now lets get back to the pending items which will wind up my post by creating Views

6. Angular JS and HTML Views

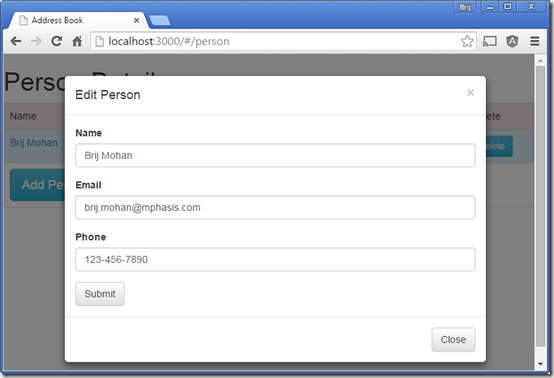
I am going to create a Dashborad which will display all the persons I have in my mongodb database in AddressBook collection. I have provided below the screenshot to show you how the completed code will look like. Here I have used AngularJS bindings for model binding and CSS3 and HTML5 to make my page look little descent.On click of Edit I am going to edit the person using a Model popup with pre-populated person data and similarly I am going to have a model popup for Add Person with empty controls which will allow the user to add a new person record and delete is simply going to remove the record from the mongodb. My example is designed to take you to the persondetail.html page which will have more details of the person, like person address but for the simplicity sake I have not implemented that in this example.

image

image

Now to achieve this I will need only few pages, which are listed below

index.html : This page is going to have only the references to the controller, angularjs, bootstrap and other client side libraries. This page also have a

<div data-ng-view="data-ng-view"></div>

This acts as a place holder for displaying the views injected by angularjs routing engine.

person.html

This is the home page or default page in my application. Screenshots of this page is provided above. The purpose of this page is to list all the persons in the mongodb database, add, edit and delete the persons from mongodb.

I have used a very loosely defined model called person for my model and this is going to be saved in mongodb directly without any further transformation. My view is binded with persons model in the $scope through the PersonCtrl. Once the model is populated I have used ng-repeat to display all the persons in the table. In line #17, I have called the searchPerson with personId in PersonCtrl to get selected person to edit from mongodb. Here data-toggle and data-target is used to tell the Edit button to display the #personEditModal is clicked. And for delete in line #18 I have called deletePerson action in PersonCtrl, this in turn calls the NodeJs API for delete and remove the person from mongodb database.

And for Add and Edit modal popup, I have a very basic design, refer the screenshot above. I have provided below the example of edit person, only difference of edit and add person is the display captions/headings and on click of save button, Edit calls the updatePerson(person) action in PersonCtrl and in add person modal this calls the addPerson(person) action in PersonCtrl.

So with these code I have completed end to end data bindings, client side API using angular, server side API using nodejs and express and you might have noticed I have not done much like schema creation in mongodb data as mongodb is schema less document oriented database. So the same JSON which I have used to communicate between the different layers are stored directly into the mongodb database. But again this is just the start, the things I have not covered in mongodb is relation data example like person and person address documents and how they can be associated with each other using references, complex model bindings, etc. You can Clone, Form or download this example from my git repository @ https://github.com/bmdayal/MEANSample

References and Other helpful links

Share:

Monday, 16 September 2013

AngularJS Tutorial Two Way Data Binding

This post is the continuation of my previous AngularJS tutorial, I had explained JSON parsing using AngularJS. In this we are going to explain how to do two way data binding with Angular JS. Data binding is the most useful feature in AngularJS, It will help you to save from writing a lots of regular code.

AngularJS Tutorial.

Read more »
Share:

Monday, 19 August 2013

AngularJS Tutorial RESTful JSON Parsing

Last some days I have been working with AngularJS, it is a Javascript MVC framework created by Google. Now Angular.js is my personal favorite framework to build better architecture web projects, especially for RESTful web services. It improves HTML with new attributes and expressions in order to define powerful templates directly in your HTML page.

AngularJS Tutorial.

Read more »
Share: