This Post is continuation to my Previous Post where I have created a ASP.NET Web Api Service, In this Post I am going to create a simple client using jQuery, MVC 4 and Razor View Engine to call the Services and perform POST, DETELE, PUT and of course GET operations using the Web Api Service.
To get the Service details which I am going to consume in this article, you can refer to the Part 1 of this post : CRUD operation using ASP.NET Web Api and MVC 4 – Part 1
Lets just directly get into my client code, as discussed in Part 1 of this post, on how to create a Web Api Project you can follow the same steps here,
OR alternatively you can use any existing application not necessarily on MVC 4, it can be any web application which supports jQuery version 1.6.2 or later. Now lets start one by one
1. Get (Get All Records, GET)
In this function I have given a sample which gets all the records present in my Database using code first approach of entity framework, jQuery and ASP.NET Web Api Services. I have used two approach here, one using getJson function of jQuery and the other using ajax function.
1: function GetCustomersAJAX() { 2: $.ajax({ 3: url: "/api/values/",
4: type: "GET",
5: contentType: "application/json;charset=utf-8",
6: success: function(data)
7: { 8: //declare a varialbe which holds html string to be appnended to create a table structure from returned data
9: var strHTML = "<table width='50%' style='border-width:thin;font-family:Verdana;font-size:small;border-collapse:collapse' border='1'>";
10: strHTML += "<tr><th>Contact ID</th><th>First Name</th><th>Middle Name</th><th>Last Name</th><th>Email Address</th></tr>";
11: //iterate over every object returened using each function
12: $.each(data, function (key, val) { 13: //Form a html row string based on the returned Json object
14: strHTML += "<tr>";
15: strHTML += "<td width='20%' style='border:1 solid gray;'>" + val.ContactId + "</td>";
16: strHTML += "<td width='20%' style='border:1 solid gray;'>" + val.FirstName + "</td>";
17: strHTML += "<td width='20%' style='border:1 solid gray;'>" + val.MiddleName + "</td>";
18: strHTML += "<td width='20%' style='border:1 solid gray;'>" + val.LastName + "</td>";
19: strHTML += "<td width='20%' style='border:1 solid gray;'>" + val.EmailAddress + "</td>";
20: strHTML += "</tr>";
21: });
22: $('#contacts').append(strHTML); 23: },
24: statusCode: { 25: 200: function () { 26: alert("All Contact Displayed successfully using AJAX"); 27: }
28: }
29: });
30: };
The function above calls the api url “api/values” without any input parameters using AJAX, and the same call using JSON is as below
1: function GetCustomersJSON() { 2: $.getJSON("/api/values", function (data) { 3: //declare a varialbe which holds html string to be appnended to create a table structure from returned data
4: var strHTML = "<table width='50%' style='border-width:thin;font-family:Verdana;font-size:small;border-collapse:collapse' border='1'>";
5: strHTML += "<tr><th>Contact ID</th><th>First Name</th><th>Middle Name</th><th>Last Name</th><th>Email Address</th></tr>";
6: //iterate over every object returened using each function
7: $.each(data, function (key, val) { 8: //Form a html row string based on the returned Json object
9: strHTML += "<tr>";
10: strHTML += "<td width='20%' style='border:1 solid gray;'>" + val.ContactId + "</td>";
11: strHTML += "<td width='20%' style='border:1 solid gray;'>" + val.FirstName + "</td>";
12: strHTML += "<td width='20%' style='border:1 solid gray;'>" + val.MiddleName + "</td>";
13: strHTML += "<td width='20%' style='border:1 solid gray;'>" + val.LastName + "</td>";
14: strHTML += "<td width='20%' style='border:1 solid gray;'>" + val.EmailAddress + "</td>";
15: strHTML += "</tr>";
16: });
17: //append html table to div
18: $('#contacts').append(strHTML); 19: });
20: }
Both my function above gives the list of all the contacts I have in my DB and wraps the results in a HTML Tables using $each method of jQuery. Just for a quick reference here I am giving below the Get method which maps to the url “api/values”
1: // GET /api/values
2: [HttpGet]
3: public IEnumerable<ContactDetail> Get()
4: { 5: return repository.GetAll();
6: }
And the corresponding repository method is as below:
1: ContactEntities context = new ContactEntities();
2:
3: /// <summary>
4: /// Gets All Contact
5: /// </summary>
6: /// <returns>All Contact Details</returns>
7: public IEnumerable<ContactDetail> GetAll()
8: { 9: return context.ContactDetails;
10: }
When I run my application and press the Get All Button either Ajax or Json, I will get the following result.
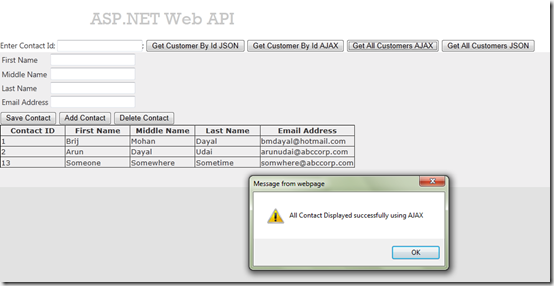
Now let me run my Developer toolbar using F12 key of IE 9 to show you the result in raw data format using Ajax and Json.

This is giving me the the Http result as 200, which means Get request is Successful, which exactly I am checking in the jQuery ajax code using the statusCode: 200, and displaying the Success message. Similarly for other results we can either return from my controller as 404 not found and handle it here to display appropriate message.

Now lets dig more into this request, by clicking into go to detailed view of developer toolbar and see the response body, this gave me the following Text output, this will be same for both JSON and AJAX.
[{"ContactId":1,"EmailAddress":"bmdayal@hotmail.com ","FirstName":"Brij ","LastName":"Dayal ","MiddleName":"Mohan "},{"ContactId":2,"EmailAddress":"arunudai@abccorp.com","FirstName":"Arun ","LastName":"Udai ","MiddleName":"Dayal "},{"ContactId":13,"EmailAddress":"somwhere@abccorp.com","FirstName":"Someone ","LastName":"Sometime ","MiddleName":"Somewhere "}]2. Get (Get By Id, GET)
Now let me take you to my next Get request which is get by Id, this will take id as a parameter and returns me the specific contact:
1: function GetCustomersByIdAJAX() { 2: //declare a varialbe which holds html string to be appnended to create a table structure from returned data
3: $.ajax({ 4: url: "/api/values/" + $("#ContactId").val(), 5: type: "GET",
6: contentType: "application/json;charset=utf-8",
7: success: function(data)
8: { 9: if (data != null) { 10: $("#ContactFName").val(data.FirstName); 11: $("#ContactMName").val(data.MiddleName); 12: $("#ContactLName").val(data.LastName); 13: $("#ContactEmail").val(data.EmailAddress); 14: }
15: else { 16: alert("Customer does not exists"); 17: ResetForm();
18: }
19: },
20: statusCode: { 21: //Web API Post method returns status code as 201
22: 200: function () { 23: $('#errMsg').html(''); 24: //alert("Contact Displayed successfully using AJAX"); 25: //GetCustomersById();
26: },
27: 400: function (jqXHR, textStatus, err)
28: { 29: $('#errMsg').html('Error: ' + err); 30: },
31: 404: function (jqXHR, textStatus, err)
32: { 33: $('#errMsg').html('Error: ' + err); 34: }
35: }
36: });
37: }
And the same code using Json is as follows
1: function GetCustomersByIdJSON() { 2: //declare a varialbe which holds html string to be appnended to create a table structure from returned data
3: $.getJSON("api/values/" + $("#ContactId").val(), 4: function (data) { 5: if (data != null) { 6: $("#ContactFName").val(data.FirstName); 7: $("#ContactMName").val(data.MiddleName); 8: $("#ContactLName").val(data.LastName); 9: $("#ContactEmail").val(data.EmailAddress); 10: $('#errMsg').html(''); 11: }
12: else { 13: alert("Customer does not exists"); 14: ResetForm();
15: }
16: })
17: .fail(
18: function (jqXHR, textStatus, err)
19: { 20: $('#errMsg').html('Error: ' + err); 21: });
22:
23: return false;
24: }
In the code above for AJAX I have handled the different error codes aka Not Found, Bad Request or Success using their error codes, to elaborate more on this let me first give here the code for controller
1: // GET /api/values/5
2: [HttpGet]
3: public ContactDetail Get(int id)
4: { 5: ContactDetail contact = repository.GetById(id);
6: if (contact == null)
7: throw new HttpResponseException(HttpStatusCode.NotFound);
8: return contact;
9: }
So now you can see above few things, first of all my Contact Id should be integer, if this this not integer then I will get HttpResponseException as BadRequest (400), and if the Contact Id does not exists then I am explicitly throwing the Not Found Exception (404) and if everything is success the system is giving me Success response (200), which I am handling in my jQuery as below

Now when I run my application I will get the following result:
For Success Result (200)

For Bad Request (400):

And finally for Not Found (404)
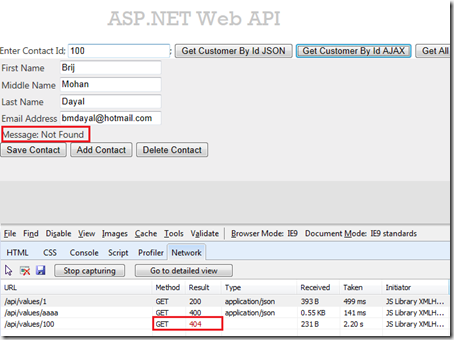
These are just few examples, you can have as many as possible depending upon your requirements. The code of the repository is given below I hope this code is self explanatory,
1: /// <summary>
2: /// Get Contact by Contact ID
3: /// </summary>
4: /// <param name="contactId">Contact Id</param>
5: /// <returns>Contact Detail</returns>
6: public ContactDetail GetById(int contactId)
7: { 8: IQueryable<ContactDetail> customers = context.ContactDetails.Where(a => a.ContactId == contactId);
9: return customers.FirstOrDefault();
10: }
So with these codes above I have covered the GET, now lets move on to PUT, POST and DELETE of Web Api. defined as Update, Add and Delete in my example.
3. Update (PUT)
In this method I have created a simple form where I can search for a contact as I have given in my example above, displaying the values in the HTML text boxes, updating those values and finally I am saving those updated values back to my Database.
Her let me start in reverse direction, I am first giving my repository code and then controller and then I will show how I am updating those values using jQuery.
1: /// <summary>
2: /// Updates Existing Contact
3: /// </summary>
4: /// <param name="contact">Contact</param>
5: /// <returns>result</returns>
6: public int Update(ContactDetail contact)
7: { 8: ContactDetail updateContact = context.ContactDetails.FirstOrDefault(c => c.ContactId == contact.ContactId);
9: updateContact.FirstName = contact.FirstName.Trim();
10: updateContact.MiddleName = contact.MiddleName.Trim();
11: updateContact.LastName = contact.LastName.Trim();
12: updateContact.EmailAddress = contact.EmailAddress.Trim();
13:
14: return context.SaveChanges();
15: }
My repository codes are very simple I am just taking the updated contact from the controller, searching the same in the context of Entity model, and finally calling SaveChanges.
1: // PUT /api/values
2: [HttpPut]
3: public void PutContact(ContactDetail contact)
4: { 5: if (repository.Update(contact)==0)
6: { 7: throw new HttpResponseException(HttpStatusCode.NotFound);
8: }
9: }
Controller codes is also just taking the value from the HttpRequestContext and just passing the values to the repository, now lets get into my view code where I am taking the values from the Html Controls, creating the Json object and using Ajax I am passing the contact object to the controller.
1: function UpdateContact() { 2: //create a Json object based on data entered by user
3: var newContact = { 4: ContactID: $("#ContactId").val(), 5: FirstName: $("#ContactFName").val(), 6: MiddleName: $("#ContactMName").val(), 7: LastName: $("#ContactLName").val(), 8: EmailAddress: $("#ContactEmail").val(), 9: };
10: //call jQuery Ajax method which calls Json.stringify method to convert
11: //the Json object into string and send it with post method
12: $.ajax({ 13: url: "/api/values/",
14: data: JSON.stringify(newContact),
15: type: "PUT",
16: contentType: "application/json;charset=utf-8",
17: statusCode: { 18: //Web API Post method returns status code as 201
19: 200: function () { 20: alert("Employee Updated successfully"); 21: //GetCustomersById();
22: }
23: }
24: });
25: return false;
26: }
In the above example once I created the contact object in JSON, I am using the Json.stringyfy method to convert the object to string format, which can be passed to the controller. Now lets see this in action, in the developer toolbar you can see my both the results are showing 200, one is used for GET and other for PUT,

Now lets get deeper into the request and response. Here you can see my Request body has the updated values, which is passed as a string to the Action method Update, which in turn calls the repository and update my contact Database.

4. Add (POST)
As the name indicates this method is used to Add a new record to the Database, my Add method is very much similar to the Update method only difference is instead of calling the HttpPut this is using HttpPost, and in repository I have to add a new contact object to the entity context and save the changes.
1: function AddContact() { 2: //create a Json object based on data entered by user
3: var newContact = { 4: ContactID: $("#ContactId").val(), 5: FirstName: $("#ContactFName").val(), 6: MiddleName: $("#ContactMName").val(), 7: LastName: $("#ContactLName").val(), 8: EmailAddress: $("#ContactEmail").val(), 9: };
10: //call jQuery Ajax method which calls Json.stringify method to convert
11: //the Json object into string and send it with post method
12: $.ajax({ 13: url: "/api/values/",
14: data: JSON.stringify(newContact),
15: type: "POST",
16: contentType: "application/json;charset=utf-8",
17: statusCode: { 18: //Web API Post method returns status code as 201
19: 200: function () { 20: alert("Employee Added successfully"); 21: //GetCustomersById();
22: }
23: }
24: });
25: return false;
26: }
You can see my jQuery code, this is same as what I have used for update, only difference is instead of using the PUT I am using POST
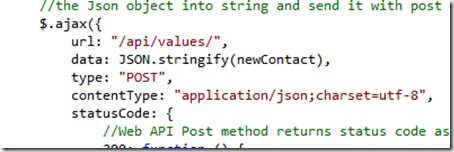
and this will call the action method which is listening to HttpPost.
1: // POST /api/values
2: [HttpPost]
3: public void PostContact(ContactDetail contact)
4: { 5: repository.Add(contact);
6: }
and my repository method is taking the contact object and saving this to the Database
1: /// <summary>
2: /// Adds New Contact
3: /// </summary>
4: /// <param name="contact">Contact</param>
5: public ContactDetail Add(ContactDetail contact)
6: { 7: var addedContact = context.ContactDetails.Add(contact);
8: context.SaveChanges();
9:
10: return addedContact;
11: }
Now lets see this in action.

the last result returned in the Dev Toolbar shows the result as 200, and the method as POST, which means addition successful, if you check the detailed view this will give you the request body which is very much similar to what we have in update method.
5. Delete (DELETE)
And last but not the least, lets clean up my unwanted records using the delete method. this method is simplest of all, where I just pass the contact id the action method, which uses the repository method to delete the contacts.

Table above is showing all my contacts present in the database, I will try to delete the contact id 16.

In the Dev Toolbar you can see my Method is showing DETELE and Result is 200, which means Delete Success.
With all the examples above I just tried to demonstrate a basic CRUD operations using jQuery and ASP.NET Web Api.
To explore more into this topic you can always refer to the http://www.asp.net link: http://www.asp.net/mvc/mvc4
In the same link you can download the MVC4 beta, and explore the other features of MVC 4, tutorials, samples, Videos, etc
You can download the complete code I have used for this example from here: https://docs.google.com/open?id=0BzIjFd_Ps-MSUm4zMklvYkxUMXlFZzdOWVBsaHJvQQ
Sample code includes both Part 1 and Part 2 of this post.
In my next post I have shown how you can publish and host your application on Windows Azure Platform: Hosting ASP.NET Web Api on Windows Azure Platform


