Today I am going to show you the basic CRUD operation using ASP.NET MVC 4 and Ignite UI Grid. The best feature of this Grid is it allows you to code in various ways depending on the language you are comfortable with, like if you are more comfortable in coding using MVC you can go for it, if you want to code in pure jQuery you can go for that too, with complete support of all the Browsers, Platform and devices.
For this demo I have chosen Web Application using HTML5 + jQuery in an MVC 4 application. To start first you can download the IgniteUI Grid package from here. And follow the steps below:
1. Setup the Environment.
Once you downloaded the installer un-package the ZIP File (IgniteUI_20122_WithSamplesAndHelp.zip) -> Go to Setup folder –> and install the IngniteUI_20122.msi in your system.
Once you complete the installations, go the folder where you have installed the IgniteUI and copy the ‘css’ and ‘js’ folder from your installer location to your application root folder.


Now include this files in your Visual Studio .NET Solution folder.

Once you perform all these steps, your solution is almost ready for the coding Ignite UI controls using jQuery and HTML 5.
Add the following JavaScript and CSS references are recommended in this order:

Alternatively instead of loading the jQuery libraries from CDN you can load the libraries from your local resources and Infragistics loader can be used to load only necessary resources for your Infragistics scripts. In my example I have kept the script references as below, make sure to keep the Infragistics loader script in the same order otherwise you may get runtime script error.

To request necessary resources, which include CSS and JavaScript files the following code may be used, note that; the asterisk at the end of igGrid is used to specify to load all the resource which starts with igGrid and required to perform the Infragistics Grid operations.

This completes the initial environment setup for the Infragistics igGrid controls using jQuery and HTML 5.
2. Setup the Model
Now the next step will be to implement the model and business logic, for the purpose of this demo I have kept this simple and used igGrid instead of using Hierarchical data using igHierarchicalGrid. I have used SQL Database as Datastore with EF 5 using Repository pattern and MVC 4 for CRUD operations. The focus of my article is to cover the features of igGrid and how to implement this control, so I am going to give you a very high level overview of the Data Model and the Patterns which are used in this example. In the model diagram below for this example I have used only the employee table. The address table can be used if you are considering to display the hierarchical data.

3. Setup the Repository Code
1: /// <summary>
2: /// Get All Employees
3: /// </summary>
4: /// <returns>Employee Collection</returns>
5: public IEnumerable<Employee> GetAll()
6: { 7: context.Configuration.ProxyCreationEnabled = false;
8: return context.Employees.Include("Addresses"); 9: }
10:
11: /// <summary>
12: /// Get Employee By Id
13: /// </summary>
14: /// <param name="employeeId">Employee Id</param>
15: /// <returns>Employee</returns>
16: public Employee GetById(int employeeId)
17: { 18: return context.Employees
19: .Where(a => a.EmployeeId == employeeId).FirstOrDefault();
20: }
21:
22: /// <summary>
23: /// Add/Update Employee
24: /// </summary>
25: /// <param name="employee">Employee to Add or Update</param>
26: /// <returns>Success or Failed</returns>
27: public int Update(Employee employee)
28: { 29: if (employee.EmployeeId == 0)
30: { 31: context.Employees.Add(employee);
32: }
33: else
34: { 35: var result = context.Employees
36: .Where(a => a.EmployeeId == employee.EmployeeId).FirstOrDefault();
37: if (result != null)
38: { 39: context.Entry(result).CurrentValues.SetValues(employee);
40: }
41: }
42: return context.SaveChanges();
43: }
44:
45: /// <summary>
46: /// Deletes an Employee
47: /// </summary>
48: /// <param name="employeeId">Employee Id of the employee to be deleted</param>
49: /// <returns>Success or Failed</returns>
50: public int Delete(int employeeId)
51: { 52: var result = context.Employees
53: .Where(a => a.EmployeeId == employeeId).FirstOrDefault();
54: context.Employees.Remove(result);
55: return context.SaveChanges();
56: }
The repository layer consists of the following methods:
GetAll :- Get all the employee to display in the Grid control, this methods returns collection of employees
GetById :- Get Employee by Employee Id, this method returns a single Employee entity.
Update :- Add or Update the employee one at a time.
Delete :- To delete the employee by employee Id
Below are the business entities, to keep simple I have modified the code generated by Entity Framework and bound the same model to the Controller and Views. Alternatively you can create a separate business entities and use the AutoMapper or Translators to do the same.

You can notice I have added three new properties, called AddRow, DeleteRow and UpdateRow, which I have used as a dummy column name to bind to my Grid for Update and Delete Operation, Alternatively you can use the concept of Unbound columns of Ignite UI Grid to do the same.
4. Setup the Controller.
Now for the controller code I have created the Action methods to GetAll the Employees, Manage, Update and Delete Employees.
1: [AcceptVerbs(HttpVerbs.Get)]
2: public ActionResult GetAll()
3: { 4: repository = new EmployeeRepository();
5: var employees = repository.GetAll().ToList();
6: return Json(employees, JsonRequestBehavior.AllowGet);
7: }
8:
9: [AcceptVerbs(HttpVerbs.Get)]
10: public ActionResult ManageEmployee(int employeeId, string command)
11: { 12: repository = new EmployeeRepository();
13: if (!String.IsNullOrEmpty(command) && command.Equals("edit")) 14: { 15: var employees = repository.GetById(employeeId);
16: ViewBag.IsUpdate = true;
17: return View("_ManageEmployee", employees); 18: }
19: else
20: { 21: ViewBag.IsUpdate = false;
22: return View("_ManageEmployee"); 23: }
24: }
25:
26: [AcceptVerbs(HttpVerbs.Post)]
27: public ActionResult Update(IgGridDemo.Models.Employee employee, string command)
28: { 29: if (ModelState.IsValid)
30: { 31: repository = new EmployeeRepository();
32: repository.Update(employee);
33: }
34: return RedirectToAction("Index"); 35: }
36:
37: [AcceptVerbs(HttpVerbs.Get)]
38: public ActionResult Delete(int employeeId)
39: { 40: repository = new EmployeeRepository();
41: repository.Delete(employeeId);
42:
43: return RedirectToAction("Index"); 44: }
In the controller we have the following Action Methods which is as follows:
GetAll :- used to fetch all the employee from the Repository and return the Json result to the Views
ManageEmployee :- used by the Edit and Add buttons from the Grid, this method accepts employeeId and command as input parameter, command parameter is used to check if the request is coming from Add or Edit button, based on the command the action logic decides which View to call and Set the parameters. In this cased I have used the same view called _ManageEmployee.cshtml for both the operation and setting the ViewBag.IsUpdate either as true or false. If IsUpdate is set to true then we display the _ManageEmployee form accordingly. This ActionMethod does not make any call the the Repository layer.
Update :- called from the _ManageEmployee.cshtml view, and accepts Employee as an input parameter. For the new employee EmployeeId is set to default value as ‘0’ and for Update operation, we will have the employeeId set. Based on the employeeId repository layer decides whether we have to Add or Update an existing employee.
Delete :- used to delete the selected employee, this Action Method accepts employeeId as input parameter and removes the employee from the database using the Repository Layer.
5. Setup the View with Ignite UI Grid
Now coming to the final part, and the one which is the main focus of this Article, the View Part. To Display the Grid in the View, I am going to extend the script of the igGrid Loader further. As mentioned earlier igGrid is a very powerful control which includes lots of features. Including all these features may not be possible to cover in single article.
igGrid supports the built-in edit, add and delete dialogs, and you can even edit the data inside the grid itself as I have given in the screen below. But for the sake of simplicity and more control on the dialog you are creating I am going to create custom Dialog controls for Add and Update screens. The screen below shows the built-in edit feature of igGrid.

Now let me start with the View Code which I have written to bind and display the data.
In the Index.cshtml, first I am going to create the place holder for the Grid control.
1: <section class="featured">
2: <div class="content-wrapper">
3: <!-- the igGrid target element-->
4: <table id="employeeGrid" style="width: auto;"></table>
5: </div>
6: </section>
And for requesting the data from server, rendering and displaying I am modifying the igGrid loader script which I have given above
1: <script type="text/javascript"> 1:
2: $.ig.loader({ 3: scriptPath: './js/',
4: cssPath: './css/',
5: resources: 'igGrid.*',
6: ready: function () { 7: $.getJSON("Home/GetAll", null, function (data) { 8: var headerTextValues = ["Employee Id", "First Name", "Last Name", "Age", "Update", "Delete"];
9: $('#employeeGrid').igGrid({ 10: expandCollapseAnimations: true,
11: animationDuration: 1000,
12: expandTooltip: "Expand to View Details",
13: collapseTooltip: "Hide details",
14: height: "400px",
15: width: "800px",
16: dataSource: data,
17: responseDataKey: "Records",
18: dataSourceType: "json",
19: autoGenerateLayouts: false,
20: autoGenerateColumns: false,
21:
22: rowEditDialogContainment: "owner",
23: showReadonlyEditors: false,
24:
25: columns: [
26: { headerText: headerTextValues[0], key: "EmployeeId", width: 150 }, 27: { headerText: headerTextValues[1], key: "FirstName", width: 175 }, 28: { headerText: headerTextValues[2], key: "LastName", width: 175 }, 29: { headerText: headerTextValues[3], key: "Age", width: 175 }, 30: { headerText: headerTextValues[4], key: "UpdateRow", width: 175, template: "<a href='Home/ManageEmployee?EmployeeId=${EmployeeId}&command=edit' class='editDialog'>Edit</a>" }, 31: { headerText: headerTextValues[5], key: "DeleteRow", width: 175, template: "<a href='Home/Delete?EmployeeId=${EmployeeId}' class='confirmDialog'>Delete</a>" }, 32: ],
33:
34: initialDataBindDepth: -1,
35: primaryKey: 'EmployeeId',
36: width: '800',
37:
38: features: [
39: { 40: name: "Selection",
41: mode: "row",
42: multipleSelection: false
43: },
44: { 45: name: 'Hiding'
46: },
47: { 48: name: 'Paging',
49: type: 'local',
50: pageSize: 5,
51: inherit: true
52: },
53: { 54: name: 'Filtering'
55: },
56: { 57: name: "ColumnMoving",
58: mode: "immediate",
59:
60: //columnDragStart: function (event, ui) { 61: // ui.owner.element.find('tr td:nth-child(' + (ui.columnIndex + 1) + ')').addClass("ui-state-moving"); 62: // colMovingKey = ui.columnKey;
63: //},
64: //columnDragEnd: function (event, ui) { 65: // var grid = $(event.target).data('igGrid'); 66: // var newindex = grid.options.columns.indexOf(grid.columnByKey(colMovingKey)) + 1;
67: // grid.element.find('tr td:nth-child(' + newindex + ')').removeClass("ui-state-moving"); 68: //},
69:
70: addMovingDropdown: true,
71: mode: "deferred",
72: type: "render"
73: }
74:
75:
76: ],
77: });
78: });
79: }
80: });
</script>
Here in the line 7, I am making the JSON call to the GetAll action method, in line 8, I have defined the headers for the Grid. Now quickly jump to the output screen which will speak by itself and then I am going to move to the next line of codes.

Best part of Ignite UI Grid is that it has built in support for Filtering, Column Hiding, Sorting, Column Rearrange, etc with just few lines of code. As you can see from line 38, I have set the features of the Grid. In this example I have demonstrated just few of the properties, for the exhaustive list of features of Ignite Grid you can refer to igGrid from this link : http://help.infragistics.com/jQuery/2012.2/ui.iggrid
From line 10-20 I am setting up the Grid Properties and there is nothing much to explain there. And from line 20-32 I am defining the columns and their binding properties, things which is to notice is on line 30 and 31 where I have defined the custom template for the column which calls the Manage Action method from the HomeController with the employeeId and command as a parameter. And to open these dialogs I have put a separate script which I have packaged with my Source code which you can download from here, alternatively you can get more details on the modal dialog controls which I have used in this link : http://www.mindstick.com/Articles/279bc324-5be3-4156-a9e9-dd91c971d462/?CRUD%20operation%20using%20Modal%20dialog%20in%20ASP.NET%20MVC.
Once you click this Add/Edit button inside the grid you will get the dialog to edit your data.


Saving on these screen makes call to Update Action method of HomeController and based on employeeId as either 0 or > 0 the Repository layer decides whether to Save or Update an existing employee. Similarly on click of the Delete button I have created a Modal windows for the Delete operation too.
6. Other Ignite UI Grid features which you might like to Explore
With this article I leveraged few of the features of Ignite UI Grid, a part from these features there are lots of other features which you can leverage like displaying the Hierarchical Data using igHirerarchialGrid, igPivotGrid for multidimensional data, Column Reordering, Column Hiding, Merged Columns, Paging, Resizing, Grid Summaries, Continuous Virtualization, and lots of other features which can be achieved with just few lines of code.
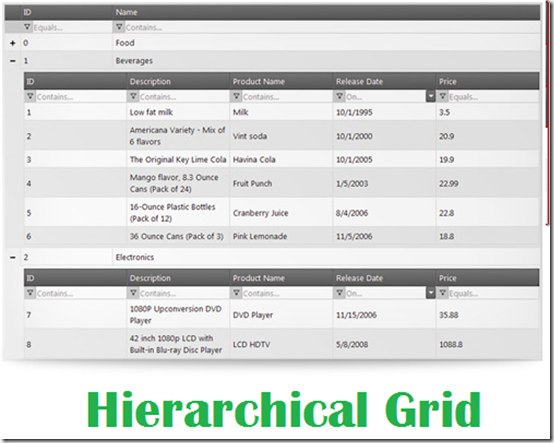

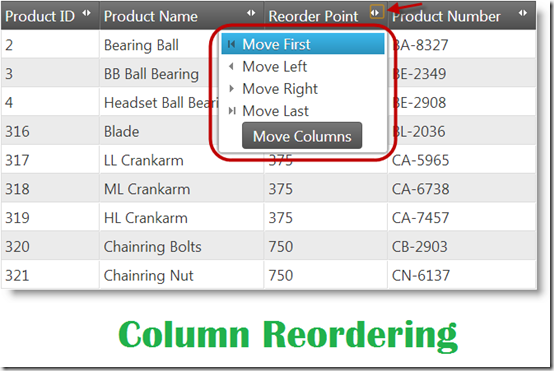
Along with these features you can either use MVC Server side code to render and display the Grid or you can use plain HTML 5 + CSS based on your comfort. In my example I have used the later one. Ignite UI Grid also have full support for REST API. In my upcoming post I will try to cover these features and try to dive more deep into these concepts.
7. Useful Links
Hope this post will help you, You can download the source code from here:
https://skydrive.live.com/redir?resid=B13080429F8946BC!7011&authkey=!APZsUBTZmzzpuww
Other useful Links which might help you.

Ignite UI Trial Download : http://www.infragistics.com/igniteui-download?utm_source=Microsoft.NetDeveloperBlog&utm_medium=Banner&utm_content=IgniteUI&utm_campaign=IgniteUI-Product
Ignite UI Api Reference : http://help.infragistics.com/NetAdvantage/jQuery/2013.1/CLR4.0
Ignite UI Developer Reference : http://help.infragistics.com/jQuery/2013.1/
Controls and Application Samples : http://www.infragistics.com/products/jquery/grid


