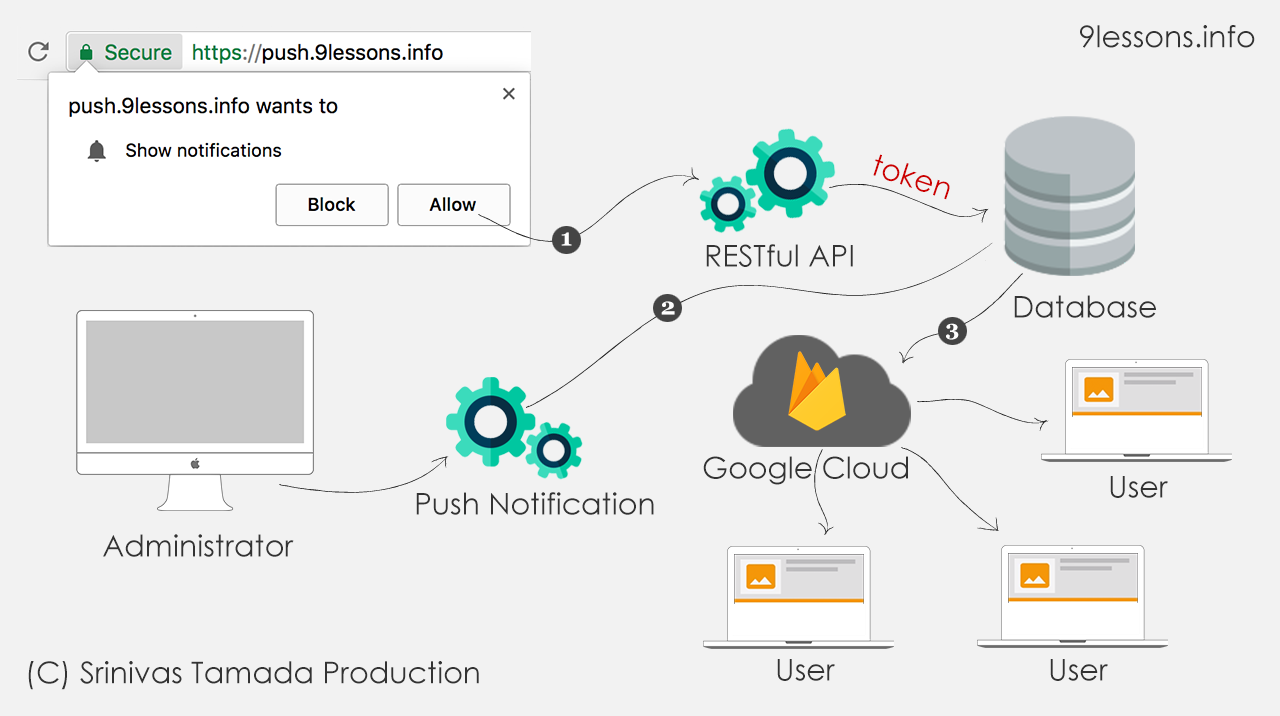
How do you increase the site’s traffic? E-commerce businesses’ main goal is to keep engage their existed subscribers and get the new visitors. There are many ways to grow site’s traffic and customer engagement - by sending email notifications, SMS alerts, through social media and do web push notifications. Today, we are going to see how push notifications work for web browsers. These are the notifications that are sent to the users through desktop and mobile browsers. These notifications are delivered on a user’s desktop or mobile browser — regardless of whether or not the user is on the website. These notifications allow users to get timely updates from sites they love and allow developers to effectively re-engage them with relevant content to increase site’s traffic. Let’s start how this works.
Today we're excited to launch Cloud Firestore, a fully-managed NoSQL document database for mobile and web app development. It's designed to easily store and sync app data at global scale, and it's now available in beta.
Key features of Cloud Firestore include:
Documents and collections with powerful querying
iOS, Android, and Web SDKs with offline data access
Real-time data synchronization
Automatic, multi-region data replication with strong consistency
Node, Python, Go, and Java server SDKs
And of course, we've aimed for the simplicity and ease-of-use that is always top priority for Firebase, while still making sure that Cloud Firestore can scale to power even the largest apps.
Optimized for app development
Managing app data is still hard; you have to scale servers, handle intermittent connectivity, and deliver data with low latency.
We've optimized Cloud Firestore for app development, so you can focus on delivering value to your users and shipping better apps, faster. Cloud Firestore:
Synchronizes data between devices in real-time. Our Android, iOS, and Javascript SDKs sync your app data almost instantly. This makes it incredibly easy to build reactive apps, automatically sync data across devices, and build powerful collaborative features -- and if you don't need real-time sync, one-time reads are a first-class feature.
Uses collections and documents to structure and query data. This data model is familiar and intuitive for many developers. It also allows for expressive queries. Queries scale with the size of your result set, not the size of your data set, so you'll get the same performance fetching 1 result from a set of 100, or 100,000,000.
Enables offline data access via a powerful, on-device database. This local database means your app will function smoothly, even when your users lose connectivity. This offline mode is available on Web, iOS and Android.
Enables serverless development. Cloud Firestore's client-side SDKs take care of the complex authentication and networking code you'd normally need to write yourself. Then, on the backend, we provide a powerful set of security rules so you can control access to your data. Security rules let you control which users can access which documents, and let you apply complex validation logic to your data as well. Combined, these features allow your mobile app to connect directly to your database.
Integrates with the rest of the Firebase platform. You can easily configure Cloud Functions to run custom code whenever data is written, and our SDKs automatically integrate with Firebase Authentication, to help you get started quickly.
Putting the 'Cloud' in Cloud Firestore
As you may have guessed from the name, Cloud Firestore was built in close collaboration with the Google Cloud Platform team.
This means it's a fully managed product, built from the ground up to automatically scale. Cloud Firestore is a multi-region replicated database that ensures once data is committed, it's durable even in the face of unexpected disasters. Not only that, but despite being a distributed database, it's also strongly consistent, removing tricky edge cases to make building apps easier regardless of scale.
It also means that delivering a great server-side experience for backend developers is a top priority. We're launching SDKs for Java, Go, Python, and Node.js today, with more languages coming in the future.
Another database?
Over the last 3 years Firebase has grown to become Google's app development platform; it now has 16 products to build and grow your app. If you've used Firebase before, you know we already offer a database, the Firebase Realtime Database, which helps with some of the challenges listed above.
The Firebase Realtime Database, with its client SDKs and real-time capabilities, is all about making app development faster and easier. Since its launch, it has been adopted by hundred of thousands of developers, and as its adoption grew, so did usage patterns. Developers began using the Realtime Database for more complex data and to build bigger apps, pushing the limits of the JSON data model and the performance of the database at scale. Cloud Firestore is inspired by what developers love most about the Firebase Realtime Database while also addressing its key limitations like data structuring, querying, and scaling.
So, if you're a Firebase Realtime Database user today, we think you'll love Cloud Firestore. However, this does not mean that Cloud Firestore is a drop-in replacement for the Firebase Realtime Database. For some use cases, it may make sense to use the Realtime Database to optimize for cost and latency, and it's also easy to use both databases together. You can read a more in-depth comparison between the two databases here.
We're continuing development on both databases and they'll both be available in our console and documentation.
Get started!
Cloud Firestore enters public beta starting today. If you're comfortable using a beta product you should give it a spin on your next project! Here are some of the companies and startups who are already building with Cloud Firestore:
Developer Advocate If you've been working with Cloud Functions for Firebase, you've probably wondered how you could speed up the development of your functions. This is possible for HTTPS type functions using the firebase serve in the Firebase CLI, but this wasn't an option for other types of functions. Now, local testing of all of your functions is easy with the Firebase CLI. If you want to try out your code before you deploy it to Cloud Functions, you can do that with the Cloud Functions shell in the Firebase CLI starting at version 3.11.0 or later.
Here's how it works, in a nutshell. We'll use a Realtime Database trigger as an example.
Imagine you have an existing project with a single function in it called makeUppercase. It doesn't have to be deployed yet, just defined in your index.js:
This onCreate database trigger runs when a new message is pushed under /messages with a child called original, and writes back to that message a new child called uppercased with the original value capitalized.
Now, if you can kick off the emulator shell from your command line using the Firebase CLI:
$ cd your_project_dir
$ firebase experimental:functions:shell
Then, you'll see something like this:
i  functions: Preparing to emulate functions.
✔  functions: makeUppercase
firebase>
That firebase prompt is waiting there for you to issue some commands to invoke your makeUppercase function. The documentation for testing database triggers says that you can use the following syntax to invoke the function with incoming data to describe the event:
makeUppercase('foo')
This emulates the trigger of an event that would be generated when a new message object is pushed under /messages that has a child named original with the string value "foo". When you run this command in the shell, it will generate some output at the console like this:
info: User function triggered, starting execution
info: Uppercasing pushId1 foo
info: Execution took 892 ms, user function completed successfully
Notice that the console log in the function is printed, and it shows that the database path wildcard pushId was automatically assigned the value pushId1 for you. Very convenient! But you can still specify the wildcard values yourself, if you prefer:
After emulating this function, if you look inside the database, you should also see the results of the function on display, with /messages/{pushId}/uppercased set to the uppercased string string value "FOO".
You can simulate any database event this way (onCreate, onDelete, onUpdate, onWrite). Be sure to read the docs to learn how to invoke them each correctly.
The Cloud Functions shell is currently an experimental offering, and as such, you may experience some rough edges. If you encounter a problem, please let us know by filing a bug report. You can also talk to other Cloud Functions users on the Firebase Slack in the #functions channel.
Some tips for using the shell
Typing the function invocation each time can be kind of a pain, so be sure to take advantage of the fact that you can navigate and repurpose your invocation history much like you would your shell's command line using the arrow keys.
Also note that the shell is actually a full node REPL that you can use to execute arbitrary JavaScript code and use special REPL commands and keys. This can be useful for scripting some of your test code.
Since you can execute arbitrary code, you can also dynamically load and execute code from other files using the require() function that you're probably already familiar with.
And lastly, if you're like me, and you prefer to use a programmer's editor such as VS Code to write your all JavaScript, you can easily emulate functions by sending code you want to run to the Firebase CLI. This command will run test code from a file redirected through standard input:
We've provided a number of different ways for you to get started building your app with the Firebase platform -- everything from quickstarts for many of our individual products, to codelabs, to some Getting Started screencasts on our YouTube channel.
But what happens after you've gotten started with a feature, and are looking to build something more substantial? How do you learn how to avoid race conditions while writing to the Firebase Database? Or lazily create an infinite feed? Do you wish there were an open-sourced Firebase playbook app that you could use to see real-life use cases in motion? Or an app that demonstrates the use of multiple Firebase products together, so you can follow the same practices in your own app?
For all you developers who want to see an app built for a real life scenario, we've created an open sourced narrative app called FriendlyPix. FriendlyPix uses some of the most popular Firebase SDKs, such as Analytics, Cloud Messaging, Cloud Functions, Authentication (with FirebaseUI), Realtime Database, Storage, Remote Config, Invites, and AdMob.
Best Practices
FriendlyPix highlights some of the best practices when using Firebase, such as:
Using FirebaseUI for Auth
Creating indexes in the Realtime Database for fast search
Fanning out simultaneous writes to avoid race conditions
Building a data hierarchy of flat, denormalized data for fast access
Running ordered, filtered queries for partial data access
Creating lazily updated feeds
Using the proper file and folder structure when uploading images to Firebase Storage in conjunctions with Cloud Functions
We look forward to seeing you use these best practices in your app, or use FriendlyPix as a starting point for your app.
The web version is already hosted at https://friendly-pix.com for you to try out, and we are planning to release FriendlyPix on other platforms for you try as well.
We'll be updating the app and adding further SDKs in the coming weeks, so keep an eye on this blog or watch our Github repos to stay updated.
Questions / Issues / Contribute
You can ask FriendlyPix related questions on StackOverflow with the firebase and friendlypix tags. Issue trackers are hosted on Github in their respective platforms repos: Web, iOS, and Android. We'd love for you to contribute to the project, although before doing so please read our Contributor guide.
Developer Advocate If you've browsed the web at all, you've probably seen some sites that ask you to prove you're a human by presenting a reCAPTCHA challenge. For example, if you try to use the goo.gl URL shortener, it won't let you shorten a link until you satisfy the reCAPTCHA, which looks like this:
Web site engineers do this to protect their site from spam and abuse from bots, while allowing legitimate human use. Why is protection needed? Maybe you have some backend code that's expensive in time and storage and you only want actual users of your web to access it.
If you have a web site, you can also use reCAPTCHA to protect its services. And, if you're building your site with Firebase Hosting, it's pretty easy to get it integrated with the help of Cloud Functions for Firebase to provide a secure, scalable backend to verify the completion of the reCAPTCHA.
In this blog post, I'll walk you through a few steps that will get you to a very basic integration that you can extend later for your own site. For this walkthrough, I'm assuming you already have some experience with web development, the Firebase console, and the Firebase CLI.
1. Create a Firebase project in the console
Navigate to the Firebase console and create a new project. There's no need to add billing to this project - you can experiment fully without providing a credit card. Once you create the project, there's nothing else you need to do in the console.
2. Set up a directory for your project code
Using the Firebase CLI, make sure you're logged in with the same Google account that you used to create the project:
$ firebase login
Now, create a root project directory and initialize it:
$ mkdir my_project
$ cd my_project
$ firebase init
When running firebase init, be sure to select both hosting and functions. When you're asked to choose a project, select the one you just created earlier. Take the defaults for every other prompt. You'll end up with a directory structure that contains a public folder for web content, and a functions folder for your backend code.
For the Cloud Functions backend, we'll need a couple modules from npm to help verify the reCAPTCHA. The reCAPTCHA API requires you to make an HTTP request for verification from your backend, and you can do that with the request and request-promise modules. Pull them into your project like this:
$ cd functions
$ npm install request request-promise
Your package.json file should now show those two new modules in addition to firebase-functions and firebase-admin.
3. Test web deployment
Make sure you can deploy web content by running this deploy command:
$ firebase deploy --only hosting
When this finishes, you'll be given the public URL to your new web site, which will look something like this:
where your-project is the unique id that was given to your project at the time it was created in the console. If you paste the Hosting URL into your browser, you should see a page that says "Firebase Hosting Setup Complete".
4. Get a reCAPTCHA API Key
reCAPTCHA requires a couple API keys for operation, one for the web client and one for the server API. You can get those from the reCAPTCHA admin panel, so navigate there. Create a new site and give it a name. Select "reCAPTCHA V2". For domains, put the full hostname of your Firebase Hosting site name (e.g. "your-project.firebaseapp.com").
After you register, you'll be given a Site key and a Secret key. The Site key will be used in your frontend HTML, and the Secret key will be used in your backend hosted by Cloud Functions.
5. Add a page with a reCAPTCHA
Now we'll add a new HTML page to display the reCAPTCHA. In the public directory in your project, add a new HTML file called recaptcha.html to display the reCAPTCHA. Simply copy and paste the following content directly into that new file:
Notice in the body there is a div with the class "g-recaptcha". The first thing you should do here is copy your reCAPTCHA site key into the div's data-sitekey attribute value. This div will get automatically transformed into a reCAPTCHA UI after the first script at the top is loaded. You can read more about that here in the docs.
You can see it right away if you firebase deploy again, then navigate to /recaptcha.html under your Hosting URL. Don't bother dealing with the reCAPTCHA yet, because we still need some backend code to complete the verification!
The JavaScript code in this page defines two functions dataCallbackand dataExpiredCallback. These are referenced in the div, and provide callbacks for the reCAPTCHA to tell you when the reCAPTCHA has been satisfied, or if the user took too long to proceed.
The important thing to note in dataCallback is that it redirects the browser to another URL in the site with the path /checkRecaptcha, and pass it a parameter named response. This response string is generated by reCAPTCHA and looks like a random collection of characters.
The path /checkRecaptcha in your web site obviously doesn't exist yet, so we need to create a Cloud Function to validate the response string it's going to receive.
6. Create a Cloud Function to verify the reCAPTCHA response
In the functions directory in your project, edit the existing index.js file. This has some sample code, but you can delete it. In its place, paste the following JavaScript code:
const functions = require('firebase-functions') const rp = require('request-promise')
The first thing you should do here is paste your reCAPTCHA secret key from the registration site in place of "PASTE_YOUR_SECRET_CODE_HERE".
(Astute readers may note that the reCAPTCHA API endpoint host is "recaptcha.google.com", while the docs say "www.google.com". This is OK! You have to use recaptcha.google.com as shown in order to make the call on the Spark plan, because that host has been whitelisted for outgoing traffic from Cloud Functions.)
This code defines an HTTPS function that, when triggered, will make another HTTPS request (using the request-promise module) to the reCAPTCHA API in order to verify the response that was received in the query string. Notice that there are three cases with three different responses to the client. Either:
The reCAPTCHA verifies successfully (the user is human)
The reCAPTCHA fails (could be a robot)
The API call fails altogether
It's important to send a response to the client in all cases, otherwise the function will time out with an error message in the Firebase console log.
To deploy this new function (and the web content at the same time) run the following command:
$ firebase deploy
You'll notice in the output that the function is assigned its own URL, which looks something like this:
This is clearly a different host than the one with your web content. However, what we really want instead is for the function to be referenced through your web host at a URL that looks like this:
What you've done here is add a new section for rewrites, and you can read more about those in the docs. Specifically what this does is allow access to the URL path /checkRecaptcha invoke the function called checkRecaptcha that you pasted into your functions/index.js file.
Remember that the JavaScript code in recaptcha.html redirects to this path when the reCAPTCHA is satisfied by the user, so this effectively sends to user to the function after they complete the reCAPTCHA.
Now do one final deploy to send everything to Firebase:
$ firebase deploy
8. Test the reCAPTCHA!
Navigate to /recaptcha.html under your hosting URL, then solve the reCAPTCHA. It may ask you to identify some cars or roads in a set of pictures. Once you've satisfied the reCAPTCHA with your humanity, the JavaScript in your HTML should redirect you to your function, which verifies with the server that you're indeed human, and you should see the message "You're good to go, human."
This example of how to use reCAPTCHA with Cloud Functions for Firebase is much more simple than what you'd probably do in your own web site. You have several options for how to send the reCAPTCHA response to your function, and you'd obviously want to provide something more useful than a message to the user. But this should get you started protecting your web content from abuse from bots.
Ever spend an hour wondering why Remote Config wasn't working, only to realize that you forgot to call activateFetched? Or didn't read a Dynamic Link because you forgot to implement the application:continue:restorationHandler method? Well, now there's a tool to help stop those mistakes before they happen!
SwiftLint is a great open source tool that makes it easier for you to follow Swift style and conventions. It also helps with identifying possible errors early by highlighting problematic usage. You can run SwiftLint on your Xcode project to see all the style guide exceptions on the lines where they occur, and fix them quickly. I found it was a great help whenI migrated my code from Objective-c to Swift.
In the spirit of making SwiftLint even more useful for Firebase developers, we've added some experimental new Firebase rules into SwiftLint. These rules will display warnings on common mistakes that might lead to errors when using the Firebase SDK.
How to use
Currently we are hosting the rules on our fork in a firebase_rules branch. Our pre-release binary holds the Firebase rules. You simply download the .pkg file and double click to install. You can also build the binary from the source.
Since the rules are opt-in, you'll need to add a .swiftlint.ymlfile in the same folder as your Swift source files, containing the following text:
Then, just run SwiftLint on your project like normal.
If you're interested in how we put the rules together, you can read our post with all the development details.
We'd love for you to give it a try and send us feedback on Twitter with #FirebaseLinter. You can also ask questions on StackOverflowusing the firebase and swiftlint tags together.
Art Director So much goes into building and maintaining a mobile game. Let's say you want to ship it with a level builder for sharing content with other players and, looking forward, you want to roll out new content and unlockables linked with player behavior. Of course, you also need players to be able to easily sign into your soon-to-be hit game.
With a DIY approach, you'd be faced with having to build user management, data storage, server side logic, and more. This will take a lot of your time, and importantly, it would take critical resources away from what you really want to do: build that amazing new mobile game!
Our Firebase SDKs for Unity and C++ provide you with the tools you need to add these features and more to your game with ease. Plus, to help you better understand how Firebase can help you build your next chart-topper, we've built a sample game in Unity: MechaHamster. Check it out on Google Play or download the sample project at Github to see how easy it is to integrate Firebase into your game.
Before you dive into the sample code for MechaHamster, here's a rundown of the Firebase products that can help your game be successful.
Analytics
One of the best tools you have to maintain a high-performing game is your analytics. With Google Analytics for Firebase, you can see where your players might be struggling and make adjustments as needed. Analytics also integrates with Adwords and other major ad networks to maximize your campaign performance. If you monetize your game using AdMob, you can link your two accounts and see the lifetime value (LTV) of your players, from in-game purchases and AdMob, right from your Analytics console. And with Streamview, you can see how players are interacting with your game in realtime.
Test Lab for Android - Game Loop Test
Before releasing updates to your game, you'll want to make sure it works correctly. However, manual testing can be time consuming when faced with a large variety of target devices. To help solve this, we recently launched Firebase Test Lab for Android Game Loop Test at Google I/O. If you add a demo mode to your game, Test Lab will automatically verify your game is working on a wide range of devices. You can read more in our deep dive blog post here.
Authentication
Another thing you'll want to be sure to take care of before launch is easy sign-in, so your users can start playing as quickly as possible. Firebase Authenticationcan help by handling all sign-in and authentication, from simple email + password logins to support for common identity providers like Google, Facebook, Twitter, and Github. Just announced recently at I/O, Firebase also now supports phone number authentication. And Firebase Authentication shares state cross-device, so your users can pick up where they left off, no matter what platforms they're using.
Remote Config
As more players start using your game, you realize that there are few spots that are frustrating for your audience. You may even see churn rates start to rise, so you decide that you need to push some adjustments. With Firebase Remote Config, you can change values in the console and push them out to players. Some players having trouble navigating levels? You can adjust the difficulty and update remotely. Remote Config can even benefit your development cycle; team members can tweak and test parameters without having to make new builds.
Realtime Database
Now that you have a robust player community, you're probably starting to see a bunch of great player-built levels. With Firebase Realtime Database, you can store player data and sync it in real-time, meaning that the level builder you've built can store and share data easily with other players. You don't need your own server and it's optimized for offline use. Plus, Realtime Database integrates with Firebase Auth for secure access to user specific data.
Cloud Messaging & Dynamic Links
A few months go by and your game is thriving, with high engagement and an active community. You're ready to release your next wave of new content, but how can you efficiently get the word out to your users? Firebase Cloud Messaging lets you target messages to player segments, without any coding required. And Firebase Dynamic Links allow your users to share this new content — or an invitation to your game — with other players. Dynamic Links survive the app install process, so a new player can install your app and then dive right into the piece of content that was shared with him or her.
At Firebase, our mission is to help mobile developers build better apps and grow successful businesses. When it comes to games, that means taking care of the boring stuff, so you can focus on what matters — making a great game. Our mobile SDKs for C++ and Unity are available now at firebase.google.com/games and don't forget to check out our sample game project, MechaHamster, on GitHub.
Developer Advocate There are a couple recent changes to the way you build your Android apps with Google Play services (and Firebase SDKs, which are distributed as part of Play services). Here's what you need to know to stay up to date.
1. Play services (and Firebase) dependencies are now available via maven.google.com
Until recently, developers were required to update their Android tools to make use of new versions of the local maven repository that contains Play services compile dependencies. Only after updating were the Android build tools able to locate them. Now, the dependencies are available directly from maven.google.com. You can update your app's Gradle build scripts to use this repository by simply configuring the build like this:
Note the new Google maven repository. This is where dependencies are now hosted. Using Gradle 4.0 and later, you can simply specify google() as a shortcut instead. Once configured like this, Gradle will be able to locate, download, and cache the correct Play services dependencies without requiring an update to the Android build tools. Play services SDKs going back to version 3.1.36 will be available in this repo.
2. Starting with Play services dependencies version 11.2.0, your app's compileSdkVersion must be at least 26
When you upgrade your app's Play services dependencies to 11.2.0 or later, your app's build.gradle must also be updated to specify a compileSdkVersion of at least 26 (Android O). This will not change the way your app runs. You will not be required to update targetSdkVersion. If you do update compileSdkVersionto 26, you may receive an error in your build with the following message referring to the Android support library:
This support library should should not use a different version (25) than the compileSdkVersion (26).
This error can be resolved by upgrading your support library dependencies to at least version 26.0.0. Generally speaking, the compileSdkVersion of your app should always match the major version number of your Android support library dependencies. In this case, you'll need to make them both 26.
If you haven't tried Firebase Performance Monitoring yet, many Firebase developers have found it to be a helpful way to get a sense of some of the performance characteristics of their iOS or Android app, without writing many extra lines of code. To get more detailed information beyond what's collected automatically, you'll eventually have to write some custom traces and counters. Traces are a report of performance data within a distinct period of time in your app, and counters let you measure performance-related events during a trace. In today's perf tip, I'll propose a way to add potentially many more traces to your Android app without writing very much code at all.
Android apps are typically made up of a collection of activities that present some task or data to the user. For the purpose of hunting down potential performance problems, it can be handy to define a trace for every Activity in your app, so you can study the results later in the Firebase console. If your app has lots of activities, it might be kind of a pain to write the code for all of them. Instead, you can write a little bit of code that instruments all of them with their own trace.
Android gives you a way to listen in on the lifecycle of every single Activity in your app. The listeners are implementations of the interface ActivityLifecycleCallbacks, and you can register one with the Application.registerLifecycleCallbacks()method. For measuring performance, I suggest creating a trace that corresponds to the onStart() and onStop() lifecycle methods. When an activity is "started", that means it's visible on screen, and when it's "stopped", it's no longer visible, so I think this is a good place to define a trace that tracks an activity while it's actually doing things. Here's the start of an implementation of ActivityLifecycleCallbacks that keeps track of traces for each of your activities. First we'll make it a singleton so it can be easily accessed everywhere (or you might want to use some form of dependency injection):
public class PerfLifecycleCallbacks implements Application.ActivityLifecycleCallbacks {
private static final PerfLifecycleCallbacks instance = new PerfLifecycleCallbacks();
// ...empty implementations of other lifecycle methods...
This will start a trace when any activity is started, and stop the same trace when the activity is stopped. For the name of the trace, I'm using the simple class name of the activity object, which is just the class name without the full java package. (Note: if you do this, make sure that your Activity class names are unique, if they're spread across Java packages!)
I'll add one more method to it that will return the trace of a given Activity object. That can be used in any activity to get a hold of the current trace so that counters can be added to it:
    @Nullable
    public Trace getTrace(Activity activity) {
        return traces.get(activity);
    }
This class should be registered before any Activity starts. A ContentProvider is a good place to do that. If you're not familiar with how that works, you can read about how Firebase uses a ContentProvider to initialize.
public class PerfInitContentProvider extends ContentProvider {
    @Override
    public boolean onCreate() {
        context = getContext();
        if (context != null) {
            Application app = (Application) context.getApplicationContext();
            app.registerActivityLifecycleCallbacks(
                PerfLifecycleCallbacks.getInstance());
        }
    }
}
Don't forget to add the ContentProvider to your app's manifest! This will ensure that it gets created before any Activity in your app.
Once this ContentProvider is in place, your app will automatically create traces for all your activities. If you want to add counters to one of them, simply use the getTrace() method from the PerfLifecycleCallbacks singleton using the current Activity object. For example:
private Trace trace;

@Override
protected void onCreate(Bundle savedInstanceState) {
    trace = PerfLifecycleCallbacks.getInstance().getTrace(this);
    // use the trace to tally counters...
}
Be sure to think carefully about the counters you want to log! You'll want to measure things that will give you information that helps inform a decision about how the user experience could be improved in your app. For example, you could record the ratio of cache hits to misses to help tune the amount of memory for the cache. And be sure to follow Firebase on Twitter to get more Firebase Performance Monitoring tips.
Sometimes the worst bugs to track down are the ones that seem to be impossible to reproduce. Or worse, inconsistent performance problems that can cause "Application Not Responding" errors in Android apps. No matter how much test code you write, these types of errors seem to have a way of sneaking into your app and causing problems for your users. However, with some clever use of Android's StrictModeAPI, alongside Firebase Test Lab for Android, you can find out about these problems before they reach production!
Over the years since Android was first available, a number of best practices have been observed for writing solid apps. For example, you shouldn't be performing blocking I/O on the main thread, and you shouldn't store references to Activity objects that are held after the Activity is destroyed. While it's likely that no one will force you to observe these practices (and you may never see a problem during development), enabling StrictMode in your app will let you know where you've made a mistake. These are called "policy violations", and you configure these policies with code in your app.
Personally, I don't want any of my code to cause any StrictMode violations. In fact, I'd like to consider them bugs that are just as serious as a regular crash, because they could crash my app in some cases! And, in fact, I can configure all StrictMode violations to crash the app. The Java code for that looks like this:
private static final StrictMode.ThreadPolicy FATAL_THREAD_POLICY =
    new StrictMode.ThreadPolicy.Builder()
        .detectAll()
        .penaltyLog()
        .penaltyDeath()
        .build();

private static final StrictMode.VmPolicy FATAL_VM_POLICY =
    new StrictMode.VmPolicy.Builder()
        .detectAll()
        .penaltyLog()
        .penaltyDeath()
        .build();

public static void enableFatalStrictMode() {
    if (shouldEnableFatalStrictMode()) {
        StrictMode.setThreadPolicy(FATAL_THREAD_POLICY);
        StrictMode.setVmPolicy(FATAL_VM_POLICY);
    }
}
Here I have both a ThreadPolicy(for the main thread) and a VmPolicy(for the entire app) that look for all known violations, and will both log that violation and crash the app. Take a look through the javadoc for those builders to learn about all the situations they can catch.
Also notice that I'm enabling the policies conditionally. You probably don't want an accidental violation to crash on your users in production, so the method shouldEnableFatalStrictMode() typically looks like this, which activates it for your debug builds only:
What I'd like to do is take this further and have StrictMode crash my app also when it's running in Firebase Test Lab. This is handy because the crash will fail the test, and I'll get a report about that in the test results. For that to happen, I can change the method to query a system setting on the device that's unique to devices in Test Lab. Note that this requires an Android Context to obtain a ContentResolver:
Now, my instrumented tests (and the automated Robo test) will crash with any StrictMode violations, and I'll see those very clearly in my Test Lab report. Here's an app that crashed in Test Lab with a StrictMode violation during a Robo test:
This doesn't tell you exactly what happened, though. Digging into the logs in the test report, I see the details of the violation right before the crash:
D/StrictMode(6996): StrictMode policy violation; ~duration=80 ms: android.os.StrictMode$StrictModeDiskReadViolation: policy=327743 violation=2
D/StrictMode(6996):  at android.os.StrictMode$AndroidBlockGuardPolicy.onReadFromDisk(StrictMode.java:1415)
D/StrictMode(6996):  at java.io.UnixFileSystem.checkAccess(UnixFileSystem.java:251)
D/StrictMode(6996):  at java.io.File.exists(File.java:807)
D/StrictMode(6996):  at android.app.ContextImpl.getDataDir(ContextImpl.java:2167)
D/StrictMode(6996):  at android.app.ContextImpl.getPreferencesDir(ContextImpl.java:498)
D/StrictMode(6996):  at android.app.ContextImpl.getSharedPreferencesPath(ContextImpl.java:692)
D/StrictMode(6996):  at android.app.ContextImpl.getSharedPreferences(ContextImpl.java:360)
D/StrictMode(6996):  at android.content.ContextWrapper.getSharedPreferences(ContextWrapper.java:167)
D/StrictMode(6996):  at com.google.firebasesandbox.MainActivity.onCreate(MainActivity.java:25)
D/StrictMode(6996):  at android.app.Activity.performCreate(Activity.java:6982)
D/StrictMode(6996):  at android.app.Instrumentation.callActivityOnCreate(Instrumentation.java:1213)
D/StrictMode(6996):  at android.app.ActivityThread.performLaunchActivity(ActivityThread.java:2770)
D/StrictMode(6996):  at android.app.ActivityThread.handleLaunchActivity(ActivityThread.java:2892)
D/StrictMode(6996):  at android.app.ActivityThread.-wrap11(Unknown Source:0)
D/StrictMode(6996):  at android.app.ActivityThread$H.handleMessage(ActivityThread.java:1593)
D/StrictMode(6996):  at android.os.Handler.dispatchMessage(Handler.java:105)
D/StrictMode(6996):  at android.os.Looper.loop(Looper.java:164)
D/StrictMode(6996):  at android.app.ActivityThread.main(ActivityThread.java:6541)
D/StrictMode(6996):  at java.lang.reflect.Method.invoke(Native Method)
D/StrictMode(6996):  at com.android.internal.os.Zygote$MethodAndArgsCaller.run(Zygote.java:240)
D/StrictMode(6996):  at com.android.internal.os.ZygoteInit.main(ZygoteInit.java:767)
So we've discovered here that an activity's onCreate() called getSharedPreferences(), and this method ends up reading the device filesystem. Blocking the main thread like this could be the source of some jank in the app, so it's worth figuring out a good way to move that I/O to another thread.
Now we have a way to check for StrictMode violations during a test, but there's still a few more details to work out.
When should I enable StrictMode?
If you do this immediately when the app launches (in an Application subclass or a ContentProvider), there is a subtle bug in some versions of Android that may need to be worked around in order to avoid losing your StrictMode policies when the first Activity appears.
When should I disable StrictMode?
There might be some times when you know there is a violation, but you can't fix the code right away for whatever reason (for example, it's in a library you don't control). In that case, you might want to temporarily suspend the crashing behavior and simply log it instead. To temporarily suspend the crash, you can define a couple other non-fatal policies and swap them in where you know there's an issue to ignore:
private static final StrictMode.ThreadPolicy NONFATAL_THREAD_POLICY =
    new StrictMode.ThreadPolicy.Builder()
        .detectAll()
        .penaltyLog()
        .build();

private static final StrictMode.VmPolicy NONFATAL_VM_POLICY =
    new StrictMode.VmPolicy.Builder()
        .detectAll()
        .penaltyLog()
        .build();

public static void disableStrictModeFatality() {
    StrictMode.setThreadPolicy(NONFATAL_THREAD_POLICY);
    StrictMode.setVmPolicy(NONFATAL_VM_POLICY);
}
Similarly, you may not want to track all the possible violations all the time. In that case, you might want to instruct the policy builder to only detect a subset of the potential issues.
Get out there and test your app!
While StrictMode violations are not always the worst thing for your users, I've always found it educational to enable StrictMode in order to find out where my app might be causing problems. In combination with Firebase Test lab, it's a great tool for maximizing the quality of your app.
One of my favorite parts about working with the Cloud Functions for Firebase team is helping developers move logic from their mobile apps to a fully managed backend hosted by Firebase. With just a few lines of JavaScript code, they're able to unify logic that automatically takes action on changes to the contents of their Realtime Database. It's really fun to see what people build!
When Cloud Functionswas first announced at Cloud Next 2017, there was just one trigger available for all types of changes to the database. This trigger is specified using the onWrite() callback, and it was the code author's responsibility to figure out what sort of change occurred. For example, imagine your app has a chat room, and you want to use Firebase Cloud Messaging to send a notification to users in that room when a new message arrives. To implement that, you might write some code that looks like this:
exports.sendNotification = functions.database
        .ref("/messages/{messageId}").onWrite(event => {
    const dsnap = event.data  // a DeltaSnapshot that describes the write
    if (dsnap.exists() && !dsnap.previous.exists()) {
        // This is a new message, not a change or a delete.
        // Send notifications with FCM...
    }
})
Note that you have to check the DeltaSnapshotfrom the event object to see if new data now exists at the location of the write, and also if there was no prior data at that location. Why is this necessary? Because onWrite() will trigger on all changes to data under the matched location, including new messages, updated messages, and deleted messages. However, this function is only interested in newmessages, so it has to make sure the write is not an update or a delete. If there was an update or delete, this function would still get triggered and return immediately. This extra execution costs money, and we know you'd rather not be billed for a function that doesn't do useful work.
Today, it gets better
The good news is that these extra checks are no longer necessary with Cloud Functions database triggers! Starting with the firebase-functions module version 0.5.9, there are now three new types of database triggers you can write: onCreate(), onUpdate(), and onDelete(). These triggers are aware of the type of change that was made, and only run in response to the type of change you desire. So, now you can write the above function like this:
Here, you don't have to worry about this function getting triggered again for any subsequent updates to the data at the same location. Not only is this easier to read, it costs you less to operate.
Note that onWrite() hasn't gone away. You can still keep using it with your functions for as long as you like.
Avoid infinite loops with onWrite() and onUpdate()
If you've previously used onWrite() to add or change data at a location, you're aware that the changes you made to that data during onWrite() would trigger a second invocation of onWrite() (because all writes count as writes, am I right?).
Consider this function that updates the lastUpdated property of a message after it's written:
This seems OK at first, but there's something very important missing. Since this function writes back to the same location where it was triggered, it will effectively trigger another call to onWrite(). You can see here that this will cause an infinite loop of writes, so it needs some way to bail out of the second invocation.
It turns out that onUpdate() function implementations share this concern. One solution in this specific case could be to check the existing value of lastUpdated and bail out if it's not more than 30 seconds older than the current date. So, if we want to rewrite this function using onUpdate(), it could look like this:
exports.lastUpdate = functions.database
        .ref("/messages/{messageId}").onUpdate(event => {
    const msg = event.data.val()
    const now = new Date().getTime()
    if (msg.lastUpdated > now - (30*1000)) {
        return
    }
    msg.lastUpdated = now
    return event.data.adminRef.set(msg)
})
This function now defends against infinite loops with a little extra logic.
To start using these new triggers, be sure to update your firebase-functions module to 0.5.9. And for more information about these updates, check out the documentation right here.
Building a great game is tough. You have to make it easy to pick up, challenging, a little bit addicting, and, of course, fun. Not to mention the technical effort involved in designing all the infrastructure that will power your blockbuster game. Our goal with Firebase is to take care of that last piece, so that you can focus on all of the elements that make your game unique.
The team hard at work building AppShip3000. Soldering irons are fun!
How it works
AppShip3000 is a 3 person, collaborative, rocketship-flying, trivia game. The players work together to control a rocket ship that is flying upwards and quickly running out of fuel. Asteroids rain down from the top of the screen, while the crew answers Firebase and Google Cloud trivia to reach higher heights.
The catch is that players can only see either the question or one of the multiple choice answers, never both. They have to talk (or yell) to each other to figure out which player has the right answer before time runs out. Similarly, one player sees asteroids before the others and has to shout out where they'll be, so the entire team can move the rocket. All players have to move the joystick in that same direction to successfully avoid losing fuel from an asteroid collision.
Building with Firebase
Now, let's take a look at how Firebase powers AppShip3000. First off, we use Firebase Authenticationfor the sign-in experience. A player opens a progressive web app (PWA) on her phone and logs in using her Google account. Creation of an account is an Authentication Trigger for a Cloud Function that generates a custom button sequence (or launch code). This launch code is used to associate the account with the game controller for the duration of the game, so that when the game finishes, all stats are automatically associated with her account.
The finished product at Google I/O 2017!
When a game finishes, Realtime Database is used to immediately update the leaderboard in the PWA. At I/O, we also had giant screens reflecting the leaderboards. Realtime Database is also used to manage the trivia questions in the game. This allows for on-the-fly updates to questions that can be written after one game and pushed to production in time for the next game.
We also generate an image of the rocket's flight path after each game and store it in Cloud Storage for Firebase. This action triggers another Cloud Function that sends a notification to the player, using Firebase Cloud Messaging. The notification lets the player know about the souvenir image and prompts her to share it with friends.
Getting Started
We had a blast building AppShip3000. Using Firebase to handle most of the infrastructure allowed us to focus on building a unique game that (we think) turned out to be a lot of fun to play. If you're interested in using Firebase in your own game, check our our C++ and Unity documentation. And to learn more about how Firebase and Google Cloud were used to manage the data pipeline of AppShip3000, check out our I/O talk. Can't wait to see what you build!
Last April, we announcedthe general availability of the Firebase Admin SDK for Python. The initial release of this SDK supported two important features related to Firebase Authentication: minting custom tokens, and verifying ID tokens. Now, we are excited to announce that database support is available in the Firebase Admin SDK for Python starting from version 2.1.0.
Due to the way it's implemented, there are several notable differences between this API and the database APIs found in our other Admin SDKs (Node.js and Java). The most prominent of these differences is the lack of support for realtime event listeners. The Python Admin SDK currently does not provide a way to add event listeners to a database reference in order to receive realtime update notifications. Instead, all data retrieval operations are provided as blocking methods. However, despite these differences there's a lot that can be achieved using this API.
The database module of the Python Admin SDK facilitates both basic data manipulation operations and advanced queries. To begin interacting with the database from a Python environment, initialize the SDK with the Realtime Database URL:
import firebase_admin from firebase_admin import credentials
Then obtain a database reference from the db module of the SDK. Database references expose common database operations as Python methods (get(), set(), push(), update() and delete()):
from firebase_admin import db

root = db.reference()
# Add a new user under /users.
new_user = root.child('users').push({
    'name' : 'Mary Anning',
    'since' : 1700
})

# Update a child attribute of the new user.
new_user.update({'since' : 1799})

# Obtain a new reference to the user, and retrieve child data.
# Result will be made available as a Python dict.
mary = db.reference('users/{0}'.format(new_user.key)).get()
print 'Name:', mary['name']
print 'Since:', mary['since']
In the Firebase Realtime Database, all data values are stored as JSON. Note how the Python Admin SDK seamlessly converts between JSON and Python's native data types.
To execute an advanced query, call one of the order_by_* methods available on the database reference. This returns a query object, which can be used to specify additional parameters. You can use this API to execute limit queries and range queries against your data, and retrieve sorted results.
from firebase_admin import db

dinos = db.reference('dinosaurs')

# Retrieve the five tallest dinosaurs in the database sorted by height.
# 'result' will be a sorted data structure (list or OrderedDict).
result = dinos.order_by_child('height').limit_to_last(5).get()

# Retrieve the 5 shortest dinosaurs that are taller than 2m.
result = dinos.order_by_child('height').start_at(2).limit_to_first(5).get()

# Retrieve the score entries whose values are between 50 and 60.
result = db.reference('scores').order_by_value() \
    .start_at(50).end_at(60).get()
Take a look at the Admin SDK documentation for more information about this new API. Also check out our Github repo, and help us further improve the Admin SDK by reporting issues and contributing patches. In fact, it was your continuing feedback that motivated us to build and release this API in such a short period. Happy coding with Firebase!
Testing your application is a great way to help maximize its quality, and many of you know that Firebase Test Lab for Android has some useful tools for testing Android apps. If you're the type of engineer who likes to maximize test coverage by writing instrumented tests (and regular unit tests), you can send those to Test Lab for execution. Even if you don't like writing tests, you have some options. You can record instrumented tests by interacting with your app using Espresso Test Recorder in Android Studio. And there's almost no effort required at all to run a Robo test that automatically crawls your app.
These tests are helpful for data-driven apps because there are robust test frameworks that understand how to navigate the Android platform widgets used to receive input and display data on screen. However, most games don't work with platform widgets. Games typically take over the screen using their own UI elements, and provide their own touch controls. As a result, it's extremely difficult to write instrumented tests for testing games, and Robo test won't know how to navigate the game at all.
To help deal with these challenges with testing games, the Test Lab team has come up with a way for game developers to test their games effectively across many of the devices that Test Lab offers. It's a new type of test called a Game Loop Test, and it's available today in beta.
How does a Game Loop test work?
If you've seen arcade video games operate, you know that they're always showing something on screen, typically some automated demo of the game, called "attract mode". With Firebase Test Lab, game developers can now use this concept of attract mode to construct test scenarios, and Test Lab will arrange for those scenarios to be invoked in sequence. This gives developers the opportunity to test a wide variety of game levels and situations in a single test run on all the devices provided by Test Lab. If there are any problems with a scenario, you'll find out which ones are problematic, so you can focus your efforts on improving that specific case.
Even better, Test Lab now provides performance data with every report. Of particular interest to game developers is a graph of the rendered frame rate over time throughout the test, tied to a video of the device display. This helps you quickly identify the parts of your game that aren't rendering at an acceptable FPS.
In addition to FPS, there are other performance metrics available for all apps. You'll be able to see your app's CPU utilization, memory usage, and network ingress and egress. Notice how you can jump directly to the point in the video where you're observing performance problems.
If you're a game developer, now is a great time to check out Firebase Test Lab for Android to see what it can do to help the quality of your game.
As the developer or the administrator of an app built on Firebase, you may need to perform various user management tasks. These include:
Provisioning new user accounts for your app
Updating existing user accounts
Manually verifying and enabling user accounts
Disabling or deleting user accounts
Querying user profile information to populate dashboards or compile reports
The Firebase Admin SDK provides a powerful API for performing these kinds of user management tasks from privileged environments. Using the Admin SDK, you can program these capabilities directly into your admin consoles, dashboards and other backend services. Unlike the Firebase client SDK, the Admin SDK is initialized with a service account credential, which grants the SDK elevated privileges necessary to perform user management operations.
This is not a brand new feature. The Firebase Admin Node.js SDK has had a user management API for a while. However, we are happy to announce that this API is now also available in our Admin Java SDK starting from version 5.1.0. This is one of the most requested features for the Admin Java SDK, and we are certain many Firebase app developers are going to find it useful.
The Java user management API closely mirrors its Node.js counterpart. Specifically, it consists of five new methods:
getUser()
getUserByEmail()
createUser()
updateUser()
deleteUser()
Following code snippet shows how to use some of these new methods in practice. In this example we retrieve an existing user account, and update some of its attributes:
final FirebaseAuth auth = FirebaseAuth.getInstance();
Task task = auth.getUserByEmail("editor@example.com")
    .addOnSuccessListener(userRecord -> {
      System.out.println("Successfully fetched user data: " + userRecord.getUid());
      UpdateRequest update = userRecord.updateRequest()
          .setDisabled(false)        // Enable the user account
          .setEmailVerified(true); // Set the email verification status
      auth.updateUser(update);
    })
    .addOnFailureListener(e -> {
      System.err.println("Error fetching user data: " + e.getMessage());
    });
You can learn more about the Firebase user management API from the Admin SDK documentation. Additionally, head over to our Github repoto see how it is implemented. (Yes, it's all open source!). You can also help us further improve this API by providing us feedback and reporting issues. As always, we are open to all sorts of contributions including pull requests to our codebase. Happy coding with Firebase!
Firebase Dynamic Links give you a single link that can send users either to your iOS or Android app, if they have it installed, or to the appropriate listing in the App Store or on Google Play, if they don't. Even better than that, Dynamic Links will deep link your users to the content they were looking for, even if they had to install the app in the process.
We've been working hard over the last year to make this experience smoother and more powerful for both developers and users, and we're happy to bring the latest set of improvements to developers in our iOS and Android SDKs.
Building Dynamic Links, Dynamically
Creating Dynamic Links through the Firebase Console was great for promotional campaigns, but we heard from our developers that they needed to be able to create user-to-user sharing campaigns programmatically from within their app.
To help you do just that, we've added support for generating both long and short dynamic links to the iOS and Android Firebase SDKs, which makes it quicker and easier to support these kind of use cases:
iOS:
guard let deepLink = URL(string: "https://mydomain.com/page?param=value") else { return }
let components = DynamicLinkComponents(link: deepLink, domain: domain)
// Build the dynamic link let link = components.url
// Or create a shortened dynamic link components.shorten { (shortURL, warnings, error) in if let error = error { print(error.localizedDescription) return }
// Build the dynamic link DynamicLink link = builder.buildDynamicLink();
// Or create a shortened dynamic link builder.buildShortDynamicLink() .addOnSuccessListener(new OnSuccessListener() { @Override public void onSuccess(ShortDynamicLink shortDynamicLink) { // } });
New Android API
We've also rebuilt the Android API from the ground up to make it easier to handle incoming Dynamic Links into your app, with the new FirebaseDynamicLinks class. You can add the new library by adding the following to your build.gradle:
Then processing an incoming Dynamic Link is easy in your launched activity:
FirebaseDynamicLinks.getInstance().getDynamicLink(getIntent()) .addOnSuccessListener( new OnSuccessListener() { @Override public void onSuccess(PendingDynamicLinkData data) { if (data == null || data.getLink() == null) { // No FDL pending for this app, don't do anything. return; }
Three years ago, we launched Firebase Hosting to make it easier for developers to deliver fast, engaging experiences on the web. Two months ago, we launched the beta of Cloud Functions for Firebase to let developers write custom backend logic without having to worry about servers or infrastructure. More recently at Google I/O, we brought Firebase Hosting and Cloud Functions together to provide a flexible set of tools to build Progressive Web Apps with world-class scale and performance.
You can connect an HTTPS Cloud Function to your Firebase Hosting app by adding a rewrite to the firebase.json configuration for your project:
Once connected, matching requests seamlessly proxy to your Cloud Function (in the example above, a function named myFunction). This one-line change enables exciting new capabilities for Firebase Hosting users including:
Server-Side Rendering. Until now, Firebase Hosting has only served static content. Now you can serve dynamic content using industry-standard libraries like Express, while still leveraging a lightning-fast global CDN cache.
Custom APIs. With Cloud Functions and Firebase Hosting, you can create custom API endpoints on your own domain, avoiding the overhead of cross-origin requests. Plus, with a few extra lines of code you can authorize your endpoints through Firebase Auth.
User-Generated Web Content. For the first time, Firebase Hosting can generate content compatible with AMP, Twitter Cards, and more without requiring a deploy. This means your Firebase Hosting apps can be more shareable and more searchable than ever before.
For Cloud Functions users, you can now run functions on an SSL-secured custom domain and get powerful caching to avoid unnecessary executions.
Product Manager Monitoring performance from the end user's point of view - both app code performance and network responsiveness/reliability - is a challenge for building great mobile apps. You have to be able to understand conditions that need improvement, in order to avoid user churn and negative reviews. Conversely, we have seen that 60% of 5-star reviews on Google Play mention speed, design or usability.
The biggest challenge in monitoring performance in native apps is understanding context. It's not enough to know that users experience delays or that your animations are not running smoothly; you need to understand where in your app that happens. It's also important to understand how those experiences differ for various countries, devices, OS levels, etc.
This is why we built Firebase Performance Monitoring for iOS and Android. It provides an SDK to capture and instrument performance metrics in production, and a console to gain insights about the data captured by the SDK.
Firebase Performance Monitoring provides two main features: traces and network activity monitoring. Let's talk about traces first. Traces allow you to instrument parts of your app to know the duration of an action, as well as attach custom metrics to that action using the "counter" API. As an example, you might set up a trace for the time from starting an image load until the image is fully rendered on the screen, and track how many times you hit or miss the cache while loading images using counters. Just by installing the SDK, you get an automated trace for your app start so you can monitor how long it takes users to go through a cold app start.
The other feature Firebase Performance offers is monitoring network activity. HTTP/S requests made by your app will be automatically monitored from the time they are sent until the response is received. For each URL pattern, you will see the response time, payload size and success rate.
When failures happen, you will also see a breakdown of 400 and 500 response codes that caused them.
All metrics collected for traces and network can be broken down by country, device, app version and OS version. This helps you narrow down the cause of an issue and fix it more easily.
Firebase Performance Monitoring is available now in beta. To learn more, check out the documentation right here, or watch our I/O session for a deep dive.