Wednesday, 29 March 2017

Using Firebase Cloud Messaging with Android O

Diego Giorgini
Diego Giorgini
Software Engineer


Firebase Cloud Messaging (FCM) is a cross-platform messaging solution that lets you reliably deliver messages to your apps and sites. It provides two types of messages:
  1. Notification Messages display a simple notification popup, with optional data payload.
  2. Data Messages deliver a JSON payload to your application and let your code handle it.
Data Messages are a great way to build custom notifications, when the layout provided by notification messages is not enough, or to trigger background operations like a database sync or the download of additional content (image attachments, emails, etc.)

How should Data Messages trigger background operations?

The best way to trigger a background operation from a data message is by using Firebase Job Dispatcher to take advantage of the Android JobScheduler and Google Play services API.

By using Firebase Job Dispatcher you allow the operating system to schedule your operation when it's best for the user (like avoiding extra work when the battery is very low, or when the CPU is already heavily used by other foreground applications). Firebase Job Dispatcher also guarantees that your background task will be performed, and not killed by the system when foreground applications require more resources.

Background Process Optimizations in Android O

To get started, check out the Android O Developer Preview site where you will find instructions on downloading and installing the required SDKs. For Firebase Development, you'll also need to install the Firebase SDKs for Android. Be sure to use version 10.2.1 or later for Android O development.

Android O introduces new background processes optimizations, which make the use of JobScheduler (or wrapper libraries like Firebase Job Dispatcher) a requirement for long-running background operations. Due to these optimizations, the FCM (hence GCM as well) callbacks onMessageReceived()and onTokenRefresh() have a guaranteed life cycle limited to 10 seconds (same as a Broadcast Receiver).

After the guaranteed period of 10 seconds, Android considers your process eligible for termination, even if your code is still executing inside the callback.

To avoid your process being terminated before your callback is completed, be sure to perform only quick operations (like updating a local database, or displaying a custom notification) inside the callback, and use JobScheduler to schedule longer background processes (like downloading additional images or syncing the database with a remote source).
@Override
public void onMessageReceived(RemoteMessage remoteMessage) {
if (/* Check if data needs to be processed by long running job */ true) {
// For long-running tasks (10 seconds or more) use Firebase Job Dispatcher.
scheduleJob();
} else {
// Handle message within 10 seconds
handleNow();
}
}
/**
* Schedule a job using FirebaseJobDispatcher.
*/
private void scheduleJob() {
FirebaseJobDispatcher dispatcher =
new FirebaseJobDispatcher(new GooglePlayDriver(this));
Job myJob = dispatcher.newJobBuilder()
.setService(MyJobService.class)
.setTag("my-job-tag")
.build();
dispatcher.mustSchedule(myJob);
}
/**
* Perform and immediate, but quick, processing of the message.
*/
private void handleNow() {
Log.d(TAG, "Short lived task is done.");
}
We hope this helps you understand how to use FCM to schedule long-running background operations. This solution greatly helps Android to preserve battery life and ensures that your application works fine on Android O. In case you have any questions don't hesitate to ask us on our support channels.
Share:

Sunday, 26 March 2017

Getting Started with React Native Template Design - Tutorial Part 1

We always look for apps that are faster to develop and run, React Native is one such emerging framework. Being focused on mobile development; React Native is an open source framework from Facebook which can be run on multiple platforms and devices such as iOS and Android. React Native is a javascript library. You do not have to learn iOS’ Swift or Java for Android, all you need to know is Javascript. I am going to present series of articles on React Native. This article explains making of native mobile template using React Native. Today, I am introducing video tutorials on Youtube for an easy learning.

React Native Template Design

Read more »
Share:

Friday, 24 March 2017

How to Schedule (Cron) Jobs with Cloud Functions for Firebase

Abe Haskins
Abe Haskins
Developer Programs Engineer

Cloud Functions are a great solution for running backend code for your Firebase app. You can write a function which is triggered by many different actions like user sign-ups, writes to the Realtime Database, changes to a Cloud Storage bucket, or conversion events in Firebase Analytics. Cloud Functions can also be triggered by some external sources, for example you could tie a Cloud Function to an HTTPS endpoint or a Cloud Pub/Sub topic.

Reacting to these events is very powerful, but you may not always want to react to an event - sometimes you may want to run a function based on a time interval. For example, you could clean up extra data in your Realtime Database every night, or run analysis on your Analytics data every hour. If you have a task like this, you'll want to use App Engine Cron with Cloud Functions for Firebase to reliably trigger a function at a regular interval.

How to Schedule Functions


Cloud Functions for Firebase does not have any special support which allow us to utilize App Engine Cron to schedule events. In fact, the solution we'll implement is nearly identical to the solution we recommend for doing reliable task scheduling on Google Compute Engine.

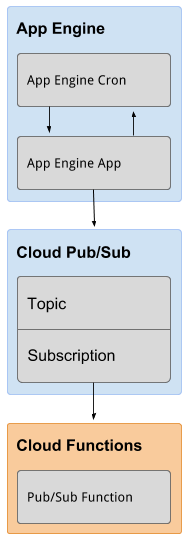
The trick is to create a tiny App Engine shim that provides hooks for App Engine Cron. These hooks will then push to Cloud Pub/Sub topics for each scheduled job.

We will then configure our Cloud Function to handle incoming messages on that Pub/Sub topic.
Although this solution is the preferred option for scheduling functions, it isn't the only way you achieve this goal. If you're interested in seeing an alternative method, you should check out the functions-samplesrepository which explains how to achieve a similar result using an external scheduling service.

Deploying the App Engine App

It just so happens that we've already written the App Engine app you'll need to set up scheduled functions. It's available in the firebase/functions-cronrepo on Github.

By default this sample triggers hourly, daily, and weekly Cloud Pub/Sub ticks. If you want to customize this schedule for your app then you can modify the cron.yaml.

For details on configuring this, please see the cron.yaml Reference in the App Engine documentation.

Let's get started!

1. Prerequisites

Install (or check that you have previously installed) the following tools.

2. Clone this repository

To clone the GitHub repository to your computer, run the following command:

git clone https://github.com/firebase/functions-cron
Change directories to the functions-cron directory. The exact path depends on where you placed the directory when you cloned the sample files from GitHub.

cd functions-cron

3. Deploy to App Engine

Configure the gcloud command-line tool to use your Firebase project.

gcloud config set project 
Change directory to appengine/
cd appengine/

Install the Python dependencies
$ pip install -t lib -r requirements.txt
Create an App Engine App

gcloud app create
Deploy the application to App Engine.
gcloud app deploy app.yaml \ cron.yaml
Open Google Cloud Logging and in the right dropdown select "GAE Application". If you don't see this option, it may mean that App Engine is still in the process of deploying.

Look for a log entry calling /_ah/start. If this entry isn't an error, then you're done deploying the App Engine app.

4. Deploy to Google Cloud Functions for Firebase

Ensure you're back the root of the repository (cd .. if you're coming from Step 2)
Deploy the sample hourly_job function to Google Cloud Functions

firebase deploy --only functions --project 
Warning: This will remove any existing functions you have deployed. If you have existing functions, copy the example from functions/index.jsinto your project's index.js

5. Verify your Cron Jobs

We can verify that our function is wired up correctly by opening the Task Queue tab in App Engine and clicking on Cron Jobs. Each of these jobs has a Run Now button next to it.

The sample functions we deployed only has one function: hourly_job. To trigger this job, let's hit the Run Now button for the /publish/hourly-tick job.

Then, go to your terminal and run...

firebase functions:log --project 
You should see a successful console.log from your hourly_job.

You're Done!

Your cron jobs will now "tick" along forever. As we mentioned above, you're not limited to the hourly-tick, daily-tick and weekly-tick that are included in the App Engine app.

You can add more scheduled functions by modifying the cron.yamlfile and re-deploying the app.

Share:

Thursday, 23 March 2017

Angular 4.0.0 Now Available

Angular version 4.0.0 - invisible-makeover - is now available. This is a major release following our announced adoption of Semantic Versioning, and is backwards compatible with 2.x.x for most applications.

We are very excited to share this release with the community, as it includes some major improvements and functionality that we have been working on for the past 3 months. We’ve worked hard to make sure that it’s easy for developers to update to this release.

What’s New

Smaller & Faster

In this release we deliver on our promise to make Angular applications smaller and faster. By no means are we done yet, and you'll see us being focused on making further improvements in the coming months.

View Engine

We’ve made changes under to hood to what AOT generated code looks like. These changes reduce the size of the generated code for your components by around 60%  in most cases. The more complex your templates are, the higher the savings.
During our release candidate period, we heard from many developers that migrating to 4 reduced their production bundles by hundreds of kilobytes.
Read the Design Doc to learn more about what we did with the View Engine.

Animation Package

We have pulled animations out of @angular/core and into their own package. This means that if you don’t use animations, this extra code will not end up in your production bundles.
This change also allows you to more easily find documentation and to take better advantage of autocompletion. You can add animations yourself to your main NgModule by importing BrowserAnimationsModule from @angular/platform-browser/animations.

New Features

Improved *ngIf and *ngFor

Our template binding syntax now supports a couple helpful changes. You can now use an if/else style syntax, and assign local variables such as when unrolling an observable.
<div *ngIf="userList | async as users; else loading">
 <user-profile *ngFor="let user of users; count as count; index as i" [user]="user"> User {{i}} of {{count}}
 </user-profile>
</div>
<ng-template #loading>Loading...</ng-template>

Angular Universal

Universal, the project that allows developers to run Angular on a server, is now up to date with Angular again, and this is the first release since Universal, originally a community-driven project, was adopted by the Angular team. This release now includes the results of the internal and external work from the Universal team over the last few months. The majority of the Universal code is now located in @angular/platform-server.

To learn more about taking advantage of Angular Universal, take a look at the new renderModuleFactory method in @angular/platform-server, or Rob Wormald’s Demo Repository. More documentation and code samples are forthcoming.

TypeScript 2.1 and 2.2 compatibility

We’ve updated Angular to a more recent version of TypeScript. This will improve the speed of ngc and you will get better type checking throughout your application.

Source Maps for Templates

Now when there is an error caused by something in one of your templates, we generate source maps that give a meaningful context in terms of the original template.

Packaging Changes

Flat ES Modules (Flat ESM / FESM)

We now ship flattened versions of our modules ("rolled up" version of our code in the EcmaScript Module format, see example file). This format should help tree-shaking, help reduce the size of your generated bundles, and speed up build, transpilation, and loading in the browser in certain scenarios.

Read more about the importance of Flat ES Modules in "The cost of small modules".

Experimental ES2015 Builds

We now also ship our packages in the ES2015 Flat ESM format. This option is experimental and opt-in. Developers have reported up to 7% bundle size savings when combining these packages with Rollup. To try out these new packages, configure your build toolchain to resolve "es2015" property in package.json over the regular "module" property.

Experimental Closure Compatibility

All of our code now has Closure annotations, making it possible to take advantage of advanced Closure optimizations, resulting in smaller bundle sizes and better tree shaking.

Updating to 4.0.0

Updating to 4 is as easy as updating your Angular dependencies to the latest version, and double checking if you want animations. This will work for most use cases.

On Linux/Mac:
npm install @angular/{common,compiler,compiler-cli,core,forms,http,platform-browser,platform-browser-dynamic,platform-server,router,animations}@latest typescript@latest --save
On Windows:
npm install @angular/common@latest @angular/compiler@latest @angular/compiler-cli@latest @angular/core@latest @angular/forms@latest @angular/http@latest @angular/platform-browser@latest @angular/platform-browser-dynamic@latest @angular/platform-server@latest @angular/router@latest @angular/animations@latest typescript@latest --save
Then run whatever ng serve or npm start command you normally use, and everything should work.
If you rely on Animations, import the new BrowserAnimationsModule from @angular/platform-browser/animations in your root NgModule. Without this, your code will compile and run, but animations will trigger an error. Imports from @angular/core were deprecated, use imports from the new package import { trigger, state, style, transition, animate } from '@angular/animations';.
We are beginning work on an interactive Angular Update Guide if you would like to see more information about making any needed changes to your application.

Known Issues

One of the goals for version 4 was to make Angular compatible with TypeScript's strictNullChecks setting, allowing for a more restrictive subset of types to be mandated. We discovered during the RC period that there is more work to be done for this to function properly in all use cases, so we intentionally made 4.0 incompatible with the strictNullChecks setting in order to  avoid breaking apps that would otherwise eagerly adopt this TypeScript mode when the proper support lands in 4.1 (tracking issue is #15432).

What's next?

We are in the process of setting the roadmap for the next 6 months, following the same cadence as our published release schedule for 2.x. You'll see patch updates to 4.0.0 and we are already getting started on 4.1. We are going to continue making Angular smaller and faster, and we're going to evolve capabilities such as @angular/http, @angular/service-worker, and @angular/language-service out of experimental.

You should also stay tuned for updates to our documentation, a stable release of the CLI, and guidance for library authors on packaging.

Share:

Wednesday, 22 March 2017

BigQuery Tip: The UNNEST Function

Todd Kerpleman
Todd Kerpelman
Developer Advocate
By now, you probably already know that you can export your Firebase Analytics data to BigQuery, which lets you run all sorts of sophisticated ad hoc queries against your analytics data.

At first, the data set in BigQuery might seem confusing to work with. If you've worked with any of our public BigQuery data sets in the past (like the Hacker News post data, or the recent San Francisco public data that our Developer Advocate Reto Meier had fun with), it probably looked a lot like a big ol' SQL table. Something like this:
The truth of the matter is that BigQuery can get much more sophisticated than that. The rows of a BigQuery table don't just have to be straightforward key-value pairs. They can look more like rows of JSON objects, containing some simple data (like strings, integers, and floats), but also more complex data like arrays, structs, or even arrays of structs. Something a little more like this:

Firebase Analytics takes advantage of this format to bundle all of your users' user properties together in the same row. Rather than have you perform some kind of join against a separate user_properties table, all of your user properties are included in the same BigQuery row as an array of structs.

A slightly simplified version of the user_properties struct in your BigQuery data 

The same thing holds true for your events. Your event parameters are included inside your events as an array of structs. And it turns out these events themselves are stored inside of an array. One single row of data in BigQuery will often contain 2 or 3 Firebase Analytics events all bundled together.
This means a single row in your BigQuery table can contain an array of user properties, as well as an array of events, which in turn also have their own arrays of event parameters. I know combining all of that information into a data structure like this seems confusing at first, but in the long run, it actually makes your life easier because there aren't any JOINs with other tables for you to worry about.

Important note: For all of these examples, I'm going to be using standard SQL, which is what all the cool kids are doing this days1. If you want to follow along, turn off Legacy SQL in your BigQuery options. Also, you'll need to follow this link to access the sample Firebase Analytics data we'll be using.

For example, I can see all of my event data at once just by calling

#standardSQL
SELECT event_dim
FROM `firebase-analytics-sample-data.android_dataset.app_events_20160607`
LIMIT 50
and I'll get back all of my event data, along with all of the event parameters, in one nice little table
And then if we want to get a list of all of my "Round completed" events, I can just write some SQL like this…

#standardSQL
SELECT event_dim
FROM `firebase-analytics-sample-data.android_dataset.app_events_20160607`
WHERE event_dim.name = "round_completed"
...which gives me a nice result of...

Error: Cannot access field name on a value with type ARRAY<STRUCT<date STRING, name STRING, params ARRAY<STRUCT<key STRING, value STRUCT<string_value STRING, int_value INT64, float_value FLOAT64, ...>>>, ...>> at [2:17]

Oh. Oh dear. 

Okay, so this won't win any awards for "Best Error Message of 2017"2 , but if you think about it, the reason it's barfing makes sense. You're trying to compare a string value to "an element of a struct that's buried inside of an array". Sure, that element ends up being a string, but they're fairly different objects.

So to fix this, you can use the UNNEST function. The UNNEST function will take an array and break it out into each of its individual elements. Let's start with a simple example.

Calling:

#standardSQL
WITH data AS (
SELECT "primes under 15" AS description,
[1,2,3,5,7,11,13] AS primes_array)
SELECT *
FROM data
will give you back a single row consisting of a string, and that array of data.

Instead, try something like this:

#standardSQL
WITH data AS (
SELECT "primes under 15" AS description,
[1,2,3,5,7,11,13] AS primes_array)
SELECT description, prime
FROM data CROSS JOIN UNNEST (primes_array) as prime
What you're basically saying is, "Hey, BigQuery, please break up that primes_array into its individual members. Then join each of these members with a clone of the original row." So you end up with a data structure that looks more like this:
The results are similar as before, but now each prime is in its own row:
You'll notice that the original primes_array is still included in the data structure. In some cases (as you'll see below), this can be useful. In this particular case, I found it was a little confusing, which is why I only asked for the individual fields of description and prime instead of SELECT *.3

It's also common convention to replace that CROSS JOIN syntax with a comma, so you get a query that looks like this.

#standardSQL
WITH data AS (
SELECT "primes under 15" AS description,
[1,2,3,5,7,11,13] AS primes_array)
SELECT description, prime
FROM data, UNNEST (primes_array) as prime
It's the exact same query as the previous one; it's just a little more readable. Plus, I can now stand by my original statement that this data format means you don't have perform any JOINs. :)

And the nice thing here is that I now have one piece of "prime" data per column that I can interact with. So I can start to do comparisons like this:

#standardSQL
WITH data AS (
SELECT "primes under 15" AS description,
[1,2,3,5,7,11,13] AS primes_array)
SELECT description, prime
FROM data, UNNEST (primes_array) as prime
WHERE prime > 8
To get just that list of prime numbers between 8 and 15.
So going back to our Firebase Analytics data, I can now use the UNNEST function to look for events that have a specific name. 

#standardSQL
SELECT event.name, event.timestamp_micros
FROM `firebase-analytics-sample-data.android_dataset.app_events_20160607`,
UNNEST(event_dim) as event
WHERE event.name = "round_completed"

As you'll recall, events have their own paramsarray, which contains all of the event parameters. If I were to UNNEST those as well, I'd be able to query for specific events that contain specific event parameter values:

#standardSQL
SELECT event, event.name, event.timestamp_micros
FROM `firebase-analytics-sample-data.android_dataset.app_events_20160607`,
UNNEST(event_dim) as event,
UNNEST(event.params) as event_param
WHERE event.name = "round_completed"
AND event_param.key = "score"
AND event_param.value.int_value > 10000

Note that in this case, I am selecting "event" as one of the fields in my query, which gives me the original array of all my event parameters nicely grouped together in my table results.

Querying against user properties works in a similar manner. Let's say I'm curious as to what language my users prefer using for my app, something our app is tracking in a "language" user property. First, I'll use the UNNEST query to get just a list of each user and their preferred language.

#standardSQL
SELECT
user_dim.app_info.app_instance_id as unique_id,
MAX(user_prop.key) as keyname,
MAX(user_prop.value.value.string_value) as keyvalue
FROM `firebase-analytics-sample-data.android_dataset.app_events_20160607`,
UNNEST(user_dim.user_properties) AS user_prop
WHERE user_prop.key = "language"
GROUP BY unique_id
And then I can use that as my inner selection to grab the total number of users4 that fits into that group.
#standardSQL
SELECT keyvalue, count(*) as count
FROM (
SELECT
user_dim.app_info.app_instance_id as unique_id,
MAX(user_prop.key) as keyname,
MAX(user_prop.value.value.string_value) as keyvalue
FROM `firebase-analytics-sample-data.android_dataset.app_events_20160607`,
UNNEST(user_dim.user_properties) AS user_prop
WHERE user_prop.key = "language"
GROUP BY unique_id
)
GROUP BY keyvalue
ORDER BY count DESC
I can also UNNEST both my event parameters and my user properties if I want to create one great big query (no pun intended) where I want to look at events of a specific name where an event parameter matches a particular criteria, while also filtering by users who meet a certain criteria:

#standardSQL
SELECT user_dim, event, event.name, event.timestamp_micros
FROM `firebase-analytics-sample-data.android_dataset.app_events_20160607`,
UNNEST(event_dim) as event,
UNNEST(event.params) as event_param,
UNNEST(user_dim.user_properties) as user_prop
WHERE event.name = "round_completed"
AND event_param.key = "squares_daubed"
AND event_param.value.int_value > 20
AND user_prop.key = "elite_powers"
AND (CAST(user_prop.value.value.string_value as int64)) > 1
Once you start playing around with the UNNESTfunction, you'll find that it's really powerful and it can make working with Firebase Analytics data a lot more fun. If you want to find out more, you can check out the Working with Arrays section of BigQuery's standard SQL documentation.

And don't forget, you get 1 terabyte of usage data for free every month with BigQuery, so don't be afraid to play around with it. Go crazy, you array expander, you!


1 The BigQuery team has asked me to inform you that this is really because standard SQL is the preferred SQL dialect for querying data stored in BigQuery. But I'm pretty sure they're just saying that so they get invited to all the good parties.

2 Yet another year the Messies have slipped from our grasp!

3   I could have also done this by saying "SELECT * EXCEPT (primes_array)", which can be pretty convenient sometimes.

4 Okay, technically, each "App Instance" -- a user interacting with my app from multiple devices would get counted multiple times here.


Share:

Saturday, 18 March 2017

Take Control of Your Firebase Init on Android

Doug Stevenson
Doug Stevenson
Developer Advocate
A while back, we discussed how Firebase initializes on Android. There was a lot of great discussion around that, and it sounded like some of you experimented with the same technique for getting your own Android libraries initialized. Many of you also noted that there were a few situations when you couldn't use the normal automatic init procedure.

What if you have a customized build system?

Normally, Android apps using Firebase are built with Gradle and the Google Services Gradle Plugin. This plugin pulls your Firebase project data out of google-services.json, and adds it to your app's resources. Once the resources are added to your project, there is a component called FirebaseInitProvider that automatically picks up those values and initializes Firebase with them.
However, if you have a different build system, such as Bazel, or you're otherwise unable to use the Gradle plugin, you need to find another way to get those resources into your app. The solution could be as simple as creating your own resource XML file and adding the correct values to it. The documentation for the plugin gives the details of how to get those values out of your google-services.json file and into your resources.

What if you need to select your app's Firebase project at runtime?

It's very rare, but sometimes an app must be able to select its Firebase project at runtime. This means your app can't use the automatic init provided by the FirebaseInitProvider that's merged into your app. In that case, the solution has two tasks.

1. Disabling FirebaseInitProvider

FirebaseInitProvider is normally automatically merged into your app build by the Android build tools when doing a build with Gradle. If you're doing your own init, however, you'll to make sure it doesn't get merged at all. The way to do that is to use your own app's manifest to override that behavior. In your manifest, add an entry for FirebaseInitProvider, and make sure to use a node marker to set its tools:node attribute to the value "remove". This tells the Android build tools not to include this component in your app:
<provider
android:name="com.google.firebase.provider.FirebaseInitProvider"
android:authorities="${applicationId}.firebaseinitprovider"
tools:node="remove"
/>

If you don't have the "tools" namespace added to your manifest root tag, you'll have to add that as well:
<manifest
xmlns:android="http://schemas.android.com/apk/res/android"
xmlns:tools="http://schemas.android.com/tools"
package="your.package"
>

2. Calling FirebaseApp.initializeApp() to initialize

Because you removed FirebaseInitProvider, you'll need to perform the same init somewhere in your app (in your own ContentProvider during its onCreate, to ensure Analytics can measure your app correctly). The method you'll need to call is FirebaseApp.initializeApp(Context, FirebaseOptions). If you click through to the javadoc, you'll see a few varieties of that method. The one you want takes both a Context and FirebaseOptionsto initialize the default FirebaseApp instance. You can create a FirebaseOptions object using its Builder:

FirebaseOptions.Builder builder = new FirebaseOptions.Builder()
.setApplicationId("1:0123456789012:android:0123456789abcdef")
.setApiKey("your_api_key")
.setDatabaseUrl("https://your-app.firebaseio.com")
.setStorageBucket("your-app.appspot.com");
FirebaseApp.initializeApp(this, builder.build());
The documentation for the plugin will help you locate the correct strings for your project in your google-services.json file.

With these changes in place, you no longer need the Google services plugin and its JSON config file in your project.

Again, if you're happy with the way your Android app builds, you shouldn't need to implement any of the changes here. Otherwise, if your situation requires it, the information here should be all you need to do to take control of your Firebase init.
Share:

Thursday, 16 March 2017

Contentmart: Honest Review

Do you wish to shine brightly in the engaging field of content writing? Are you hoping to get jobs in freelance content writing? Are you looking for talented writers across the country to write an exciting and quality article for you? Well, now you don’t need to spend a hefty amount of time browsing opportunities online. The Internet is a vast marketplace and there are loads of websites offering your needs in contents, but they are time-consuming, lacks a number of options and face issues with the payout. Contentmart is your one-stop solution to all your content needs.

Contentmart – The Best Paying Digital Content Marketplace

Read more »
Share:

Tuesday, 14 March 2017

Profiling your Realtime Database Performance

Tyler Rockwood
Tyler Rockwood
Software Engineer
The Firebase Realtime Database has traditionally been a black box that doesn't really give you a lot of insight into its performance. We're changing that. Today, you'll be able to get insights into how your database instance is performing by using the profiler built into the Firebase CLI. You can now easily monitor your database writes and reads at the path level, collecting granular data on bandwidth usage and speed.


To start, make sure you have the latest version of the Firebase CLI installed and initialized. Start profiling using the database:profile command.


firebase database:profile 


This will start streaming operations from your Realtime Database. When you press enter, the CLI aggregates the collected data into a summary table broken down into three main categories: speed, bandwidth and unindexed queries. Speed and bandwidth reports are further broken down by the operation type (write or read) and the path in your Realtime Database. If you have a location with more than 25 children (for example, if you're using .push in the SDKs), the summary table collapses those paths into a single entry and replaces the push ids with $wildcard.


Speed*

This table displays 4 items: the path, the number of times that location has been hit, the number of milliseconds it took for the server to process the request, and the number of times that the path has been denied by rules.


Bandwidth**

The table displays 3 items: the path, the total amount of bandwidth for the path, and the average bandwidth per operation.


Unindexed Queries

This shows 3 things: the path, the index rule that should be added to your rules, and the number of times the location has been queried. Warnings for these queries also show up in the SDK logs.


What if this isn't enough?


You can also collect the raw operations from your server by using the --raw flag (you'll probably also want to specify an output file with --output), to get more detailed information like ip addresses and user agent strings for connected applications. See the profiler reference page for a complete list of possible operations you can collect information about and what they show.


* Speeds are reported at millisecond resolution and refers to the time it takes for the database to process an operation. However, you may see vastly different latencies depending on network conditions and numerous other factors.


** Bandwidth is an estimate based on the data payload and is not a valid measure of the billable amount. Values here could be over or under your actual billed bandwidth, and the stats sent by the profiler also count towards your bandwidth bill.
Share:

Friday, 10 March 2017

Multiplying the Power of Firebase Storage

Mike McDonald
Mike McDonald
Product Manager
Since the initial release of Firebase Storage at Google I/O 2016, we've been happy to see mobile app developers make use of its scalable, secure, and robust file storage to power their apps. Hundreds of thousands of developers have created buckets, and we serve hundreds of millions of requests for photos, videos, audio, and other rich media every day.

But we're not done yet: we have a few more features lined up that will make it faster and easier to store and share your app's content.

Use multiple buckets in your projects

After our launch at I/O '16, Firebase projects were limited to a single bucket, located in the United States. With our announcement at Google Cloud Next '17, any Firebase project on the Blaze payment plan can now create buckets in any of the regions and storage classes supported by Google Cloud Storage. This enables some powerful use cases:
  • Logically separate different types of data (e.g. user data from developer data).
  • Store data in a locationcloser to users, either to optimize performance or support regulatory compliance.
  • Reduce cost by storing infrequently accessed data (e.g. backups) in a different storage class.
Creating new buckets in the Firebase Console is easy: just select the location and storage class and give it an easy-to-remember name!

Link existing buckets to your projects

Because every Firebase project is also a Google Cloud Platform project, you can easily use any existing Cloud Storage buckets directly with Firebase SDKs for Cloud Storage. This means your mobile and web apps can access data in your buckets without having to do an expensive data migration. This is a useful feature for existing apps looking to modernize by integrating Firebase.

Linking your existing bucket to Firebase is easier than creating a new one: just select the bucket you want to import, configure your security rules to allow access, and start using the bucket directly from your app.


Integrate with Google Cloud Functions

At Google Cloud Next '17 we also announced Cloud Functions for Firebase, which enables developers to write code that responds to events in Cloud or Firebase features. Cloud Storage for Firebase integrates well with that, allowing you to trigger code when a file is uploaded, changed, or deleted from a storage bucket. This powerful mechanism enables developers to build new functionality on top of their project storage, such as automatically converting images, generating thumbnails, moderating images with the Google Cloud Vision API, and extracting metadata. Previously, these tasks would have required maintenance of a custom backend, but now, Cloud Functions makes it easy to automate by deploying code with a single command line.

Same feature, new name

With these new features and integrations with Cloud Storage, we're proud to announce Firebase Storage is now Cloud Storage for Firebase. We want to highlight the fact that Firebase Storage is Google Cloud Storage, and that using Firebase means that you're getting the ease of use of an SDK tailored for mobile and web developers, plus the full scale and performance of Google's infrastructure.

You can continue to use the existing Firebase SDKs for Cloud Storage on iOS, Android, JavaScript, C++, and Unity, knowing that your data is stored on the same infrastructure that powers Snapchat, Spotify, and Google Photos. And if you want to access data from Cloud Functions or your own server, you can always use the Cloud Storage server SDKs.

We think you're going to love the expanded Cloud Storage for Firebase. When you're building your next app with us, reach out on Twitter, Facebook, Slack, or our Google Group and let us know how it's going. We can't wait to see what you build!
Share: