Wednesday, 24 August 2016

iOS 10, Xcode 8, and Swift 3, oh my!

Frank van Puffelen
Todd Kerpelman
Developer Advocate

We know that it's important for you to make sure your apps can run on the latest and greatest technology out there. And in the world of iOS development, there's this little release on the horizon called iOS 10 that many of you are excited about supporting with your apps.

Well, we here on the Firebase team also want to make sure your apps are up and running on iOS 10 as soon as it's made available to the general public. So we're going to go over some of the changes that we've included in the latest version (3.5.1) of the Firebase Cocoapod, and let you know about upcoming changes that will affect you as we move into the exciting new world of iOS 10 development.

Dynamic Links, Invites, App Indexing

With the latest version of the Firebase library, we've added support for handling deep links on iOS 10. If your app uses a feature that relies on deep links -- specifically, Dynamic Links, Firebase Invites, and App Indexing -- go ahead and update to the latest version of the library. Rebuild your app (no code changes needed!), and these features should all work properly.

Firebase Analytics

The latest version of the Firebase SDK includes some changes to more accurately track app installs resulting from AdWords search and display ads. If this sounds familiar, it’s because this feature was also included in version 3.3.0 of Firebase, but now we've added support for this on iOS 10 as well. Like the new deep link support, this should work automatically if you rebuild your code with the new library.

Firebase Cloud Messaging

iOS 10 made a lot of exciting changes around notifications, along with new ways for you as a developer to handle incoming user notifications. Specifically, notifications are now handled by methods belonging to the UNUserNotificationCenterDelegate protocol, while the old UIApplicationDelegate methods likeapplication:didReceiveRemoteNotification are now deprecated.

That said, you might notice that the most recent release of the Firebase SDK is still calling the older appDelegate methods. We hope to have support for these new UNUserNotificationCenterDelegate protocol methods soon, so do keep an eye out for any future announcements as we update our libraries.

A Quick Note About Firebase Auth and Xcode 8

We've noticed what seems to be an issue with the latest iOS 10 simulators (up to beta 6 at the time of this writing) that causes Firebase Auth to throw an error due it to not being able to write values to the keychain. This issue does not affect real devices.

We have filed a radar with Apple and are hoping to get this issue resolved shortly, but you may encounter errors when testing Firebase Auth in the simulator. As a workaround, we recommend testing Auth on a physical device running iOS 10. If you do not have access to a real device, you also can try enabling Keychain Sharing in the Capabilities section of your app, as described in this StackOverflowpost.

What about Swift 3?

You might have noticed that the code samples in our documentation still reflect Swift 2.3. With all the changes that are still happening in Swift 3, we've decided to wait until version 3.0 has been officially released before switching over the code samples in our documentation.

Of course, if you're interested in trying out our samples in Swift 3, you can always download our latest sample code and let Xcode's Swift conversion tool convert the samples for you. It does a remarkably good job. And, in the next few days, we'll be creating a specific Swift 3 branch of our sample apps, so you can check out those branches from GitHub and see the source code without having to go through the conversion process.

Send us Feedback!

Obviously, releasing a library to support an operating system that's still in beta is a tricky proposition. Issues may still arise here and there as new versions of iOS 10 are made available, and if they do, we'll try to address them as quickly as we can. So if you encounter an error that seems to be specific to iOS 10, please let us know! Our Google Group is a good place to start.

Share:

Thursday, 18 August 2016

Angular Material - 1.1 and 2.x

We promised in March that you'd continue to see updates on the Angular Material 1.x branch, in addition to ongoing bugfix releases.

I'm happy to announce the release of Angular Material 1.1, now available for use with Angular 1.x applications.

We've also added some new faces to the team. Welcome to Erin, Paul, and Kristiyan as new core contributors.  As lead for one of the internal Google projects using Angular, Erin and her team contributed to Angular Material 1.x with architecture designs and implementations for the new <md-nav-bar> and $mdPanel components. Paul and Kristiyan are developers from the open source community who joined the core team just before 1.0, at the end of 2015.

Why should you update from Angular Material 1.0 to 1.1?

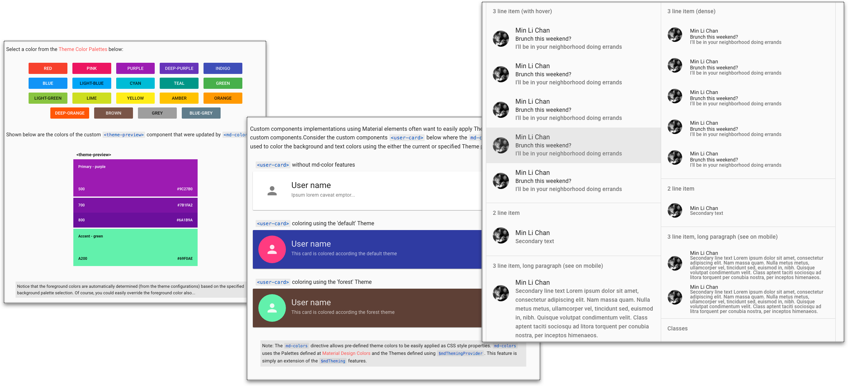
With more than 700 commits, the updates in version 1.1 directly improve the responsiveness and stability of Angular Material components. In particular, this release improves the behavior of Tooltip, Progress Indicators, Menu, Select, Chips, and AutoComplete components.

You'll also find new components nav-bar, colors, theme picker, dense layouts for lists, vertical sliders, select-header, and more.
newComponents.png


Finally, we've added community-requested features for global-level control over appearance, including disabling themes, layouts, and/or ripples. For full details, see the changelog.

We anticipate that most apps will find it easy to update to 1.1. As part of upgrading, you'll want to check the CSS, colors, and spacings on 1.1, especially if you have applied customizations.

What about Angular 2.x?

Angular Material 2 continues in alpha preview. Since we announced our first alpha release, we've grown from six to eighteen components, and have been using Angular Material 2 as one of the validation tests for each Angular 2 release candidate.

You can see the published components on npm and follow our development progress on GitHub.
Share:

Tuesday, 16 August 2016

Wall Comment System with React JS Part Two

This post is continuation of React JS previous post. React JS is lighter and faster. It needs less coding and as mentioned in the earlier post, React suites best for one page application, front-end and single page websites. The article explains how to post a comment, delete a comment and also toggle(hide/show) a comment using React JS. React JS and Angular JS are two prominent frameworks in JavaScript now-a-days. As its a new series in my blog, I would appreciate for any doubts or your feedback in the comments so that I could explain it to you in a better way.

Social Network System with React JS

Read more »
Share:

Sunday, 14 August 2016

Social Network System with React JS Part One

How to solve infinity loading either in your desktop or mobile? By now, everyone is familiar with JQuery, but we all know is JQuery cannot handle such large amount of data to load. React JS is the best solution for this problem. JQuery and other libraries interacts directly with DOM to load any data; but React JS is specifically designed in such a way that it has a mid interactive layer called Virtual DOM which in turn interacts with DOM(as shown in the diagram below). This Virtual DOM helps in data loading very faster.

Social Network System with React JS

Read more »
Share:

Wednesday, 10 August 2016

Sending notifications between Android devices with Firebase Database and Cloud Messaging


Frank van Puffelen
Frank van Puffelen
Engineer

In this article we will show how to send notifications between Android devices using Firebase Database, Cloud Messaging and Node.js. Since this article was written, we also released Cloud Functions for Firebase, which offers a way to send notifications without requiring a Node.js server. See the documentation on sending notifications with Cloud Functions to learn more.
The Firebase Database is a great back-end for building multi-user mobile applications. Whenever multiple users have the application open, changes that any user makes are synchronized to all other connected users within milliseconds.
A great example of this is a chat application: any message that a user sends is instantly synchronized to other users. That leads to a very smooth chat experience.
But what if one of the users doesn't have the application running on their Android device? That means that the device is not connected to the Firebase Database servers, so it will not receive the changes automatically. This is fine for regular chat messages, but in most chat apps you want to pull the user back in when someone @ mentions them (e.g. "hey @puf, can you help out here?")
For this scenario, you'll typically send a notification to the user's device using Firebase Cloud Messaging. Such a notification will then show up in the notification area of the device, providing a great way to get the user back into the application when an interesting event happens.
In this article, we'll use Firebase Cloud Messaging to deliver the notification to the device. We'll write a Node script that interacts with FCM, so that we don't have to expose our API key on the Android devices. But first: we need to figure out what the code for sending a notification will look like on the Android device itself.

Sending a push notification from the Android app

To send a notification to a user, our Android application does the following:
sendNotificationToUser("puf", "Hi there puf!");
The sendNotificationToUser() method is a helper that we implemented like this:
public static void sendNotificationToUser(String user, final String message) {
Firebase ref = new Firebase(FIREBASE_URL);
final Firebase notifications = ref.child("notificationRequests");

Map notification = new HashMap<>();
notification.put("username", user);
notification.put("message", message);

notifications.push().setValue(notification);
}
This is probably not what you expected. This code just writes the notification data to the Database. How is that sending a notification?
It is not. We are using the database as a queue here. Our Android app writes the request to send a notification into the database, where our Node script will pick it up and send the notification through Cloud Messaging. We'll have a look at that script in a minute. First, we want to talk a bit about how we structured the data for this application.

Data structure

Just like with any application, the data structure is probably one of the most important parts of your Firebase-backed application. We've already seen the data structure for sending notifications:
  notificationRequests
$pushid
message: "Hello there"
username: "puf"
This is the node that our Android application was writing to. Each notification request consists of the message that we're sending and the name of the user we're notifying. How we're mapping the username to an actual notification depends a bit on your application. But in this case, we're going to use topic based notification: a username is mapped to a topic /topics/user_. So in my case the message will be sent to (and the Android application will subscribe to) /topics/user_puf.
Now it's about time we get to the Node code I've been talking about.

Node code

Now that we know how the Android app writes a notification request into the database, and we know what the database structure looks like, it's time to write the code that will actually be sending the notifications.
This is going to be a Node process, which runs on a trusted environment, such as a Google App Engine Flexible Environment. The node script monitors the notification queue that we saw above. For every child that is added to this queue, it extracts the necessary information and then calls the Cloud Messaging REST API to send the notification. If that succeeds, it removes the notification request from the queue.
var firebase = require('firebase-admin');
var request = require('request');

var API_KEY = "..."; // Your Firebase Cloud Messaging Server API key

// Fetch the service account key JSON file contents
var serviceAccount = require("path/to/serviceAccountKey.json");

// Initialize the app with a service account, granting admin privileges
firebase.initializeApp({
credential: firebase.credential.cert(serviceAccount),
databaseURL: "https://<your database>.firebaseio.com/"
});
ref = firebase.database().ref();

function listenForNotificationRequests() {
var requests = ref.child('notificationRequests');
requests.on('child_added', function(requestSnapshot) {
var request = requestSnapshot.val();
sendNotificationToUser(
request.username,
request.message,
function() {
requestSnapshot.ref.remove();
}
);
}, function(error) {
console.error(error);
});
};

function sendNotificationToUser(username, message, onSuccess) {
request({
url: 'https://fcm.googleapis.com/fcm/send',
method: 'POST',
headers: {
'Content-Type' :' application/json',
'Authorization': 'key='+API_KEY
},
body: JSON.stringify({
notification: {
title: message
},
to : '/topics/user_'+username
})
}, function(error, response, body) {
if (error) { console.error(error); }
else if (response.statusCode >= 400) {
console.error('HTTP Error: '+response.statusCode+' - '+response.statusMessage);
}
else {
onSuccess();
}
});
}

// start listening
listenForNotificationRequests();
For more information on accessing Firebase from a server, see how to set up the Firebase Admin SDK. If you're new to running your own node.js script on a server, learn more about running node.js on Google Cloud Platform. To learn how to send notifications without requiring a Node.js server, see the documentation on sending notifications with Cloud Functions.
Since we're listening for child_added events, we'll end up calling sendNotificationToUser() for each notification request in the queue. If sending succeeds, we remove the request from the queue. There is no auto-retry in this simple script, so it will only retry failed notifications when you restart the script. For a more scalable approach, consider using our firebase-queue library.
You've probably also noticed that we have an API_KEY constant in the script. That is the key that we got from Firebase Cloud Messaging to be able to send message. It is also the exact reason why we don't want to run this code in the Android application itself: knowing the API key opens you up to abuse, since it can be used to send messages on your behalf. By having this key in our Node script on a server, we make sure the users of our Android application can't get at it.

Receiving a notification in the Android app

The code for Android is pretty minimal, thanks to the way the Firebase Cloud Messaging SDK handles notification messages. When it receives a notification message while the app is in the background, it displays a message in the system notification area. When the user clicks the message, it automatically opens the app. This type of re-engagement is exactly what we want for this app, so we really only have to include the Firebase Messaging library and subscribe to the topic of our user name.

Subscribe to the topic

We are using a topic that matches our user name to ensure we get messages that are meant for this user.
String username = "puf";
FirebaseMessaging.getInstance().subscribeToTopic("user_"+username);
We've hard-coded the username in this snippet, since it depends on your app. But you can see that once you've determined the user name, all it takes to register for notifications (and display them when the app is backgrounded) is a single line of code.
If you'd also like to handle the notification when your app is in the foreground or would like to send more data along with the message, read the documentation about Firebase Cloud Messaging and its message types.

Summary

This post shows how you can send push notifications to an Android application using Firebase and a Node script. We've sent the notification from Android code, but could just as easily send them from any other application that can access the Firebase Database. Adding iOS support is easy too: just add the dependency and register for remote notifications.
Share:

Tuesday, 9 August 2016

Angular 2 RC5 - NgModules, Lazy Loading and AoT compilation

Today we’re publishing Angular 2 RC5 - including:
  • Support for @NgModule decorators
  • FormsModule, RouterModule, and Material Design modules make it easier to use these libraries
  • Ahead-of-time (AoT) compilation for components and services
  • Lazy-loading support for the router

NgModules

@NgModule is a new decorator added in RC5 that provide a number of useful features for both Angular’s core and developer ergonomics. Check out the new docs here.

Basic NgModule usage looks like this:
@NgModule({
imports: [ BrowserModule ],
declarations: [ MyComponent ],
bootstrap: [ MyComponent ]
})
class MyAppModule {}

This decorator tells Angular two important things about your application:
declarations tell angular that `MyComponent` belongs to the `MyAppModule`
bootstrap advises angular that when it creates this module at startup, we want to automatically bootstrap `MyComponent` into the DOM.

To really understand what `NgModules` provide though, it’s worth understanding a bit deeper how Angular works under the hood, specifically in regards to compilation.

Compilation

At the heart of Angular 2 is our compiler. The compiler’s job is to take components and services written by developers and turn them into instructions to the browser to interact with your application.

At a high level, the compiler takes a Component like this:

@Component({
  selector: 'my-component',
  template: '<div>Hello {{name}}</div>'
})
class MyComponent {
name = ‘Sally’
}

and produces a ComponentFactory that looks (simplified) like this:

class MyComponentFactory {
  //creates the initial UI state
createInternal(){
    const parentRenderNode = this.renderer.createViewRoot(nativeDOMElement);
    this._text_0 = this.renderer.createText(parentRenderNode,'\n   ',null);
    this._el_1 = this.renderer.createElement(parentRenderNode,'div',null);
    this._text_2 = this.renderer.createText(this._el_1,'',null);
    this._text_3 = this.renderer.createText(parentRenderNode,'\n\n ',null);
  }
//updates the UI state
detectChangesInternal(){
    const currVal_0:any = utils.interpolate(1,'Hello ',this.context.name,'');
    if (utils.checkBinding(throwOnChange,this._expr_0,currVal_0)) {
      this.renderer.setText(this._text_2,currVal_0);
this._expr_0 = currVal_0;
}
  }
}

A ComponentFactory then, is simply the wrapper around the instructions that update the DOM based on your data. In pretty much every Angular 2 application written so far, this has happened behind the scenes transparently, right before your application starts up. We’ve referred to this as “dynamic” compilation in the past - our official term is “Just in Time (JIT)” compilation.
From the beginning, part of the design for Angular 2 was to enable this process to happen Ahead of Time (AoT) - that is, as a build step, when building your application. Roughly 60% of Angular’s code size is the compiler which does this work, so enabling AoT compilation means you don’t have to ship that code to your users, which gives a huge savings in bytes over the wire. Additionally, because the work is happening ahead of time, your users see dramatically decreased startup times for your app, because the compilation work doesn’t have to be done before the app can start.

So how does this work? For Angular to assemble a factory for each component, it examines your templates and looks for custom components (`my-foo-widget`), directives ( *ngFor, *ngIf, etc ), pipes ( someObservable | async ). It does this by looking up tags and selectors against a known list of these features.

We refer to this environment as the compiler’s context -  the suite of components, directives, and pipes that are available to angular as it is parsing your applications templates. Context is the reason, historically, you’ve had to add the components, directives and pipes to every component you’ve written:
@Component({
  selector: ‘my-component’,
  template: ‘my-component.html’,
  directives: [ SomeComponent, SomeOtherComponent ],
  pipes: [ MyMagicPipe ]
})
class MyComponent {}

If you’ve written any Angular 2 code at all though, you’ve probably asked yourself “but WHY do I have to list all these things!?” - especially if you’ve noticed that certain directives and pipes in Angular 2 are “special” - they’re available to your entire application without you doing anything ( *ngFor / *ngIf / *ngSwitch, for example). Good news for people who’ve asked that question - NgModules solve this confusion and significantly reduce the amount of boilerplate it takes to write an Angular application. For example - an application that wanted to use the router and Material Design might look like this:

import {Component} from ‘@angular/core’
import {MD_BUTTON_DIRECTIVES} from ‘@angular-material2/button’
import {MD_SIDENAV_DIRECTIVES} from ‘@angular-material2/sidenav’
import {MD_CARD_DIRECTIVES} from ‘@angular-material2/card’
import {provideRouter, ROUTER_DIRECTIVES} from ‘@angular/router’
@Component({
  selector: ‘my-component’,
  providers: [ provideRouter(routeConfig) ],
  directives: [
    MD_BUTTON_DIRECTIVES,
    MD_SIDENAV_DIRECTIVES,
    MD_CARD_DIRECTIVES,
    ROUTER_DIRECTIVES
  ]
})
class MyComponent {}

Quite a bit of boilerplate here, which would then need to be repeated in every component you want to use those directives in - which can get quite repetitive. By contrast, the same application using @NgModules would look like this:
import {Component} from ‘@angular/core’
import {MdButtonModule} from ‘@angular-material2/button’
import {MdSideNavModule} from ‘@angular-material2/sidenav’
import {MdCardModule} from ‘@angular-material2/card’
import {RouterModule} from ‘@angular/router’
@NgModule({
  imports: [
    MdButtonModule,
    MdSideNavModule,
    MdCardModule,
    RouterModule.forRoot(routeConfig)
  ]
})

class MyAppModule {}

At first glance, this might not seem all that different. The important difference is that now, *any* Component that belongs to this module now has access to *everything* imported into the Module, so building a Component that uses the router and material design now looks like
@Component({
  selector: ‘my-component’,
  templateUrl: ‘my-component.html’
})
class MyComponent {}

Note the distinct lack of repeated declarations of Components, Pipes, and Directives. This gets better and better as your application grows, and makes the entire Angular 2 experience much nicer. As your application grows, `NgModules` allow you to organize and pass around chunks of functionality at the module level, without large amounts of overhead and unofficial conventions (MY_RANDOM_THING_PROVIDERS).

 Essentially, NgModules provide the context the compiler needs to do its’ work, without the overhead of repeatedly declaring that context in every place you want to make it available. AoT Compile - because an NgModule now makes it easy to provide the context necessary for compilation, Angular’s AoT compiler works well - this functionality is included in RC5, and documentation on how to use it is forthcoming.

At a high level, @angular/compiler-cli provides a wrapper around Typescript’s `tsc` compiler, and both AoT compiles your application’s code, and then transpiles your application’s Typescript to Javascript:
$ ngc -p src

This generates a new file for each component and module ( called an NgFactory ), and to run your app in AoT mode, all that’s required is changing your main.ts file from
import {platformBrowserDynamic} from ‘@angular/platform-browser-dynamic’
import {MyAppModule} from ‘./app’
platformBrowserDynamic().bootstrapModule(MyAppModule);

to
import {platformBrowser} from ‘@angular/platform-browser’
import {MyAppModuleNgFactory} from ‘./app.ngfactory’ //generated code
platformBrowser().bootstrapModuleFactory(MyAppModuleNgFactory);

Lazy Loading In addition to enabling AoT compilation and generally improving the developer experience of Angular2, NgModules enable a simple way to lazy load pieces of your application via the router. A simple example illustrates this:
import {RouterModule} from ‘@angular/router’
import {NgModule} from ‘@angular/core’
@NgModule({
declarations: [ MyComponent, MyHomeRoute ],
bootstrap: [ MyComponent ],
imports: [
  RouterModule.forRoot([
{ path: ‘home’, component: MyHomeRoute },
{ path: ‘lazy’, loadChildren: ‘./my-lazy-module’ }
])
})
class MyAppModule {}

You simply define a `loadChildren` property on a route, and Angular will go fetch the module at that location and load the routes defined in it into the router config.
import {RouterModule} from ‘@angular/router’
import {NgModule} from ‘@angular/core’

@NgModule({
declarations: [ MyLazyHome, MyLazyChild ],
imports: [
  RouterModule.forChild([
  { path: ‘’, component: MyLazyHome },
{ path: ‘a’, component: MyLazyChild }
])
]
})
class MyLazyModule {}

You can additionally define a guard to protect the loading of child modules, which makes it perfect for controlling access to application functionality via user authentication or configuration.

RC5 deprecations 

While we made some significant changes in RC5, we’ve been careful to make sure it shouldn’t break any existing applications - most apps should just work with an upgrade to RC5. Because NgModules now provide a much cleaner and simpler way to declare the things your applications needs to run, we’ve deprecated and will remove for 2.0.0-final the need to declare directives, pipes and components in individual components, in favor of doing so at the NgModule level. For simple applications, migrating to NgModules syntax will generally involve tweaking your bootstrap file, and deleting a significant amount of repetitive boilerplate code in your components.

We’ve provided a migration guide here to guide you through it.

Upcoming

RC5 represents our expected public API for our 2.0.0 release, including router and forms APIs, and introduces some major improvements in how angular applications are written and compiled. We plan to spend the next few weeks optimizing Angular’s core for build tooling and tree-shakeablility, providing documentation and guidance on building for production, and tackling any issues that surface with RC5. Stay tuned - we’re almost there!
Share:

Thursday, 4 August 2016

Importing the Mobile Ads SDK with Firebase

alt="Andrew Brogdon">
Andrew Brogdon
DPE for Mobile Ads

The transformation of Firebase into a unified mobile platform brought with it new Gradle artifacts and CocoaPods that mobile developers can use to import the Mobile Ads SDK. With these additions, there are now several alternatives for each platform. Thanks to your feedback, we wanted to share a little more information about which ones we recommend and what libraries they include, so here's a quick run-down.

Android & Gradle

firebase-ads (recommended)

This is the best way to get the Mobile Ads SDK into your project. With the firebase-ads artifact, you get everything you need to load and display ads from AdMob, DFP, or AdX, plus Firebase Analytics built in. You'll also be ready to add the client components for any other Firebase services you want to use, like firebase-crash or firebase-config. Unless you have a specific need to use the SDK without Firebase, this is your jam.

If you'd like to see a screencast of how to get up and running with AdMob using firebase-ads, check out this episode of the Firecasts series:

play-services-ads

For those not using Firebase, this Gradle artifact contains the Mobile Ads SDK on its own. You'll get the client code for AdMob, DFP, and AdX, but no Firebase services.

play-services

This is the full Google Play services client, also without Firebase. This gives you not only the Mobile Ads SDK, but all the other Google Play services SDKs as well: Maps, Drive, Fit, and so on. Since you're probably not using every API that Play services offers, it's better to import them individually. If you need mobile ads and Play games, for example, just include play-services-ads and play-services-games.

play-services-ads-lite

The SDK team developed this new Gradle artifact for a very specific use-case. It contains a slimmed-down version of the Mobile Ads SDK designed to work only on devices that have Google Play services installed. If reducing app size is extremely important for you, this can help lessen the impact of the Mobile Ads SDK, but it won't be able to load and display ads on devices that don't have Play services. Make sure you're intimately familiar with your app's install base before considering this tradeoff, and see the Lite SDK guide for more details.

iOS & CocoaPods

Firebase/AdMob (recommended)

This is the Firebase CocoaPod for AdMob and the Mobile Ads SDK. While it's labelled as "AdMob," this pod gives you the iOS client code for DFP and AdX as well. You'll get everything you need to load and display ads from all three sources, plus Firebase Analytics built in. This CocoaPod is also easy to combine with any other Firebase pods your app needs, like Firebase/Crashand Firebase/Database. For most developers, this is the one you want.

The Firecasts series has an episode that shows how to import AdMob and Firebase into an app using Firebase/AdMob, so check that out for a detailed screencast:

Google-Mobile-Ads-SDK

For developers not yet using Firebase, this pod contains just Mobile Ads SDK. You get everything necessary to show ads from AdMob, DFP, and AdX, but no Firebase services.

GoogleMobileAds

This is an older, alternate CocoaPod for the Mobile Ads SDK that should no longer be used. Google-Mobile-Ads-SDK is the better choice if you aren't using Firebase.

More Info

If you've got questions about Firebase and the best ways to get started, the Firebase support page also has a bunch of options that can help. If you've got technical questions about the Mobile Ads SDK itself, you're welcome to stop by the SDK support forum.

Share: